Strategy ONE
Modifying the Amount of Information Displayed on the Prompt Page in one or multiple Prompt questions
The layout of information on the Prompt page is determined by the style applied, and specifically by the layout definition file used with that style. Prompts in MicroStrategy Web can be displayed with various styles such as check box, shopping cart, drop-down menu, etc. Each prompt style is rendered using a different layout definition file.
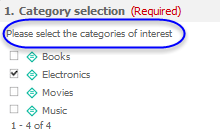
The default information displayed includes instructions for choosing a selection and whether a selection is required. In this customization scenario, you remove the text that instructs the user about the selection. You accomplish this by modifying the layout definition file used by the prompt style that is applied.
Before customization:
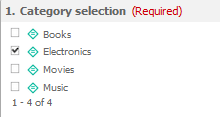
After customization:
This customization can be accomplished using either of the following methods:
Deploying the plug-in provided with MicroStrategy SDK
MicroStrategy SDK provides a plug-in (ZIP file) that can simply be extracted to the plugins folder to view the customization in MicroStrategy Web. The following steps guide you in locating the plug-in and deploying it.
-
Access the plug-in: JSP version or ASP .NET version.
-
Extract the plug-in to the plugins subfolder inside the MicroStrategy Web installation folder.
-
Launch MicroStrategy Web to view the customization.
Using the Web Customization Editor to create a plug-in
MicroStrategy SDK provides a Web Customization Editor that can be used to create a customization plug-in. The following steps guide you in creating the plug-in and deploying it.
-
Create a new plug-in and give it a meaningful name. For example: ModifyingPromptInfo.
-
Exit the Web Customization Editor.
-
Create a layout definition file, PromptsContainerLayout_widget.xml, with the following code.:
<!DOCTYPE mstrlayout:layout SYSTEM "mstrlayout.dtd">
<mstrlayout:layout>
<mstrlayout:include file="/WEB-INF/xml/layouts/widgets/PromptsContainerLayout_widget.xml">
<mstrlayout:replace slot="ReportInstanceModel">
<mstrlayout:bList path="promptQuestions/items">
<mstrlayout:bDeleteProperty path="meaning"/>
</mstrlayout:bList>
</mstrlayout:replace>
</mstrlayout:include>
</mstrlayout:layout>
-
Save this layout definition file, PromptsContainerLayout_widget.xml, in the plugins\pluginName\WEB-INF\xml\layouts subfolder inside the MicroStrategy Web installation folder. For example: plugins\ModifyingPromptInfo\WEB-INF\xml\layouts.
-
If the Web Customization Editor is closed, launch it again and access your plug-in.
-
Click on MicroStrategy Web Configuration inside the Application Settings view to expand the hierarchical tree. The expanded list comprises the different settings that can be modified to perform customizations.
-
Click on Styles to expand the list of styles used in MicroStrategy Web.
-
Double-click PromptsContainerStyle_Widget to launch the Style Properties editor in the right frame.
-
Click the Style Layouts tab.
-
Click ... to navigate to the layout definition file, PromptsContainerLayout_widget.xml, in the plugins\pluginName\WEB-INF\xml\layouts subfolder. For example: plugins\ModifyingPromptInfo\WEB-INF\xml\layouts.
-
Click Open.
-
Save your changes.
-
Launch MicroStrategy Web to view the customization.
See Also