Strategy ONE
Modifying the Page By Buttons
This scenario deals with modifying the buttons on the Page By panel. These buttons allow you to perform operations such as dragging and dropping report objects to rows, columns or page by fields, or removing them from the report, and so on. The approach for modifying these buttons involves modifying a CSS file.
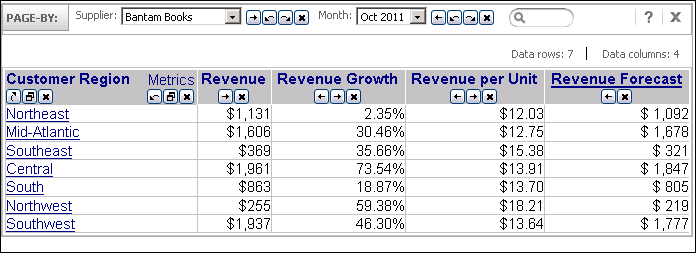
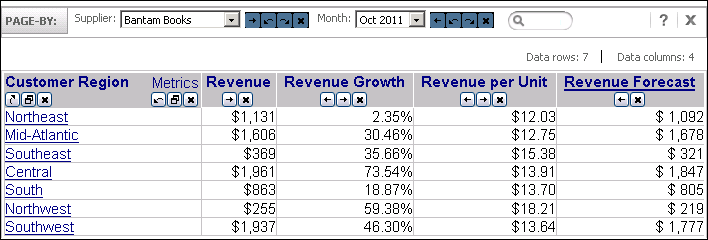
In this example, the images that are used for rendering the buttons on a Page By panel are updated. The default page by buttons (pivotLeft.gif, pivotRight.gif, pivotToRows.gif, pivotToCols.gif, and remove.gif) displayed on the Page By panel are located in the style/mstr/images of the application. As shown in the diagrams below, different buttons are used.
Before customization:

After customization:

This customization can be accomplished using either of the following methods:
Deploying the plug-in provided with MicroStrategy SDK
MicroStrategy SDK provides a plug-in (ZIP file) that can simply be extracted to thepluginsfolder to view the customization in MicroStrategy Web. The following steps guide you in locating the plug-in and deploying it.
-
Access the plug-in: JSP version or ASP .NET version.
-
Extract the plug-in to the plugins subfolder inside the MicroStrategy Web installation folder.
-
Launch MicroStrategy Web to view the customization.
Using the Web Customization Editor to create a plug-in
MicroStrategy SDK provides a Web Customization Editor that can be used to create a customization plug-in. The following steps guide you in creating the plug-in and deploying it.
-
Click on MicroStrategy Web Configuration inside the Application Settings view to expand the hierarchical tree. The expanded list comprises the different settings that can be modified to perform customizations.
-
Click on Pages to expand the list of pages used in MicroStrategy Web.
-
Click on report (Report Execution) to expand the child nodes under it.
-
Double-click on CSS to expand the child nodes under it.
-
Click on MicroStrategy Web to expand the child nodes under it.
-
Click on mstr to expand the list of CSS files used on the Welcome page.
-
Click on mstr.css to expand the rules defined within this CSS file.
-
Click on .pivotLeft to expand the properties defined for this rule.
-
Double-click on background-image to launch the Update CSS Property dialog.
-
Click on Utils >> to view the Utilities panel.
-
Click the Image button on the Utilities panel to navigate to the image for the new button.
-
Select the image and click OK. The location of the image gets added in the Value text field.
-
Click OK. This new background-image property gets added under the .pivotLeft rule inside a newly created CSS file "reportPage.css" under report (Report Execution)->CSS->Customizations.
-
Click on .pivotRemove (under report (Report Execution)->CSS->MicroStrategy Web->mstr->mstr.css) to expand the properties defined for this rule.
-
Double-click on background-image to launch the Update CSS Property dialog.
-
Click on Utils >> to view the Utilities panel.
-
Click the Image button on the Utilities panel to navigate to the image for the new button.
-
Select the image and click OK. The location of the image gets added in the Value text field.
-
Click OK. This new background-image property gets added under the .pivotRemove rule inside the previously created CSS file "reportPage.css" under report (Report Execution)->CSS->Customizations.
-
Click on .pivotRight (under report (Report Execution)->CSS->MicroStrategy Web->mstr->mstr.css) to expand the properties defined for this rule.
-
Double-click on background-image to launch the Update CSS Property dialog.
-
Click on Utils >> to view the Utilities panel.
-
Click the Image button on the Utilities panel to navigate to the image for the new button.
-
Select the image and click OK. The location of the image gets added in the Value text field.
-
Click OK. This new background-image property gets added under the .pivotRight rule inside the previously created CSS file "reportPage.css" under report (Report Execution)->CSS->Customizations.
-
Click on .pivotToCols (under report (Report Execution)->CSS->MicroStrategy Web->mstr->mstr.css) to expand the properties defined for this rule.
-
Double-click on background-image to launch the Update CSS Property dialog.
-
Click on Utils >> to view the Utilities panel.
-
Click the Image button on the Utilities panel to navigate to the image for the new button.
-
Select the image and click OK. The location of the image gets added in the Value text field.
-
Click OK. This new background-image property gets added under the .pivotToCols rule inside the previously created CSS file "reportPage.css" under report (Report Execution)->CSS->Customizations.
-
Click on .pivotToRows (under report (Report Execution)->CSS->MicroStrategy Web->mstr->mstr.css) to expand the properties defined for this rule.
-
Double-click on background-image to launch the Update CSS Property dialog.
-
Click on Utils >> to view the Utilities panel.
-
Click the Image button on the Utilities panel to navigate to the image for the new button.
-
Select the image and click OK. The location of the image gets added in the Value text field.
-
Click OK. This new background-image property gets added under the .pivotToRows rule inside the previously created CSS file "reportPage.css" under report (Report Execution)->CSS->Customizations.
-
Launch MicroStrategy Web to view the customization.
See Also
-
Fundamentals of Customization: Data Presentation
