Strategy ONE
Changing the Layout of the Prompt Selection Shopping Cart
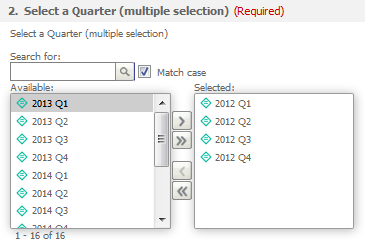
By default, the Available and Selected sections of the shopping cart style of prompt is displayed in a horizontal manner such that prompt answers are added from left to right.
In this customization scenario, the layout of the shopping cart style of prompt is changed to a vertical layout such that prompt answers are added from top to bottom.
Before customization:
After customization:

This customization can be accomplished using either of the following methods:
Deploying the plug-in provided with MicroStrategy SDK
MicroStrategy SDK provides a plug-in (ZIP file) that can simply be extracted to thepluginsfolder to view the customization in MicroStrategy Web. The following steps guide you in locating the plug-in and deploying it.
-
Access the plug-in: JSP version or ASP .NET version.
-
Extract the plug-in to the plugins subfolder inside the MicroStrategy Web installation folder.
-
Launch MicroStrategy Web to view the customization.
Using the Web Customization Editor to create a plug-in
MicroStrategy SDK provides a Web Customization Editor that can be used to create a customization plug-in. The following steps guide you in creating the plug-in and deploying it.
-
Click on MicroStrategy Web Configuration inside the Application Settings view to expand the hierarchical tree. The expanded list comprises the different settings that can be modified to perform customizations.
-
Navigate to Client-side Layouts->mstr->layouts to expand the client-side layout definition files used in MicroStrategy Web.
-
Double-click ListCart, and click the Yes button in the prompt to edit ListCart.xml.
-
ListCart.xml opens in the editor. The sample, ListCart.xml, contains the entire code for this custom client-side layout definition file. You can use this code in ListCart.xml that is open for editing. The changes include repositioning of the <tr> tags and updating the indices specified in the layout handler.
-
Save your changes.
-
Click on CSS inside the CSS Settings view to expand the hierarchical tree. The expanded list comprises the different CSS files used in MicroStrategy Web.
-
Navigate to MicroStrategy Web Styles->style->mstr.
-
Click on widgets.css to expand the selectors defined within this CSS file.
-
Click on .mstrBGIcon_tbAdd to expand the properties defined for this selector.
-
Double-click on background-image to launch the Update CSS Property dialog.
-
Click Utils >>.
-
Click Image to select the new image (one downward-pointing arrow indicating adding of one prompt selection) and click Open.
-
Click OK.
-
Make sure the Apply to All Pages radio button is selected, and click OK. The updated background property gets added under the .mstrBGIcon_tbAdd selector inside a newly created CSS file "global.css" under CSS->Customized Web Styles->style.
-
-
Right-click this newly created CSS file "global.css" (under CSS->Customized Web Styles->style) and select New Selector.
-
Enter .mstrBGIcon_tbAddAll in the text field for Selector.
-
Make sure the Apply to All Pages radio button is selected, and click OK.
-
-
Right-click .mstrBGIcon_tbAddAll and select New Property.
-
Enter background-image in the Property text field.
-
Click Utils >>.
-
Click Image to select the new image (two downward-pointing arrows indicating adding of all prompt selections) and click Open.
-
Click OK.
-
Make sure the Apply to All Pages radio button is selected, and click OK.
-
-
Right-click global.css (under CSS->Customized Web Styles->style) and select New Selector.
-
Enter .mstrBGIcon_tbRemove in the text field for Selector.
-
Make sure the Apply to All Pages radio button is selected, and click OK.
-
-
Right-click .mstrBGIcon_tbRemove and select New Property.
-
Enter background-image in the Property text field.
-
Click Utils >>.
-
Click Image to select the new image (one upward-pointing arrow indicating removing of one prompt selection) and click Open.
-
Click OK.
-
Make sure the Apply to All Pages radio button is selected, and click OK.
-
-
Right-click global.css (under CSS->Customized Web Styles->style) and select New Selector.
-
Enter .mstrBGIcon_tbRemoveAll in the text field for Selector.
-
Make sure the Apply to All Pages radio button is selected, and click OK.
-
-
Right-click .mstrBGIcon_tbRemoveAll and select New Property.
-
Enter background-image in the Property text field.
-
Click Utils >>.
-
Click Image to select the new image (two upward-pointing arrows indicating removal of all prompt selections) and click Open.
-
Click OK.
-
Make sure the Apply to All Pages radio button is selected, and click OK.
-
-
Right-click global.css (under CSS->Customized Web Styles->style) and select New Selector.
-
Enter .centertable in the text field for Selector.:
This selector is added to center the table for aesthetic purposes. It is not a required selector for this customization to work.
-
Make sure the Apply to All Pages radio button is selected, and click OK.
-
-
Right-click .centertable and select New Property.
-
Enter margin-left and auto in the Property and Value text fields respectively.
-
Make sure the Apply to All Pages radio button is selected, and click OK.
-
-
Right-click .centertable and select New Property.
-
Enter margin-right and auto in the Property and Value text fields respectively.
-
Make sure the Apply to All Pages radio button is selected, and click OK.
-
-
Right-click .centertable and select New Property.
-
Enter width and 200px in the Property and Value text fields respectively.
-
Make sure the Apply to All Pages radio button is selected, and click OK.
-
-
Launch MicroStrategy Web to view the customization.
See Also
-
Fundamentals of Customization: Data Presentation