Strategy ONE
Displaying Different Subscription Types on Separate Pages
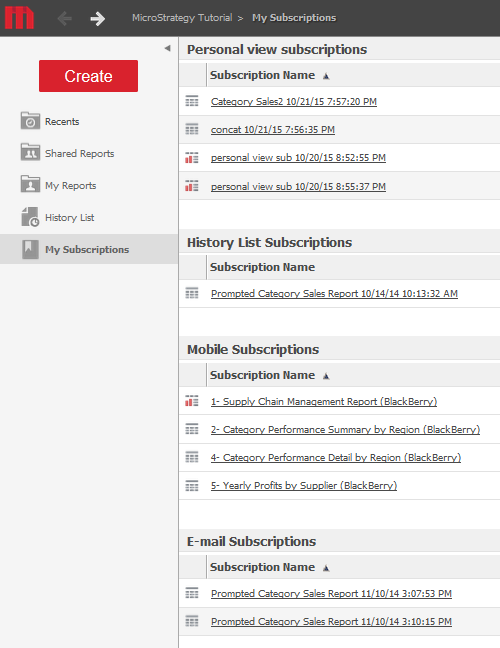
One of the default links in the menu on the left is a shortcut to the My Subscriptions page. By default, the My Subscriptions page displays a list of subscriptions (History List and Mobile subscriptions) as well as MicroStrategy Distribution Services deliveries (E-mail, File and Print subscriptions).
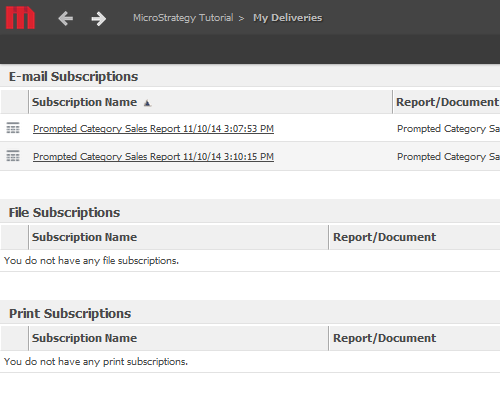
In this customization scenario, you modify the My Subscriptions page so that only the list of History List and Mobile subscriptions is displayed on the page. You also add a new shortcut to the menu called My Deliveries and create a new My Deliveries page. Clicking the new My Deliveries link opens up the new My Deliveries page, which displays only a list of MicroStrategy Distribution Services deliveries (E-mail, File and Print subscriptions).
Before customization: My Subscriptions page
After customization: My Subscriptions page

After customization: My Deliveries page
This customization can be accomplished using either of the following methods:
Deploying the plug-in provided with MicroStrategy SDK
MicroStrategy SDK provides a plug-in (ZIP file) that can simply be extracted to thepluginsfolder to view the customization in MicroStrategy Web. The following steps guide you in locating the plug-in and deploying it.
-
Access the plug-in: JSP version or ASP .NET version.
-
Extract the plug-in to the plugins subfolder inside the MicroStrategy Web installation folder.
-
Launch MicroStrategy Web to view the customization.
Using the Web Customization Editor to create a plug-in
MicroStrategy SDK provides a Web Customization Editor that can be used to create a customization plug-in. The following steps guide you in creating the plug-in and deploying it.
-
Create a new plug-in and give it a meaningful name. For example: DisplayingSubsSchedsSepPages
-
Exit the Web Customization Editor.
-
Navigate to the WEB-INF/xml/layouts subfolder inside the MicroStrategy Web installation folder and copy the layout definition file, SubscriptionsLayout.xml.
-
Paste this copy of layout definition file, SubscriptionsLayout.xml, inside your customization plug-in folder (example: plugins\DisplayingSubsSchedsSepPages\WEB-INF\xml\layouts) and rename it as DeliveriesLayout.xml.
-
If the Web Customization Editor is closed, launch it again and access your plug-in.
-
Click on MicroStrategy Web Configuration inside the Application Settings view to expand the hierarchical tree. The expanded list comprises the different settings that can be modified to perform customizations.
-
Click on Styles to expand the list of styles used in MicroStrategy Web.
-
Right-click NCSubscriptionsListStyle and select Duplicate. This creates a duplicate style called CopyOfNCSubscriptionsListStyle that opens in the Style Properties editor in the right frame.
-
Right-click CopyOfNCSubscriptionsListStyle and select Rename.
-
Enter DSDeliveriesListStyle in the text field and click OK.
-
Click Style Layouts at the bottom in the right frame.
-
Click ... and navigate to the custom layout definition file, DeliveriesLayout.xml in the plugins\DisplayingSubsSchedsSepPages\WEB-INF\xml\layouts subfolder inside the MicroStrategy Web installation folder.
-
Click Open. The path to the custom layout definition file gets filled in the Layout Definition text field.
-
Save your changes.
-
Refresh the Application Settings view by clicking the Refresh View icon,
 .
. -
Click on MicroStrategy Web Configuration inside the Application Settings view to expand the hierarchical tree. The expanded list comprises the different settings that can be modified to perform customizations.
-
Click on Styles to expand the list of styles used in MicroStrategy Web.
-
Double-click DSDeliveriesListStyle to open the Style Properties editor in the right frame.
-
Click Edit Layout in the Style Properties editor (under Style Layouts tab) to edit the new layout definition file, DeliveriesLayout.xml.
-
Remove the following entire <mstrlayout:if name="isFeatureAvailable"> block of code for History List Subscriptions and Mobile Subscriptions.:
<mstrlayout:if name="isFeatureAvailable">
<mstrlayout:argument value="scheduling"/>
<mstrlayout:then>
<div class="mstrTitle">
<mstrlayout:render name="descriptor">
<mstrlayout:argument type="String" value="mstrWeb.5001"/> <!-- History List Subscriptions -->
</mstrlayout:render>
<span class="mstrIcon-inline">
<mstrlayout:render name="userHelpAnchor">
<mstrlayout:argument type="String" value="History_List_on_schedule.htm"/>
</mstrlayout:render>
</span>
</div>
<mstrlayout:render name="subscriptionsByDeliveryMode">
<mstrlayout:argument type="int" value="16"/>
</mstrlayout:render>
</mstrlayout:then>
</mstrlayout:if>
<mstrlayout:if name="isFeatureAvailable">
<mstrlayout:argument value="use-mobile"/>
<mstrlayout:then>
<div class="mstrTitle">
<mstrlayout:render name="descriptor">
<mstrlayout:argument type="String" value="mstrWeb.5002"/> <!-- Mobile Subscriptions -->
</mstrlayout:render>
<span class="mstrIcon-inline">
<mstrlayout:render name="userHelpAnchor">
<mstrlayout:argument type="String" value="Delivering_reports.htm"/>
</mstrlayout:render>
</span>
</div>
<mstrlayout:render name="subscriptionsByDeliveryMode">
<mstrlayout:argument type="int" value="128"/>
</mstrlayout:render>
</mstrlayout:then>
</mstrlayout:if>
-
Save your changes.
-
Navigate back to MicroStrategy Web Configuration->Styles.
-
Double-click NCSubscriptionsListStyle to open it in the Style Properties editor.
-
Click Style Layouts at the bottom.
-
Click Edit Layout in the Style Properties editor (under Style Layouts tab) to edit the layout definition file, SubscriptionsLayout.xml.
-
Click Yes in the prompt. SubscriptionsLayout.xml opens for editing.
-
Remove the following entire code for E-mail Subscriptions, File Subscriptions and Print Subscriptions.:
<div class="mstrTitle">
<mstrlayout:render name="descriptor">
<mstrlayout:argument type="String" value="mstrWeb.5003"/> <!-- E-mail Subscriptions -->
</mstrlayout:render>
<span class="mstrIcon-inline">
<mstrlayout:render name="userHelpAnchor">
<mstrlayout:argument type="String" value="Email_on_schedule.htm"/>
</mstrlayout:render>
</span>
</div>
<mstrlayout:render name="subscriptionsByDeliveryMode">
<mstrlayout:argument type="int" value="1"/>
</mstrlayout:render>
<div class="mstrTitle">
<mstrlayout:render name="descriptor">
<mstrlayout:argument type="String" value="mstrWeb.5004"/> <!-- File Subscriptions -->
</mstrlayout:render>
<span class="mstrIcon-inline">
<mstrlayout:render name="userHelpAnchor">
<mstrlayout:argument type="String" value="Export_on_schedule.htm"/>
</mstrlayout:render>
</span>
</div>
<mstrlayout:render name="subscriptionsByDeliveryMode">
<mstrlayout:argument type="int" value="2"/>
</mstrlayout:render>
<div class="mstrTitle">
<mstrlayout:render name="descriptor">
<mstrlayout:argument type="String" value="mstrWeb.5005"/> <!-- Print Subscriptions -->
</mstrlayout:render>
<span class="mstrIcon-inline">
<mstrlayout:render name="userHelpAnchor">
<mstrlayout:argument type="String" value="Print_on_schedule.htm"/>
</mstrlayout:render>
</span>
</div>
<mstrlayout:render name="subscriptionsByDeliveryMode">
<mstrlayout:argument type="int" value="4"/>
</mstrlayout:render>
-
Save your changes.
-
Navigate to Pages->mySubs (My Subscriptions).
-
Right-click mySubs (My Subscriptions) and select Duplicate->by making a copy of this page. The copy opens in the Basic Properties editor.
-
Enter myDeliveries in the text field for Name.
-
Remove the entry from the text field for Descriptor ID. Keep it blank.
-
Enter My Deliveries in the text field for Descriptor.
-
Save your changes.
-
Navigate to Beans->allSubscriptions (Type=SubscriptionFolderBean).
-
Double-click allSubscriptions (Type=SubscriptionFolderBean) to launch the Bean Properties editor.
-
Update the value of the initialization property deliveryMode to 7.
-
Click Bean Styles.
-
Click Add below the list of styles available.
-
Select DSDeliveriesListStyle and click >>.
-
Click OK.
-
Click the Template Properties tab at the bottom.
-
Select allSubscriptions in the Display Components section and click Edit. This launches the Display Web GUI Component Wizard.
-
Click Next.
-
Do not make any changes to the features and click Next.
-
Enter DSDeliveriesListStyle in text field for Style associated to this component.
-
Clear the check box From Preference.
-
Click Next.
-
Click Finish.
-
Save your changes.
-
Navigate to Pages->mySubs (My Subscriptions)->Beans->allSubscriptions (Type=SubscriptionFodlerBean).
-
Double-click allSubscriptions (Type=SubscriptionFodlerBean) to launch the Bean Properties editor.
-
Update the value of the initialization property deliveryMode to 144.
-
Save your changes.
-
Navigate to Pages->-1 (Default Page).
-
Double-click the -1 (Default Page) page to launch the Basic Properties editor.
-
Click the Template Properties tab at the bottom in the right frame to make changes to the Default page template.
-
Click Edit Shortcuts.
-
Select the radio button for Add New Shortcut.
-
Click Next.
-
Enter deliveries in the Name text field.
-
Enter My Deliveries in the Descriptor text field.
-
Click Modify next to the text field for Display this menu item only if the following feature(s) is(are) available.
-
Select scheduling, scheduled-email, scheduled-file-export, and scheduled-print, and click >>.
-
Click OK.
-
Click Add Event in the Events section.
-
To select the event enumeration class, click Browse and enter EnumServletEvents.
-
Select EnumServletEvents from your project and click OK.
-
Select WebEventOpenPage from the drop-down menu for Event to trigger when menu element is selected.
-
Click Add in the EventsArguments section.
-
Select WebEventArgumentTarget from the drop-down menu and click OK.
-
Enter myDeliveries in the Argument Value text field.
-
Click OK.
-
Click Next.
-
Click Finish.
-
Save your changes.
-
Click OK in the Refresh Application window to refresh the view.
-
Click on MicroStrategy Web Configuration inside the Application Settings view to expand the hierarchical tree. The expanded list comprises the different settings that can be modified to perform customizations.
-
Click on Pages to expand the list of pages used in MicroStrategy Web.
-
Double-click the -1 (Default Page) page to launch the Basic Properties editor.
-
Click the Template Properties tab at the bottom in the right frame to make changes to the Default page template.
-
Click Edit Shortcuts.
-
Select the radio button for Rearrange Shortcuts.
-
Click Next.
-
Select deliveries from the list of shortcuts and use the upwards pointing arrow to position it just after the subscriptions shortcut.
-
Click Next.
-
Click Finish.
-
Save your changes.
-
Click OK in the Refresh Application window to refresh the view.
-
Navigate to Pages->myDeliveries (My Deliveries).
-
Double-click the myDeliveries (My Deliveries) page to launch the Basic Properties editor.
-
Click the Template Properties tab at the bottom in the right frame to make changes to the Default page template.
-
Click Edit Shortcuts.
-
Select the radio button for Rearrange Shortcuts.
-
Click Next.
-
Select deliveries from the drop-down menu for Selected shortcut.
-
Click Next.
-
Click Finish.
-
Save your changes.
-
Launch MicroStrategy Web to view the customization.