Strategy ONE
Disabling Toolbar Items Based on Feature Availability
Sometimes you want a functionality to be visible but not enabled when certain conditions are met. This customization scenario illustrates how to disable a toolbar item based on whether a specified Web Feature is available. Web Features is a generic term for a variety of preferences, privileges, settings, etc. that can be used to control the functionality available to the end-user— in this case, whether a toolbar item is enabled or disabled.
You enable or disable a toolbar item using the “enable-feature-id“ attribute for the shortcut and setting it to the feature or features for which you want to check. If the feature check returns true, the item appears as enabled; otherwise, it shows as disabled. The feature to be checked and the associated functionality (enabled/disabled) are set in the XML toolbar definition file.
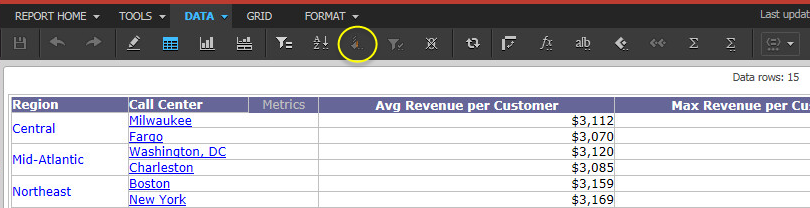
In this scenario, you use the Yearly Revenue Growth by Customer Region report in the MicroStrategy Tutorial project because it has the drilling feature enabled by default. As a result, when you run this report, the “drilling“ icon on the toolbar is enabled by default. In order to illustrate what happens when a toolbar item is disabled, you will “negate“ the feature used to determine whether the “drilling“ icon is enabled. After you make this change, when you execute a report for which drilling is enabled, such as Yearly Revenue Growth by Customer Region, the disabled icon will be displayed for drilling.
This customization does not actually disable the drilling feature, just the toolbar item.
Before customization

After customization
This customization can be accomplished using either of the following methods:
Deploying the plug-in provided with MicroStrategy SDK
MicroStrategy SDK provides a plug-in (ZIP file) that can simply be extracted to thepluginsfolder to view the customization in MicroStrategy Web. The following steps guide you in locating the plug-in and deploying it.
-
Access the plug-in: JSP version or ASP .NET version.
-
Extract the plug-in to the plugins subfolder inside the MicroStrategy Web installation folder.
-
Launch MicroStrategy Web to view the customization.
Using the Web Customization Editor to create a plug-in
MicroStrategy SDK provides a Web Customization Editor that can be used to create a customization plug-in. The following steps guide you in creating the plug-in and deploying it.
-
Create a new plug-in and give it a meaningful name. For example: DisablingToolbarItemsFeatureAvailability.
-
Click on MicroStrategy Web Configuration inside the Application Settings view to expand the hierarchical tree. The expanded list comprises the different settings that can be modified to perform customizations.
-
Click on Toolbars to expand the list of toolbars used in MicroStrategy Web.
-
Expand ReportDataToolbarModel to view its toolbar items and double-click on tbDrill (Drill...). This launches the toolbar editing wizard.
-
On the Edit Toolbar Element Wizard, under the Advanced section, click the Modify button for the Select the feature that will make this toolbar enabled/disabled text box. A shopping cart of toolbar elements opens.
-
On the Shopping Cart - Add Elements dialog, select enable-drill-editor and use the >> button to move it to the right side of the shopping cart.
-
Clear the checkbox next to enable-drill-editor and click OK.
-
Click Finish to save your changes.
-
Launch MicroStrategy Web to view the customization.
See Also