Strategy ONE
Add Functionality with a Custom Application Delegate in iOS
Starting in Strategy One (November 2025), it is not recommended to add functionality with the custom application delegate. Instead, follow the steps in KB489555: Add Functionality with a Custom Scene Delegate in Strategy Mobile iOS. If you still want to use the custom application delegate, follow the steps in KB489554: Add Functionality with a Custom Application Delegate in Strategy Mobile iOS.
Every iOS application has a delegate object that conforms to the UIApplicationDelegate protocol. This app delegate object is mainly responsible for tracking the state transitions the application goes through while it is running. The app delegate of an application is defined in the Xcode project configuration and is instantiated by iOS when the application launches. See the iOS Developer Library for more information about the UIApplicationDelegate protocol.
The MicroStrategyMobile Xcode project is preconfigured with its own internal app delegate class (called MSIAppDelegateImpl), but it is possible to configure a custom app delegate class that adds additional functionality when the application launches and when state transitions occur. This can be done by extending the MicroStrategyMobile internal app delegate class and overriding the different methods defined in the UIApplicationDelegate protocol.
To create a custom app delegate in the MicroStrategyMobile project:
-
Set up the environment to use the MicroStrategyMobile project
-
Create a custom application delegate class that extends MSIAppDelegateImpl
To deploy multiple mobile applications built using the MicroStrategyMobile project, see Deploying Multiple MicroStrategyMobile projects.
A detailed explanation of each of these steps is provided below.
-
Set up the environment to use the MicroStrategyMobile project
Set up the environment so that you can use the MicroStrategyMobile project as the base for your customizations. -
Create a custom application delegate class that extends MSIAppDelegateImpl
Create a custom app delegate class that extends MSIAppDelegate.-
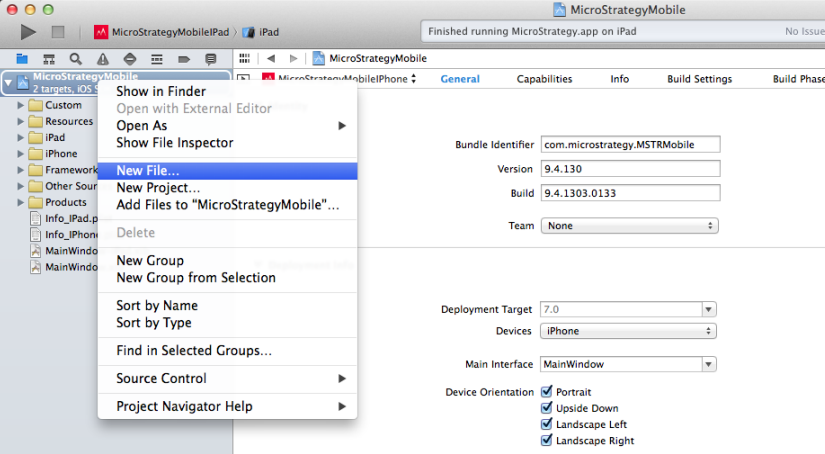
Right-click the MicroStrategyMobile project and select New File.
-
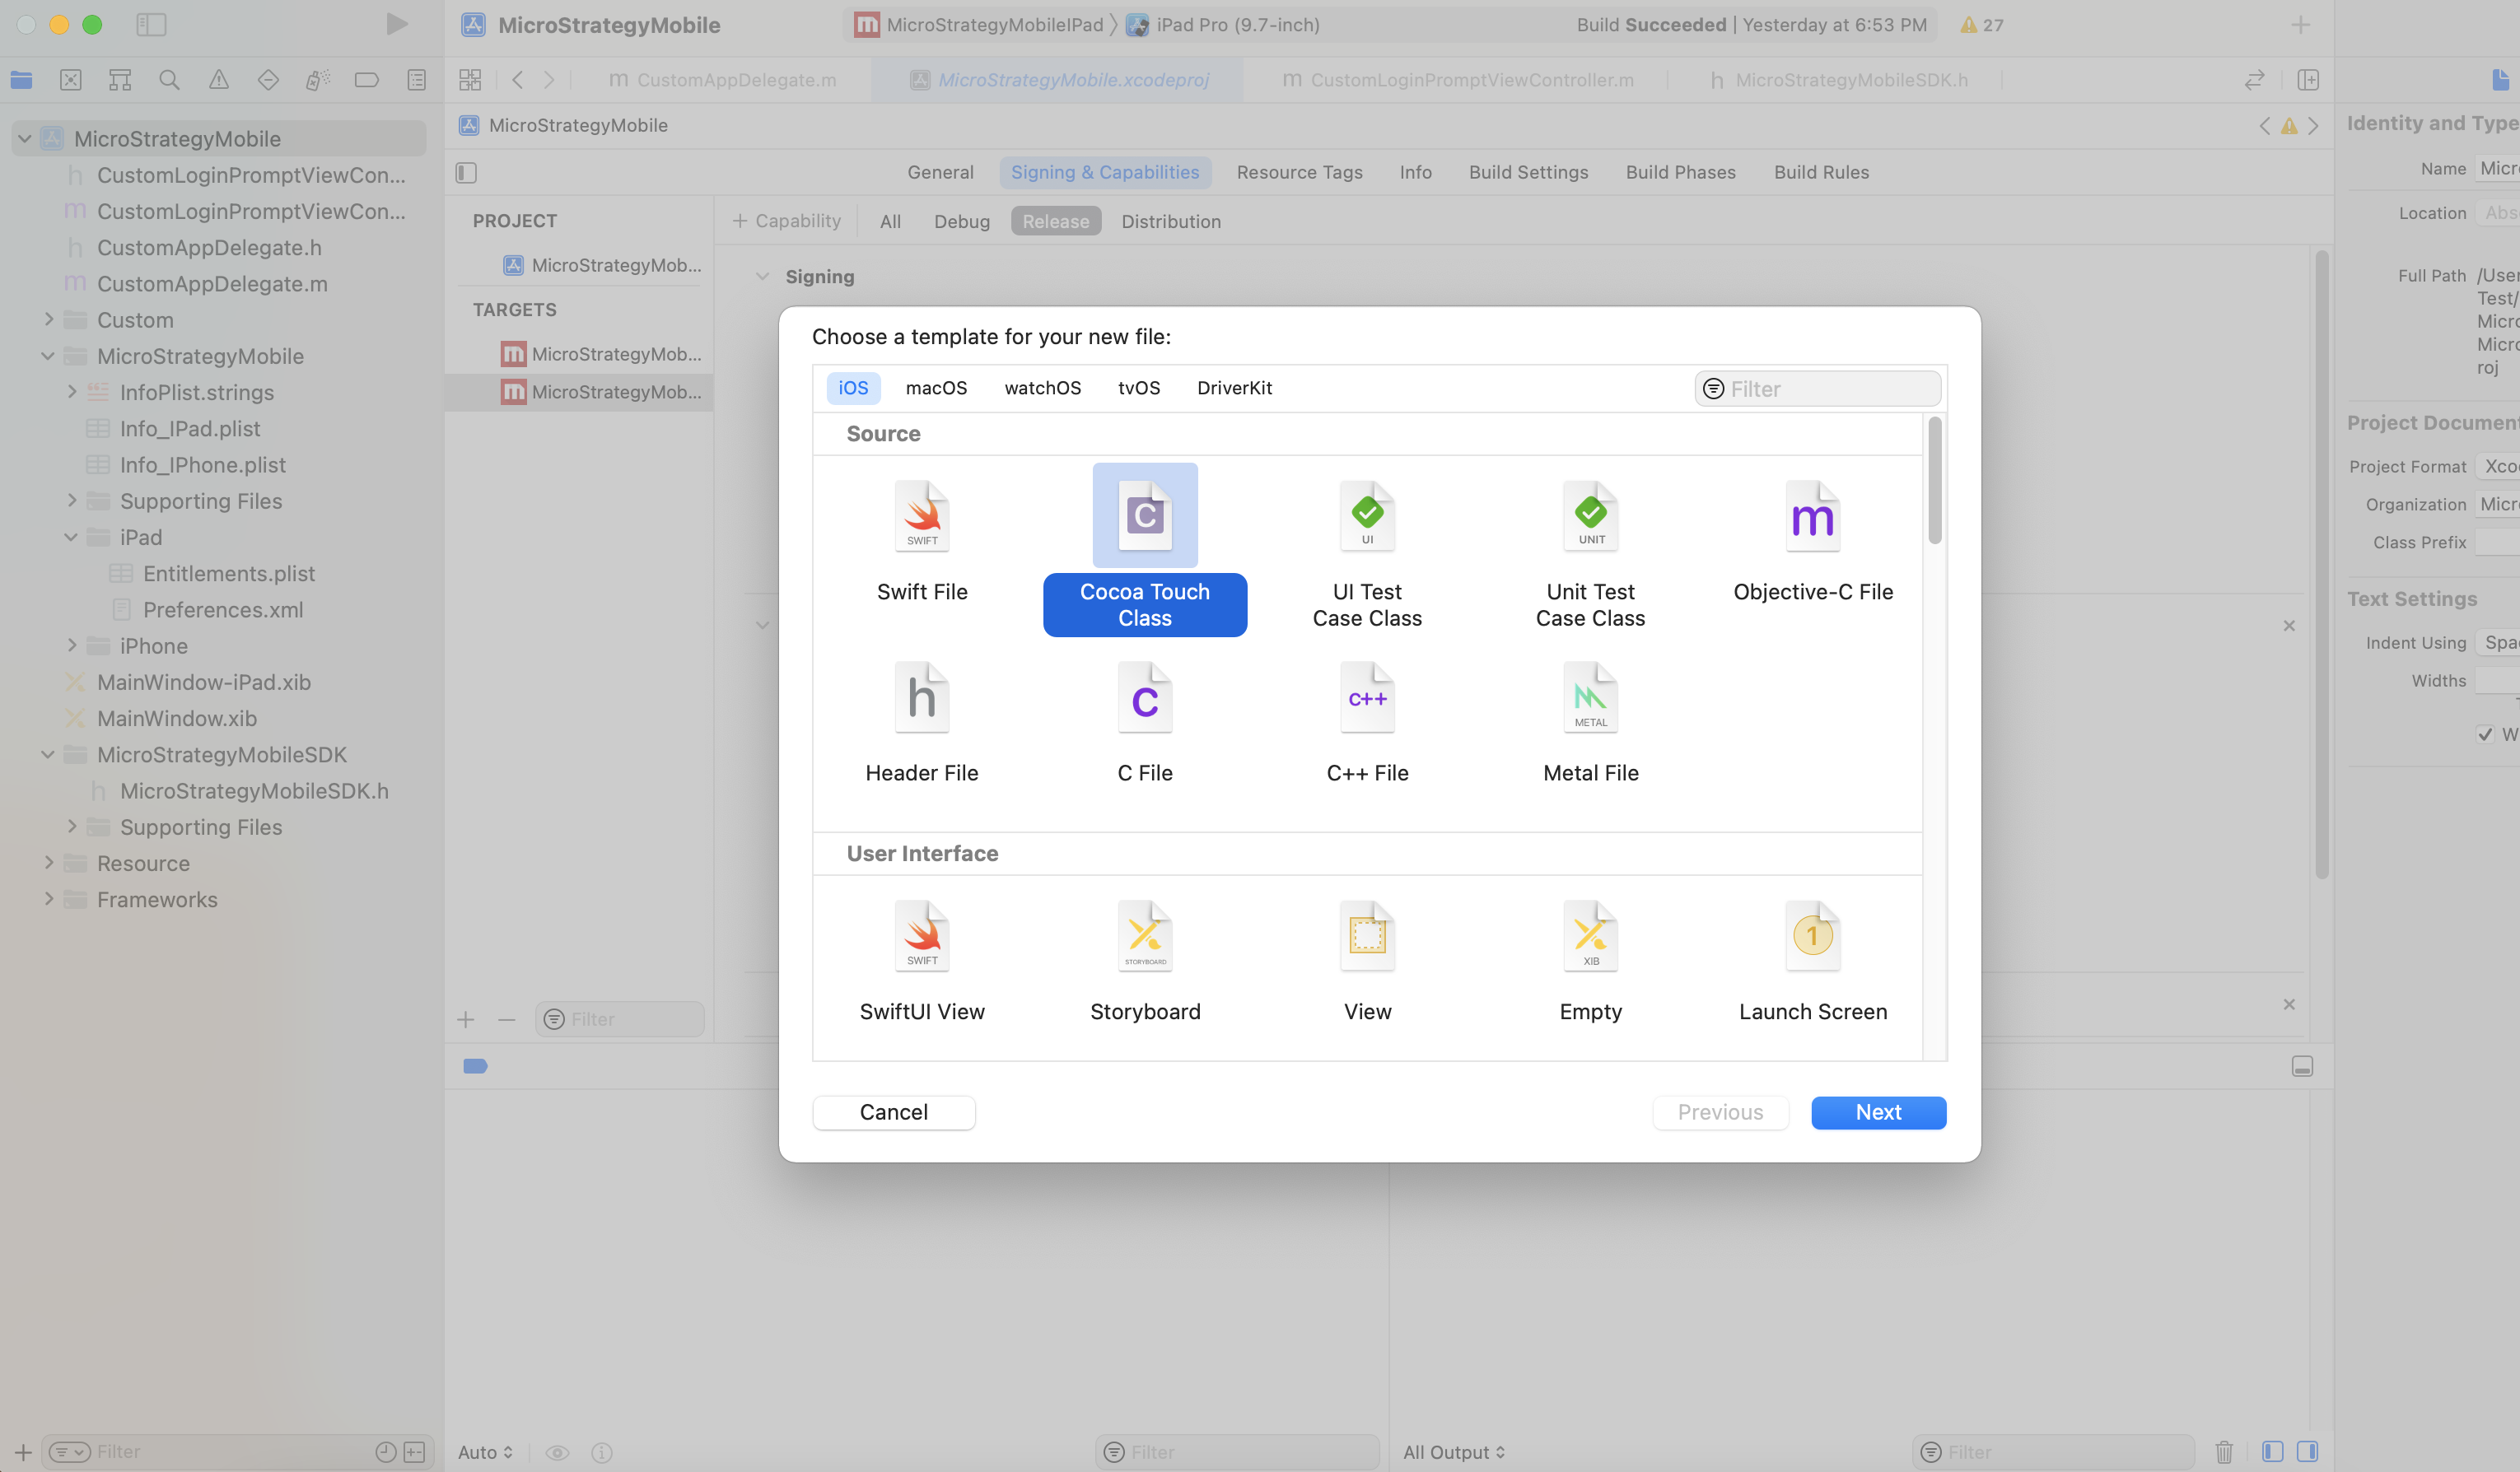
Select Cocoa Touch Class and click Next.
-
Enter a name for your app delegate class and enter
MSIAppDelegateImplas the parent class. Select the language as Objective-C. Click Next. -
Enter a name for your app delegate class and enter MSIAppDelegateImpl as the parent class. Click Next.
-
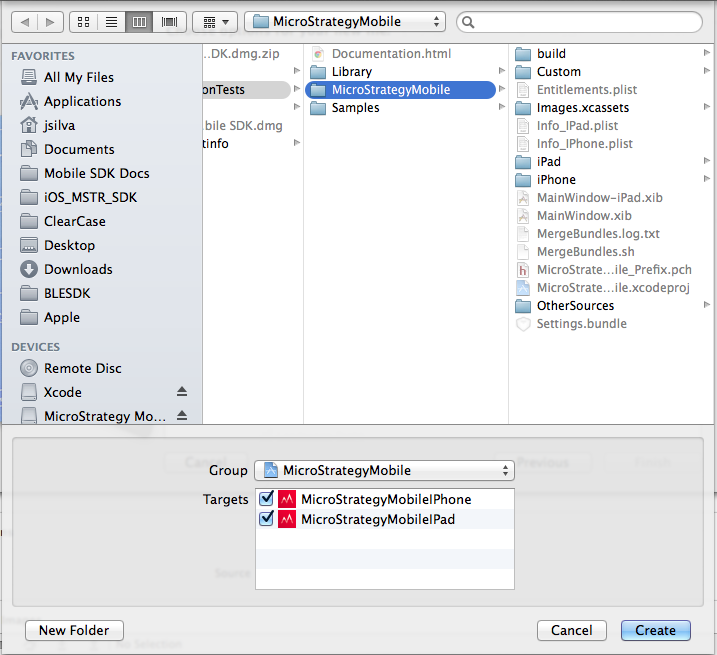
In the window that pops up, make sure that the Group is MicroStrategyMobile and that both MicroStrategyMobileIPhone and MicroStrategyMobileIPad are selected as Targets. Click Create.
-
The template code for your custom app delegate class is displayed. Add the following lines of code:
Copy#import <UIKit/UIKit.h>
#import <MicroStrategyMobileSDK/MSIAppDelegateImpl.h>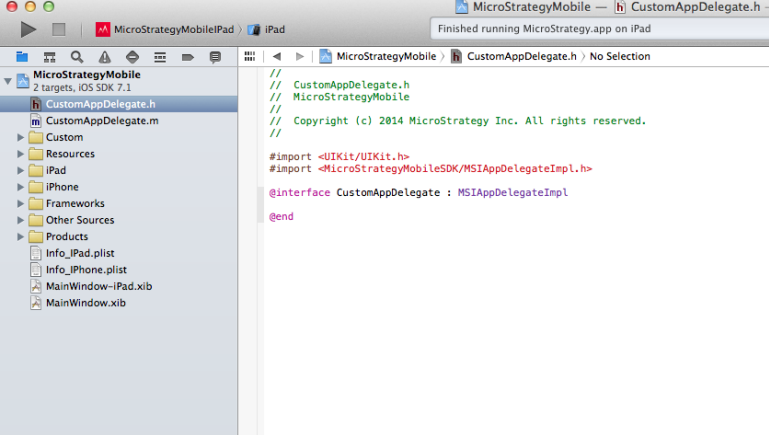
-
When using
#import <MicroStrategyMobileSDK/MSIAppDelegateImpl.h>or importing any other MicroStrategy SDK headers for your customization files, you must copy all header files under/Library/LegacyResources/Headersto/Library/MicroStrategyMobileSDK.framework/Headers. See “No such file or directory” for MicroStrategy SDK headers for more information. -
In the template code for your custom app delegate class, override the appropriate methods to perform actions at specific places in the application workflow, as illustrated in the code snippets below. For example, you can add custom code that is run before MicroStrategy launches any services that require authentication, or you can add custom code that is run after MicroStrategy is initialized but before the user sees any screens. You override the didFinishLaunchingWithOptions method and add the custom code to perform these actions as illustrated in the code snippet below:
Copy-(BOOL)application:(UIApplication *)application didFinishLaunchingWithOptions:(NSDictionary *)launchOptions {
// Add custom code to be run before MicroStrategy is set up and launches services like subscriptions that might trigger or need authentication.
BOOL res = [super application:application didFinishLaunchingWithOptions:launchOptions];
// Add custom code to be run after MicroStrategy is initialized but before the user sees any screen.
return res;
}You can also add code to perform custom actions when the application is sent to the background. You override ApplicationDidEnterBackground and add the custom code to perform these actions as illustrated in the code snippet below:
Copy-(void)applicationDidEnterBackground:(UIApplication *)application{
[super applicationDidEnterBackground:application];
//Add custom code to be run when the application goes to the background.
}Then, you can add code to perform custom actions when the application returns to the foreground. You override ApplicationWillEnterForeground and add the custom code to perform these actions as illustrated in the code snippet below:
Copy-(void)applicationWillEnterForeground:(UIApplication *)application{
[super applicationWillEnterForeground:application];
//Add custom code to be run when the application comes to the foreground
} -
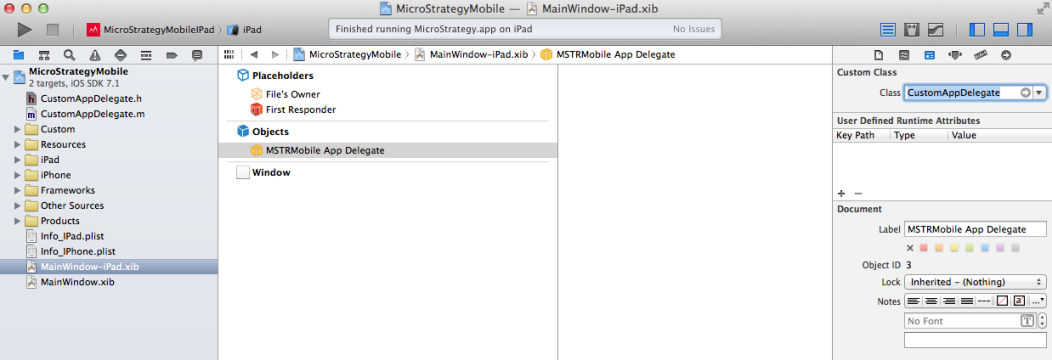
In the project hierarchy tree on the left, select MainWindow-iPad.xib, then MSTRMobile App Delegate under Objects. For Class under Custom Class on the right, select the name of your custom app delegate class.
-
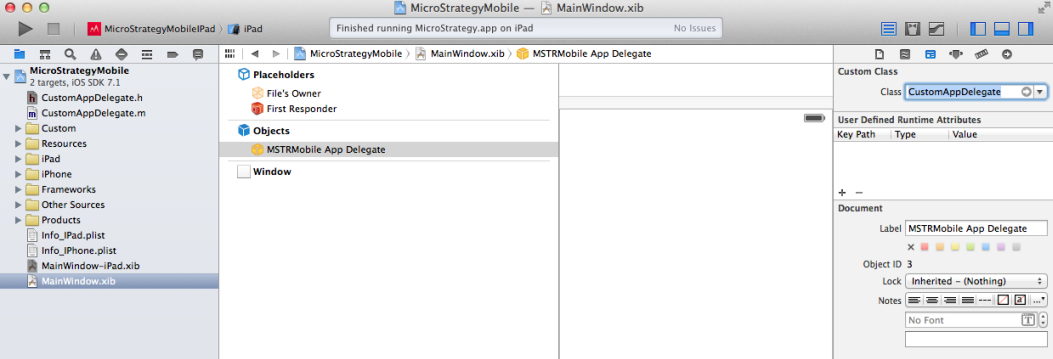
In the project hierarchy tree on the left, select MainWindow.xib, then MSTRMobile App Delegate under Objects. For Class under Custom Class on the right, select the name of your custom app delegate class.
- In MicroStrategy 10, Automatic Reference Counting is used by default. In earlier versions, you need to set a flag to use Automatic Reference Counting, as described below.
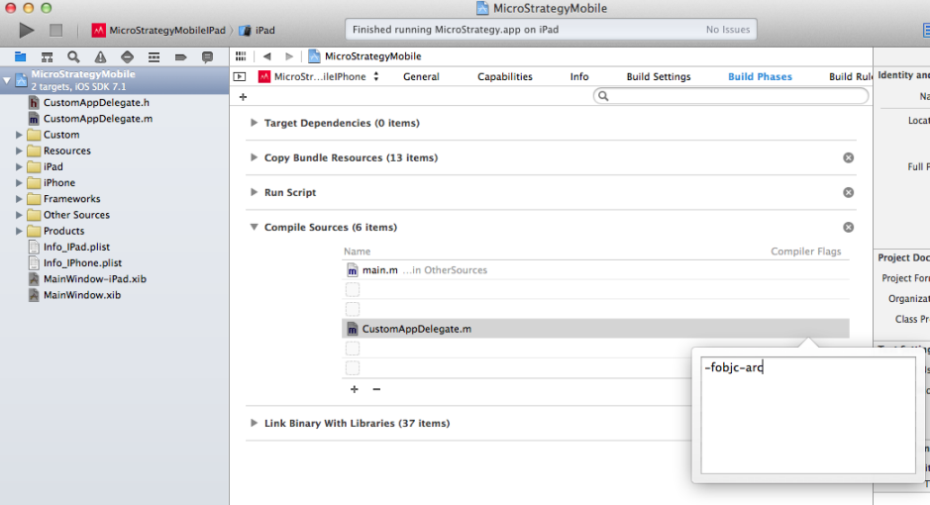
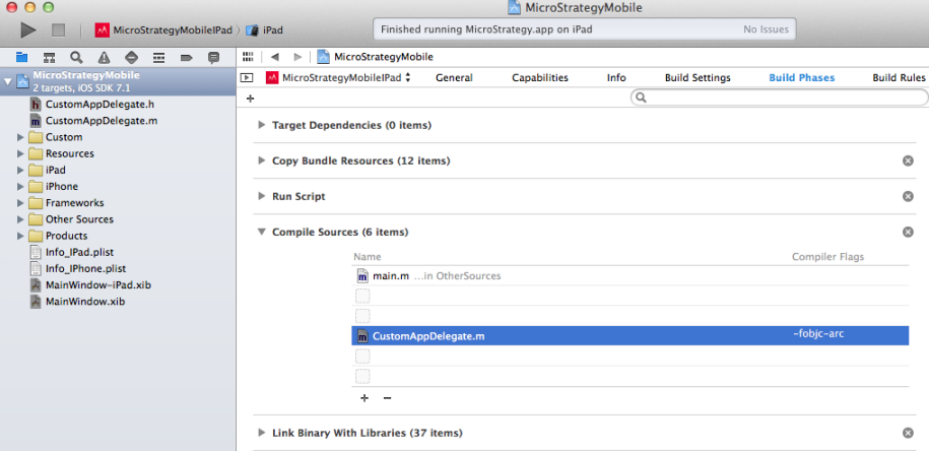
In the project hierarchy tree on the left, select MicroStrategyMobile, then click the Build Phases tab. Expand Compile Sources in the center pane and double-click the implementation class for your custom app delegate. In the popup text box, enter " -fobjc-arc" to use Automatic Reference Counting and press Enter.
Click the target at the top left side of the window. In the dialog that pops up, one target is selected. Verify that the entry for the custom app delegate class for that target includes the "-fobjc-arc" compiler flags you just added. Select the other target and click Enter.
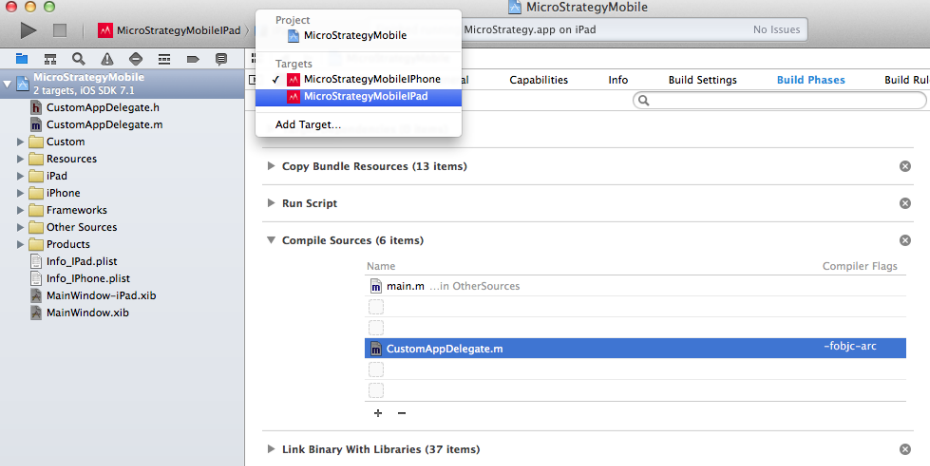
Verify that the entry for the custom app delegate class for the other target also includes the "-fobjc-arc" compiler flags you just added.
-
-
Build the project to confirm that it compiles and deploys successfully
Build and deploy the project:
- Make sure that the appropriate target is selected.
-
Click the Run button to compile and deploy the application to a simulator. Confirm that it compiles and deploys successfully.
To upload the application to a device, set the destination in the scheme to the mobile device and then build and run. For other requirements on deploying to a device, refer to documentation from Apple. You can access useful links to the Apple documentation from the Distributing iPhone or iPad Applications topic.