Strategy ONE
Set Up the MicroStrategy Mobile for iOS Project
To create a customized version of the MicroStrategy Mobile project provided with the Mobile SDK and make sure that it compiles and deploys successfully, install the Mobile SDK and follow the steps below.
-
Open the MicroStrategy Mobile project in Xcode
Open the MicroStrategyMobile folder that you extracted from the MicroStrategy Mobile SDK.dmg, and double-click MicroStrategyMobile.xcodeproj. The MicroStrategy Mobile project opens in Xcode.
-
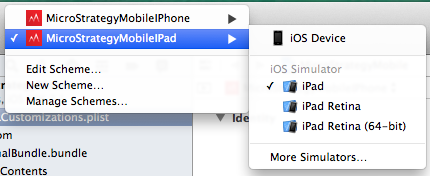
Choose whether to deploy the project to an iPhone or iPad
From the drop-down list at the top left of the window, choose whether to deploy the project to an iPhone or iPad.
Typically, you deploy the application to a simulator during development and testing. Once you have confirmed that it compiles and deploys successfully, you deploy it to a device for additional testing or use.
-
If you are customizing the MicroStrategy Mobile project for an iPhone, select MicroStrategyMobileIPhone and choose a specific iOS device or simulator.
-
If you are customizing the MicroStrategy Mobile project for an iPad, select MicroStrategyMobileIPad and choose a specific iOS device or simulator.
-
-
Update the bundle identifier with your application ID
The bundle identifier stores the value of the application ID. By default, it is com.microstrategy.ipad or com.microstrategy.iphone.
-
Double-click the appropriate property list file—Info_IPhone.plist or Info_IPad.plist—to open it in the property editor.
-
Update the value of the Bundle identifier property with your application ID.
-
Save your changes.
-
-
Optionally, enable push notification
Prior to Xcode 8, if the provisioning profile and the app ID enabled push notification, the application automatically had push notification enabled. Now you must do the following steps to enable push notification:
- Enable push notification in the "Capabilities" section of the target.
- Choose the target device under TARGETS.
- Select the Capabilities tab.
- Expand Push Notifications and select Add the Push Notifications feature to your App ID and Add the Push Notification entitlement to your entitlements file.
-
Ensure that the apns-environment key exists in Entitlements.plist.
If Xcode failed to add this automatically, you can add it manually.
- For iPad, Entitlements.plist is located under SDK folder/MicroStrategyMobile/iPad.
- For iPhone, Entitlements.plist is located under SDK folder/MicroStrategyMobile/iPhone.
- Enable push notification in the "Capabilities" section of the target.
-
Optionally, update the URL scheme
URL schemes identify the configuration URLs that will be recognized by the application. This step is required if you will be installing multiple instances of mobile applications built using the MicroStrategy Mobile SDK on the same device, and want to use different configuration URLS to deploy each application.
-
Double-click the appropriate property list file—Info_IPhone.plist or Info_IPad.plist—to open it in the property editor.
-
Navigate to URL types -> Item 0 -> URL Schemes -> Item 0. The URL types property stores the values for all the URL schemes used by the application.
-
Delete any URL schemes that you do not want this application to recognize. For example, you might want to delete Item 0 which is mstr by default, or Item 1 which is mstripad by default. You should not delete the URL schemes that are used by Good Dynamics, Facebook, or Badge. They have specific uses and will not interfere with your deployments.
A sample mobile configuration URL using mstr as the URL scheme is shown below:
Copymstr://?url=http%3A%2F%2FmyServer%3A8080%2FMicroStrategy%2Fservlet%2FtaskProc%3FtaskId%3DgetMobileConfiguration%26taskEnv%3Dxml%26taskContentType%3Dxmlanf%26configurationID%3D191bf822-d405-4392-bfe2-809f5526dcecauthMode=1 -
Add the URL schemes that will be used for the URL configuration for this application. For example, you might add a new Item 0 with a value set to app1mstr or a new Item 1 with a value set to app1mstripad.
A sample mobile configuration URL using app1mstr as the URL scheme is shown below:
Copyapp1mstr://?url=http%3A%2F%2FmyServer%3A8080%2FMicroStrategy%2Fservlet%2FtaskProc%3FtaskId%3DgetMobileConfiguration%26taskEnv%3Dxml%26taskContentType%3Dxmlanf%26configurationID%3D191bf822-d405-4392-bfe2-809f5526dcecauthMode=1 -
Save your changes.
-
-
Optionally, disable Bitcode for your project
Following Apple's recommended practice, the MicroStrategy Mobile SDK enables Bitcode by default. As a result, the DMG file size is increased and the size of the application is increased when you build it. This is expected behavior.
If you want to disable Bitcode for your project, select a target and do the following:
-
Set the Enable Bitcode build setting to "No"
- Click the Build Settings tab.
- Click All and scroll down to Build Options or search for Enable Bitcode
- Expand Build Options and set Enable Bitcode to "No".
-
Set the BITCODE_GENERATION_MODE setting to "marker"
- Click the Build Settings tab.
- Click the plus sign ( + ) to the far right of All and choose Add user-defined setting.
- Enter BITCODE_GENERATION_MODE as the NEW_SETTING and set its value to "marker".
-
-
Build the project to confirm that it compiles and deploys successfully
-
Click Run to compile and deploy the application. If you chose to deploy it to a simulator during development and testing, you see the results on your computer screen.
-
After testing is complete, deploy the application to a device. From the drop-down list at the top left of the window, choose either an iPhone or iPad device and click Run. You see the results on your device.
For other requirements on deploying to a device, refer to documentation from Apple. You can access useful links to the Apple documentation from the Distributing iPhone or iPad Applications topic.
-
Your project is now ready to be customized.