Strategy ONE
Modifying Predefined Quick Thresholds
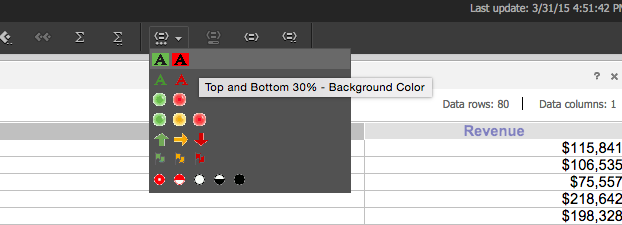
The default range for predefined quick thresholds is top and bottom 20%. This customization modifies the range to top and bottom 30%.
Before customization

After customization
This customization can be accomplished using either of the following methods:
Deploying the plug-in provided with MicroStrategy SDK
MicroStrategy SDK provides a plug-in (ZIP file) that can simply be extracted to thepluginsfolder to view the customization in MicroStrategy Web. The following steps guide you in locating the plug-in and deploying it.
-
Access the plug-in: JSP version or ASP .NET version.
-
Extract the plug-in to the plugins subfolder inside the MicroStrategy Web installation folder.
-
Launch MicroStrategy Web to view the customization.
Using the Web Customization Editor to create a plug-in
MicroStrategy SDK provides a Web Customization Editor that can be used to create a customization plug-in. The following steps guide you in creating the plug-in and deploying it.
-
Create a new plug-in and give it a meaningful name. For example: ModifyingPredefinedThresholds.
-
Exit the Web Customization Editor.
-
Navigate to the javascript folder inside the MicroStrategy Web installation folder and copy mstrQuickThresholds.js.
-
Paste this copy of mstrQuickThresholds.js inside the customization plug-in folder. For example: plugins/ModifyingPredefinedThresholds/javascript.
-
Open this copy of mstrQuickThresholds.js for editing. To modify the predefined quick threshold background formatting condition to top and bottom 30%, make the change shown in bold below.
defineQuickThreshold(0, 0, "FormattingPatterns!FillColor!255;", "", "", "", "30", THRESHOLD_TYPE_LOWEST_PERCENT, "name");
defineQuickThreshold(0, 1, "FormattingPatterns!FillColor!32768;", "", "", "70", "", THRESHOLD_TYPE_LOWEST_PERCENT, "name");
-
Save your changes.
-
If the Web Customization Editor is closed, launch it again and access your plug-in.
-
Click on MicroStrategy Web Configuration inside the Application Settings view to expand the hierarchical tree. The expanded list comprises the different settings that can be modified to perform customizations.
-
Click on Pages to expand the list of pages used in MicroStrategy Web.
-
Double-click the report (Report Execution) page.
-
Click the Template Properties tab at the bottom in the right frame to make changes to the Default page template.
-
Right-click the links page section and select Edit current file.
-
Click the Yes button in the prompt to edit Report_Links.jsp/ascx.
-
Make the following change shown in bold to specify the location of mstrQuickThresholds.js inside the customization plug-in folder. Replace the name highlighted in bold below with the name of your plug-in.
J2EE environment:
...
<web:resource type="javascript" name="../plugins/ModifyingPredefinedThresholds/javascript/mstrQuickThresholds.js"/>
...
.NET environment:
...
<web:resource runat="server" type="javascript" name="../plugins/ModifyingPredefinedThresholds/javascript/mstrQuickThresholds.js"/>
...
-
Save your changes.
-
Enable the Property Files setting from the Show Advanced Options in MicroStrategy Preferences
-
Click on MicroStrategy Web Configuration inside the Application Settings view to expand the hierarchical tree. The expanded list comprises the different settings that can be modified to perform customizations.
-
Navigate to Property Files->WEB-INF->classes->resources and double-click MessagesBundle_en_US.properties to launch the Web Properties Editor.
-
Enter a new property-value pair in the text field at the bottom confirming to the syntax nameOfProperty=value. For example: scenario1.6=Top and Bottom 30% - Background Color.
-
Click Add.
-
Save your changes.
-
Exit the Web Customization Editor.
-
Create an XML file, ReportDataToolbarModel.xml, with the following code.
<!DOCTYPE block SYSTEM "../dtds/blockLibrary.dtd">
<block inherits="RptToolbarModel" name="ReportDataToolbarModel">
<assignments>
<property name="items">
<list>
<block listElementKey="K1174">
<property name="items">
<list>
<block listElementKey="K1175">
<property name="desc">{desc:scenario1.6|Top and Bottom 30% - Background Color}</property>
</block>
</list>
</property>
</block>
</list>
</property>
</assignments>
</block>
-
Save this XML file, ReportDataToolbarModel.xml, in the plugins\pluginName\WEB-INF\xml\blocks subfolder inside the MicroStrategy Web installation folder. For example: plugins\ModifyingPredefinedThresholds\WEB-INF\xml\blocks.
-
Save your changes.
-
Launch MicroStrategy Web to view the customization.