Strategy ONE
Displaying information about connection to the Intelligence Server
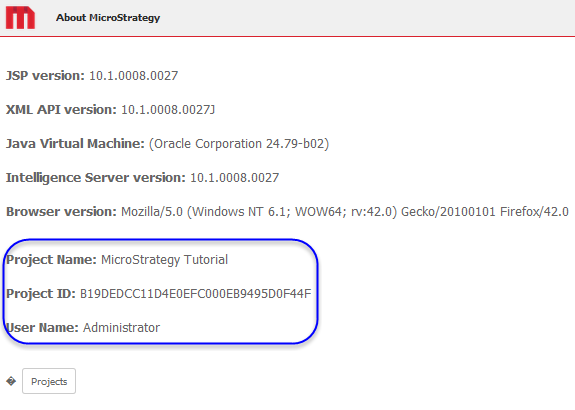
This scenario shows you how to modify the About page to display the name and ID of the project the Intelligence Server is connected to and the name of the user who is currently logged in, in addition to the connection information that is displayed by default. The default information includes the ASP.Net version, the XML API version, the JVM version, and the Intelligence Server version. You perform this customization by using a custom MicroStrategy HTML tag. You can extrapolate from the steps in this scenario to display other kinds of information, such as authentication mode, or to display the information on a different MicroStrategy Web page. Refer to the API Reference for a listing of other information that you can display.
Before customization:

After customization:
This customization can be accomplished using either of the following methods:
-
Using the plug-in provided for you:
This method lets you view the customization right away, without having to do anything except deploying the plug-in provided with the MicroStrategy SDK.
-
Creating the plug-in yourself using the Web Customization Editor:
This method gives you hands-on experience in performing this customization, as it steps you through the process of creating and deploying the plug-in.
Using the plug-in provided for you
The MicroStrategy SDK provides an out-of-the-box plug-in (ZIP file) that customizes the color and font properties on the Prompts page. Follow the simple steps below to deploy the plug-in and view the results in MicroStrategy Web.
-
Access the plug-in: JSP version or ASP .NET version.
-
Extract the plug-in to the plugins subfolder inside the MicroStrategy Web installation folder.
-
Restart your web server.
-
Launch MicroStrategy Web and click the Version information link on the Home page to view the customization.
Creating the plug-in yourself using the Web Customization Editor
If you want to understand how the additional information is displayed on the About page, follow the steps below to create the plug-in and deploy it.
-
On the Application Settings tab, click the Select Plug-in icon.:

-
On the Select Plug-in dialog box, click New and enter a meaningful name forthe plug-in, such as DisplayingConnectionInfoIntelligenceServer.
-
Click OK.
-
On the Application Settings tab, expand MicroStrategy Web Configuration to view the list of settings that can be modified to perform customizations.
-
Expand Pages to view the list of pages used in MicroStrategy Web.
-
Double-click about (About) to view it in the editor.
-
Select the Template Properties tab at the bottom of the editor.
-
Right-click the content page section and select Edit current file.
-
Click the Yes button in the prompt to edit AboutInfo_Content.jsp/ascx.
-
Add the lines of code shown in bold text below.:
J2EE environment:
...
<%@include file='/jsp/About_Content.jsp' %>
<SPAN class="mstrVersionInfo">
<SPAN CLASS=highlighted><web:descriptor key="" desc="Project Name:" /></SPAN> <web:connectionValue property="projectName"/><BR /><BR />
<SPAN CLASS=highlighted><web:descriptor key="" desc="Project ID:" /></SPAN> <web:connectionValue property="projectID"/><BR /><BR />
<SPAN CLASS=highlighted><web:descriptor key="" desc="User Name:" /></SPAN> <web:connectionValue property="userName"/><BR /><BR />
</SPAN>
<web:ifFeature name="!mobile-server">
<web:then>
<form <web:value attribute="action" type="config" name="webServletDeploymentName"/> method="post"><input class="mstrButton" style="padding: 6px;" type="submit" <web:descriptor key="mstrWeb.37" desc="Projects" attribute="value"/>/>
</form>
</web:then>
</web:ifFeature>
.NET environment:
...
<web:include runat="server" flush="false" path="About_Content.ascx" />
<SPAN class="mstrVersionInfo">
<SPAN CLASS=highlighted><web:descriptor runat="server" key="" desc="Project Name:" /></SPAN> <web:connectionValue runat="server" mproperty="projectName"/><BR /><BR />
<SPAN CLASS=highlighted><web:descriptor runat="server" key="" desc="Project ID:" /></SPAN> <web:connectionValue runat="server" mproperty="projectID"/><BR /><BR />
<SPAN CLASS=highlighted><web:descriptor runat="server" key="" desc="User Name:" /></SPAN> <web:connectionValue runat="server" mproperty="userName"/><BR /><BR />
</SPAN>
<web:ifFeature runat="server" name="!mobile-server">
<web:then>
<form <web:value runat="server" attribute="action" type="config" name="webServletDeploymentName"/> method="post"><input type="submit" <web:descriptor runat="server" key="mstrWeb.37" desc="Projects" attribute="value"/>/>
</form>
</web:then>
</web:ifFeature>
-
Save AboutInfo_Content.jsp/ascx.
-
A new plug-in folder, with the name you gave it, now exists in the plugins folder of your MicroStrategy Web installation directory. Restart your web server to apply the plug-in.
-
Launch MicroStrategy Web and click the Version information link on the Home page to view the customization.
See Also
-
Fundamentals of customization: Data presentation, styles and layout definitions