Strategy ONE
Adding or Removing a TimeStamp for a Report or a Document
All reports and documents displayed in MicroStrategy Web display a timestamp to indicate when the report or document was last executed. You can customize this timestamp by removing it completely or replacing it with another timestamp for any other event.
In this customization, the default timestamp for last execution is replaced with the timestamp for when the data warehouse was last updated.
Adding or Removing a TimeStamp for a Report
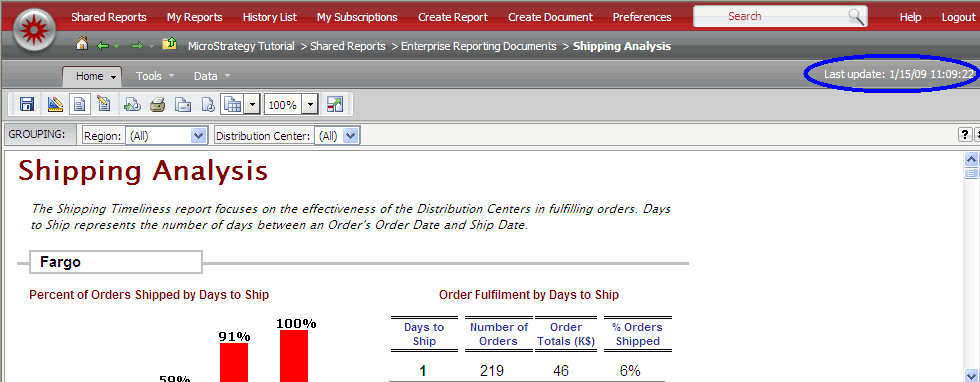
The timestamp for a report is displayed in the top right corner of a report. In this scenario, this timestamp is replaced by the timestamp when the data warehouse was last updated. This new timestamp is stored in a separate file which is included for display. Each time the warehouse is updated, this separate file needs to be updated as well with the correct timestamp.
Before customization:

After customization:

This customization can be accomplished using either of the following methods:
Deploying the plug-in provided with MicroStrategy SDK
MicroStrategy SDK provides a plug-in (ZIP file) that can simply be extracted to the plugins folder to view the customization in MicroStrategy Web. The following steps guide you in locating the plug-in and deploying it.
-
Access the plug-in: JSP version or ASP .NET version.
-
Extract the plug-in to the plugins subfolder inside the MicroStrategy Web installation folder.
-
Launch MicroStrategy Web to view the customization.
Using the Web Customization Editor to create a plug-in
MicroStrategy SDK provides a Web Customization Editor that can be used to create a customization plug-in. The following steps guide you in creating the plug-in and deploying it.
-
Create a new plug-in and give it a meaningful name. For example: AddingTimeStampReport.
-
Exit the Web Customization Editor.
-
Create a XML toolbar definition file, ReportToolbar.xml, with the following code.
<!DOCTYPE block SYSTEM "../dtds/blockLibrary.dtd">
<block>
<assignments>
<property name="children">
<list>
<block listElementKey="K1288" name="RibbonListView">
<property name="rightIcons">
<list>
<block listAction="delete" listElementKey="K1290" listItem="K1290"/>
</list>
</property>
</block>
</list>
</property>
</assignments>
</block>
-
Save this custom XML toolbar definition file, ReportToolbarModel.xml, in the plugins\pluginName\WEB-INF\xml\blocks subfolder inside the MicroStrategy Web installation folder. For example: plugins\AddingTimeStampReport\WEB-INF\xml\blocks. Steps 4 and 5 are responsible for removing the default time stamp displayed.
-
Create an include file that will contain the timestamp when the data warehouse was last updated and save it in the customization plug-in inside the MicroStrategy Web installation. For example: plugins/AddingTimeStampReport/inc. You can update this file with the new timestamps manually or in an automated manner.
-
If the Web Customization Editor is closed, launch it again and access your plug-in.
-
Click on MicroStrategy Web Configuration inside the Application Settings view to expand the hierarchical tree. The expanded list comprises the different settings that can be modified to perform customizations.
-
Click on Pages to expand the list of pages used in MicroStrategy Web.
-
Double-click the report (Report Execution) page.
-
Click the Template Properties tab at the bottom in the right frame to make changes to the Default page template.
-
Right-click the dockTop page section and select Edit current file.
-
Click the Yes button in the prompt to edit Report_Toolbar.jsp/ascx.
-
Make the following change shown in code below.
ASP .NET:
Before customization:
<web:displayBean runat="server" bean="ribbonBean" styleName="RptRibbonToolbars" />
<div id = "standardToolbarFullScreenHolder" layout="ReportFullscreenToolbarBlockLoader" class="mstrTabbedMenuVBoxItem"></div>
After customization:
<web:displayBean runat="server" bean="ribbonBean" styleName="RptRibbonToolbars" />
<div class="mstrMenuLastUpdatedCustom" nowrap>Last Warehouse Update: <!--#include file="../inc/whtime.inc"--> </div>
<div id = "standardToolbarFullScreenHolder" layout="ReportFullscreenToolbarBlockLoader" class="mstrTabbedMenuVBoxItem"></div>
JSP:
Before customization:
<web:displayBean bean="ribbonBean" styleName="RptRibbonToolbars" />
<div id = "standardToolbarFullScreenHolder" layout="ReportFullscreenToolbarBlockLoader" class="mstrTabbedMenuVBoxItem"></div>
After customization:
<web:displayBean bean="ribbonBean" styleName="RptRibbonToolbars" />
<div class="mstrMenuLastUpdatedCustom" nowrap>Last Warehouse Update: <jsp:include page="../inc/whtime.inc" flush="true"/></div>
<div id = "standardToolbarFullScreenHolder" layout="ReportFullscreenToolbarBlockLoader" class="mstrTabbedMenuVBoxItem"></div>
-
Save your changes.
-
Navigate to report (Report Execution)->CSS.
-
Click on Customizations to expand the child nodes under it.
-
Right-click reportPage.css and select New Selector.
-
Enter .mstrMenuLastUpdatedCustom in the Selector text field.
-
Select the radio button for Apply Selector to This Page.
-
Click OK.
-
Right-click .mstrMenuLastUpdatedCustom and select New Property.
-
Enter color and #FFFFFF in the Property and Value text fields respectively.
-
Select the radio button for Apply to This Page.
-
Click OK.
-
Right-click .mstrMenuLastUpdatedCustom and select New Property.
-
Enter float and right in the Property and Value text fields respectively.
-
Select the radio button for Apply to This Page.
-
Click OK.
-
Right-click .mstrMenuLastUpdatedCustom and select New Property.
-
Enter padding-right and 3px in the Property and Value text fields respectively.
-
Select the radio button for Apply to This Page.
-
Click OK.
-
Right-click .mstrMenuLastUpdatedCustom and select New Property.
-
Enter padding-top and 3px in the Property and Value text fields respectively.
-
Select the radio button for Apply to This Page.
-
Click OK.
-
Right-click .mstrMenuLastUpdatedCustom and select New Property.
-
Enter margin-top and -53px in the Property and Value text fields respectively.
-
Select the radio button for Apply to This Page.
-
Click OK.
-
Save your changes.
-
Launch MicroStrategy Web to view the customization.
Adding or Removing a TimeStamp for a Document
The timestamp for a document is displayed in the top right corner of a document. In this scenario, this timestamp is replaced by the timestamp when the data warehouse was last updated. This new timestamp is stored in a separate file which is included for display. Each time the warehouse is updated, this separate file needs to be updated as well with the correct timestamp.
Before customization:
After customization:

This customization can be accomplished using either of the following methods:
Deploying the plug-in provided with MicroStrategy SDK
MicroStrategy SDK provides a plug-in (ZIP file) that can simply be extracted to the plugins folder to view the customization in MicroStrategy Web. The following steps guide you in locating the plug-in and deploying it.
-
Access the plug-in: JSP version or ASP .NET version.
-
-
Launch MicroStrategy Web to view the customization.
Using the Web Customization Editor to create a plug-in
MicroStrategy SDK provides a Web Customization Editor that can be used to create a customization plug-in. The following steps guide you in creating the plug-in and deploying it.
-
Create a new plug-in and give it a meaningful name. For example: AddingTimeStampDocument.
-
Exit the Web Customization Editor.
-
Create a XML toolbar definition file, DocumentToolbar.xml, with the following code.
<!DOCTYPE block SYSTEM "../dtds/blockLibrary.dtd">
<block>
<assignments>
<property name="children">
<list>
<block listElementKey="K423" listItem="K423">
<property name="rightIcons">
<list>
<block listAction="delete" listElementKey="K425" listItem="K425"/>
</list>
</property>
</block>
</list>
</property>
</assignments>
</block>
-
Save this custom XML toolbar definition file, DocumentToolbar.xml, in the plugins\pluginName\WEB-INF\xml\blocks subfolder inside the MicroStrategy Web installation folder. For example: plugins\AddingTimeStampDocument\WEB-INF\xml\blocks. Steps 4 and 5 are responsible for removing the default time stamp displayed.
-
Create an include file that will contain the timestamp when the data warehouse was last updated and save it in the customization plug-in inside the MicroStrategy Web installation. For example: plugins/AddingTimeStampDocument/inc. You can update this file with the new timestamps manually or in an automated manner.
-
If the Web Customization Editor is closed, launch it again and access your plug-in.
-
Click on MicroStrategy Web Configuration inside the Application Settings view to expand the hierarchical tree. The expanded list comprises the different settings that can be modified to perform customizations.
-
Click on Pages to expand the list of pages used in MicroStrategy Web.
-
Double-click the rwd (Report Writing Documents) page.
-
Click the Template Properties tab at the bottom in the right frame to make changes to the Default page template.
-
Right-click the dockTop page section and select Edit current file.
-
Click the Yes button in the prompt to edit RW_Toolbar.jsp/ascx.
-
Make the following change shown in code below.
ASP .NET:
Before customization:
...
<web:mthen runat="server">
<web:displayBean runat="server" bean="ribbonBean" styleName="RWRibbonToolbars" />
</web:mthen>
...
After customization:
...
<web:mthen runat="server">
<web:displayBean runat="server" bean="ribbonBean" styleName="RWRibbonToolbars" />
<div class="mstrMenuLastUpdatedCustom" nowrap>Last Warehouse Update: <!--#include file="../inc/whtime.inc"--> </div>
</web:mthen>
...
JSP:
Before customization:
...
<web:then>
<web:displayBean bean="ribbonBean" styleName="RWRibbonToolbars" />
</web:then>
...
After customization:
...
<web:then>
<web:displayBean bean="ribbonBean" styleName="RWRibbonToolbars" />
<div class="mstrMenuLastUpdatedCustom" nowrap>Last Warehouse Update: <jsp:include page="../inc/whtime.inc" flush="true"/></div>
</web:then>
...
Save your changes.
Navigate to rwd (rwd (Report Writing Documents))->CSS.
Click on Customizations to expand the child nodes under it.
Right-click rwdPage.css and select New Selector.
Enter .mstrMenuLastUpdatedCustom in the Selector text field.
Select the radio button for Apply Selector to This Page.
Click OK.
Right-click .mstrMenuLastUpdatedCustom and select New Property.
Enter color and #FFFFFF in the Property and Value text fields respectively.
Select the radio button for Apply to This Page.
Click OK.
Right-click .mstrMenuLastUpdatedCustom and select New Property.
Enter float and right in the Property and Value text fields respectively.
Select the radio button for Apply to This Page.
Click OK.
Right-click .mstrMenuLastUpdatedCustom and select New Property.
Enter padding-right and 3px in the Property and Value text fields respectively.
Select the radio button for Apply to This Page.
Click OK.
Right-click .mstrMenuLastUpdatedCustom and select New Property.
Enter padding-top and 3px in the Property and Value text fields respectively.
Select the radio button for Apply to This Page.
Click OK.
Right-click .mstrMenuLastUpdatedCustom and select New Property.
Enter margin-top and -53px in the Property and Value text fields respectively.
Select the radio button for Apply to This Page.
Click OK.
Save your changes.
Launch MicroStrategy Web to view the customization.
For specific settings that affect whether customization changes are applied automatically or require a restart of the Web server, see Applying customization changes to the application.