Strategy ONE
Validating Prompt Answers for a Report
This customization scenario showcases how to use JavaScript to validate prompt answers once they are submitted. By default, all prompt answers are accepted and passed on to the report where the data pertinent to the prompt answer (filter) is displayed. If the prompt answer is invalid, no data is returned. In this scenario, the prompt answer is validated and an error message is displayed in case of an invalid prompt answer.
This scenario below uses the Zip Code Validation report located inside Shared Reports\MicroStrategy Platform Capabilities\MicroStrategy SDK\Customization Scenarios\Prompt Customization in MicroStrategy Tutorial. This report has a value prompt for the Zip code attribute which is validated using JavaScript.
After customization:
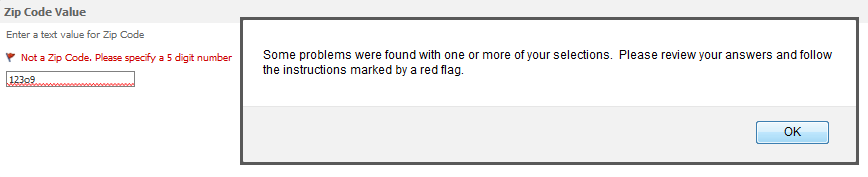
This customization can be accomplished using either of the following methods:
Deploying the plug-in provided with MicroStrategy SDK
MicroStrategy SDK provides a plug-in (ZIP file) that can simply be extracted to thepluginsfolder to view the customization in MicroStrategy Web. The following steps guide you in locating the plug-in and deploying it.
-
Access the plug-in: JSP version or ASP .NET version.
-
Extract the plug-in to the plugins subfolder inside the MicroStrategy Web installation folder.
-
Launch MicroStrategy Web to view the customization.
Using the Web Customization Editor to create a plug-in
MicroStrategy SDK provides a Web Customization Editor that can be used to create a customization plug-in. The following steps guide you in creating the plug-in and deploying it.
-
Create a new plug-in and give it a meaningful name. For example: ValidatingValuePromptAnswer.
-
Exit the Web Customization Editor.
-
Navigate to the customization plug-in folder inside the plugins folder of the MicroStrategy Web installation, and create a javascript folder inside the plug-in. For example: plugins/ValidatingValuePromptAnswer/javascript.
-
Create a JavaScript file, reportPage.js, that contains the logic for validating the prompt answer. The sample, reportPage.js,contains the entire code for this JavaScript file.
-
Save this custom JavaScript file in the plugins\pluginName\javascript subfolder as reportPage.js inside the MicroStrategy Web installation folder.
Make sure that the name of the JavaScript file follows the convention [Name of the page]Page.js where [Name of the page]is the MicroStrategy Web page on which the JavaScript should be executed.
-
Save your changes.
-
Launch MicroStrategy Web to view the customization
See Also