Strategy ONE
Adding or Removing Context Menu Items
This customization scenario illustrates how to add context menu items to or remove context menu items from context menus on a MicroStrategy Web page. You can use the instructions in this scenario as a guide for adding or removing context menu items on other MicroStrategy Web pages.
The examples in this scenario differ from the example in the Adding Context Menu Items Not Implemented by Default scenario. In this scenario, the context menu items that you add are generic, while the context menu item added in the other scenario has a dependency on the object that is right-clicked.
Adding a context menu item that opens a page
In the first example in this scenario, you add a new context menu item, called Preferences, to the context menu on the Folder Browsing page. When you right-click an object on the Folder Browsing page after you have made these changes, a new context menu item, called Preferences, appears. When you click this menu item, the Preferences page opens.
Before customization:

After customization:

This customization can be accomplished using either of the following methods:
Deploying the plug-in provided with MicroStrategy SDK
MicroStrategy SDK provides a plug-in (ZIP file) that can simply be extracted to thepluginsfolder to view the customization in MicroStrategy Web. The following steps guide you in locating the plug-in and deploying it.
-
Access the plug-in: JSP version or ASP .NET version.
-
Extract the plug-in to the plugins subfolder inside the MicroStrategy Web installation folder.
-
Launch MicroStrategy Web to view the customization.
Using the Web Customization Editor to create a plug-in
MicroStrategy SDK provides a Web Customization Editor that can be used to create a customization plug-in. The following steps guide you in creating the plug-in and deploying it.
-
Click on MicroStrategy Web Configuration inside the Application Settings view to expand the hierarchical tree. The expanded list comprises the different settings that can be modified to perform customizations.
-
Click on Context Menus to expand the list of context menus used in MicroStrategy Web.
-
Navigate to folderContextMenus->default.
-
Right-click the default context menu and select New Shortcut.
-
Enter group3 in the text field and click OK. This launches the Shortcut Attributes editor for group3.
-
Enter - in the Descriptor text field.
-
Save your changes. group3 will be a horizontal line that will separate the Preferences item from the rest of the menu items.
-
Navigate back to folderContextMenus->default.
-
Right-click the default context menu and select New Shortcut.
-
Enter preferences in the text field and click OK. This will be the Preference context menu item.
-
In the Shortcut Attributes editor for preferences, enter Preferences in the Descriptor text field.
-
Click Modify next to the Descriptor ID text field.
-
Select mstrWeb.862 and click OK.
-
Click the Advanced Properties tab at the bottom of the Shortcut Attributes editor for preferences.
-
Click Add Event in the Events section.
-
To select the event enumeration class, click Browse and enter EnumServletEvents.
-
Select EnumServletEvents from your project and click OK.
-
Select WebEventOpenPreferences from the drop-down menu for Event to trigger when menu element is selected.
-
Click Add in the EventArguments section.
-
Select WebEventArgumentPreferenceGroup from the drop-down menu and click OK.
-
Enter grid in the Argument Value text field.
-
Click OK.
-
Save your changes.
-
Launch MicroStrategy Web to view the customization.
In this customization, Preferences is the last item on the context menu, and it is set apart from the other menu items by a separator. You can vary the location of the new menu item by changing the placement of the shortcut in the list of shortcuts. To change the position of Preferences, navigate to folderContextMenus->default and double-click default to launch the Shortcut Attributes editor for default. The position of context menu items can be ordered in the List of Shortcuts section.
Adding a context menu item that displays a message
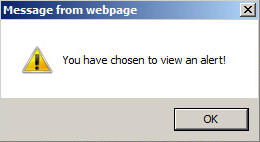
In the second example in this scenario, you add a new context menu item, called View Alert, to the context menu on the Folder Browsing page. Clicking this new context menu item triggers JavaScript that displays a message.
Before customization:
After customization:

When you click View Alert on the context menu, the following message is displayed.
This customization can be accomplished using either of the following methods:
Deploying the plug-in provided with MicroStrategy SDK
MicroStrategy SDK provides a plug-in (ZIP file) that can simply be extracted to thepluginsfolder to view the customization in MicroStrategy Web. The following steps guide you in locating the plug-in and deploying it.
-
Access the plug-in: JSP version or ASP .NET version.
-
Extract the plug-in to the plugins subfolder inside the MicroStrategy Web installation folder.
-
Launch MicroStrategy Web to view the customization.
Using the Web Customization Editor to create a plug-in
MicroStrategy SDK provides a Web Customization Editor that can be used to create a customization plug-in. The following steps guide you in creating the plug-in and deploying it.
-
Click on MicroStrategy Web Configuration inside the Application Settings view to expand the hierarchical tree. The expanded list comprises the different settings that can be modified to perform customizations.
-
Click on Context Menus to expand the list of context menus used in MicroStrategy Web.
-
Navigate to folderContextMenus -> default.
-
Right-click the default context menu and select New Shortcut.
-
Enter viewalert in the text field and click OK. This name will identify the View Alert context menu item.
-
In the Shortcut Attributes editor for viewalert, enter View Alert in the Descriptor text field. This is the text that will actually display on the context menu.
-
For the append-state text field, change the value to false.
-
Click the Advanced Properties tab at the bottom of the Shortcut Attributes editor.
-
For the Onclick text field, enter alert('You have chosen to view an alert!').
-
Save your changes.
-
Launch MicroStrategy Web to view the customization.
When you right-click an object on the Folder Browsing page after you have made these changes, a new menu item, called View Alert, appears. When you click this menu item, a message is displayed. In this example, View Alert is the last item on the context menu, and it is not separated from the other menu items. You can vary the location of the menu item by where you place the shortcut in the list of shortcuts.
Removing a context menu item
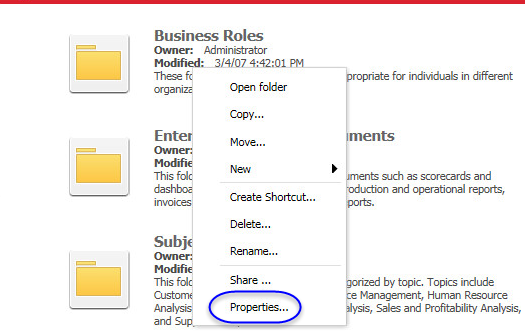
In the third example in this scenario, you remove the Properties context menu item from context menus on the Folder Browsing page.
Before customization:
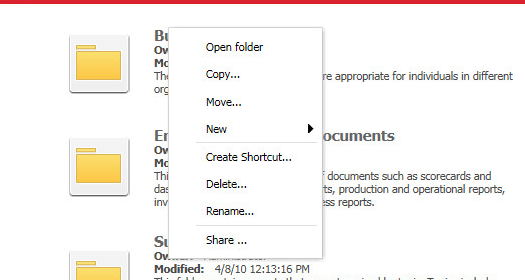
After customization:
This customization can be accomplished using either of the following methods:
Deploying the plug-in provided with MicroStrategy SDK
MicroStrategy SDK provides a plug-in (ZIP file) that can simply be extracted to thepluginsfolder to view the customization in MicroStrategy Web. The following steps guide you in locating the plug-in and deploying it.
-
Access the plug-in: JSP version or ASP .NET version.
-
Extract the plug-in to the plugins subfolder inside the MicroStrategy Web installation folder.
-
Launch MicroStrategy Web to view the customization.
Using the Web Customization Editor to create a plug-in
MicroStrategy SDK provides a Web Customization Editor that can be used to create a customization plug-in. The following steps guide you in creating the plug-in and deploying it.
-
Click on MicroStrategy Web Configuration inside the Application Settings view to expand the hierarchical tree. The expanded list comprises the different settings that can be modified to perform customizations.
-
Click on Context Menus to expand the list of context menus used in MicroStrategy Web.
-
Navigate to folderContextMenus -> default -> properties([Properties...]).
-
Right-click the properties([Properties...]) context menu item and select Delete.
-
A Confirm Delete dialog will be displayed, asking you whether you are sure you want to delete this shortcut. Click Yes.
-
Save your changes.
-
Launch MicroStrategy Web to view the customization.
When you right-click an object on the Folder Browsing page after you have made these changes, Properties no longer appears as a menu item on the context menu.
See Also
-
Scenarios: Customizing Existing Functionality: Adding Custom Context Menus
-
Scenarios: Customizing Existing Functionality: Removing Context Menus
-
Scenarios: Extending Existing or Adding New Functionality: Disabling or Removing Context Menu Items for a Specific Object
-
Scenarios: Extending Existing or Adding New Functionality: Adding Context Menu Items that Display Information about the Object
-
Scenarios: Extending Existing or Adding New Functionality: Adding Context Menu Items Not Implemented by Default