Strategy ONE
Adding Shortcuts and Changing the Root Folder in the Object Browser for a Report
The Object Browser pane is displayed to the left of the report contents on the MicroStrategy Web Report Execution page or the document contents on the Document Execution page. The Object Browser pane has accordion tabs such as All Objects, Report Objects, Notes and Related Reports. The All Objects tab displays a list of the contents of the root folder of the project and a set of shortcuts to the following folders: My Personal Objects, Attributes, Metrics, and Hierarchies. The Object Browser pane allows you to navigate to different folders inside your project while working with a report or a document, and the shortcuts provide single-click access to any folder inside a MicroStrategy project. The Object Browser pane can be hidden and made visible by selecting All Objects (or Report Objects or Notes or Related Reports) from the Tools menu.
In this customization scenario, you add a new shortcut in the All Objects tab on the Report Execution page. This shortcut allows you to display the contents of the Filters folder with one click, rather than having to first click Public Folders and then click Filters. You also change the root folder that determines the contents displayed in the All Objects tab so that the contents of the Schema Objects folder are displayed instead of the contents of the project itself.
Before customization:

After customization:
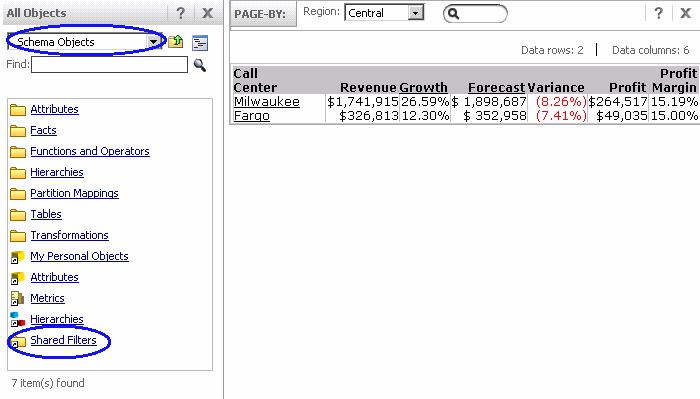
This customization can be accomplished using either of the following methods:
Deploying the plug-in provided with MicroStrategy SDK
MicroStrategy SDK provides a plug-in (ZIP file) that can simply be extracted to thepluginsfolder to view the customization in MicroStrategy Web. The following steps guide you in locating the plug-in and deploying it.
-
Access the plug-in: JSP version or ASP .NET version.
-
Extract the plug-in to the plugins subfolder inside the MicroStrategy Web installation folder.
-
Launch MicroStrategy Web to view the customization.
Using the Web Customization Editor to create a plug-in
MicroStrategy SDK provides a Web Customization Editor that can be used to create a customization plug-in. The following steps guide you in creating the plug-in and deploying it.
-
Click on MicroStrategy Web Configuration inside the Application Settings view to expand the hierarchical tree. The expanded list comprises the different settings that can be modified to perform customizations.
-
Click on Folder Links to expand the list of links used in MicroStrategy Web.
-
Double-click Report Object Browser to launch the Project and Folder Links editor in the right frame.
-
Select DssXmlFolderNameRoot in Folder Links section. This is the default root folder (MicroStrategy Tutorial folder) and the value of "true" in the drop-down menu for Set as root folder designates it as the root folder.
-
Click Delete.
-
Click Add in the Folder Links section. This launches the New Folder Link dialog.
-
Select DssXmlFolderNameSchemaObjects from the drop-down menu for Folder.
-
Click OK.
-
Enter Schema Objects in the text field for Description.
-
Select true from the drop-down menu for Set as root folder. This designates Schema Objects folder as the root folder.
-
Click Add in Folder Links section. This launches the New Folder Link dialog.
-
Select DssXmlFolderNamePublicFilters from the drop-down menu for Folder.
-
Click OK.
-
Save your changes.
-
Launch MicroStrategy Web to view the customization.
The customization above is applied to all projects because the changes are made to folder links for project Default (-1). To implement this customization for a specific project, add a new project by clicking Add in the Projects section. Specify the ID and name for the project and perform steps 7-14 shown above.
See Also
-
Fundamentals of Customization: Application Page Structure
-
Fundamentals of Customization: Data Presentation and Styles
-
Page Content and Layout: Web Beans and Web-Components
-
References: Transform Parameters Reference