Strategy ONE
Grouping report data: Page-by
When you have a very large set of data on a report, it can be easier to handle that data by grouping the report data into logical subsets, and viewing only one of the subsets at a time. To group data into subsets, you can use the page-by feature.
The subsets that you separate your business data into are called pages, and you then page your way through the report, viewing one data subset at a time. Page-by makes viewing a report easier than scrolling through long lists of data.
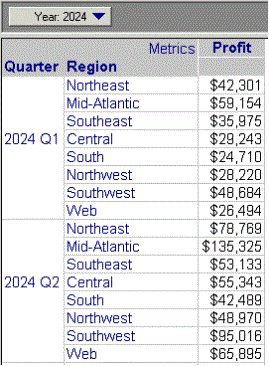
For example, if a report showing your profit data is organized by Year, Quarter, and Region, you can create a page-by for Year, so that the report shows only one year's data at a time. The following image shows such a report with Year in the page-by area of the report (the top of the report):

You simply click the page-by field to select a different subset of data to display. The page-by feature lets you decide what subsets of your business data you want to display as separate pages of your report.
Attributes and metrics are the most common objects available in the page-by pane of a report, although you can enable page-by for most objects that appear on a report. For a list of objects that can be displayed as pages, see Objects that can be displayed as separate report pages.
Page-by capabilities can be enabled or disabled for your project by your project designer. If you encounter a problem moving a certain type of object into the page-by area above a report, your project designer may have disabled the page-by functionality for that type of object.
If you export a paged report to PDF, you might not be able to specify accurate page ranges to print, unless you specify that the PDF uses logical page numbers. For more details and instructions, see Exporting a report to PDF.
To display pages for a report
-
Run a report. (For steps to run a report, see Running a report.)
-
From the View menu, select Page-by.
-
If page-by fields have already been defined, they display automatically.
-
If there are no page-by fields defined for the report, the Drop Page Fields Here box opens at the top of the report. You can add page-by fields, as described in To add a page-by field to a report below.
-
To add a page-by field to a report
See Objects that can be used as pages for a list of objects that can be used as pages.
You can place more than one object in the page-by pane. If you decide to place multiple related attributes in the page-by pane, be aware that order matters. Whatever you page-by first (furthest to the left) affects the elements displayed in the other page-by fields. Place multiple objects into the page-by pane in logical order, from left to right. You can sort the list of page-by fields later; for details and instructions see Advanced sorting: sorting the page-by list.
-
Open the report.
-
From the View menu, choose Page-by. The Drop Page Fields Here box opens at the top of the report.
-
Use one of the following methods to add a page-by field:
-
To use an object in the Object Browser: Select the object in the Object Browser, and drag and drop it into the Drop Page Fields Here box.
-
To move a row: Select the row header to page by. From the Move menu, choose Move to Page-by.
-
To move metrics in columns: Right-click the word Metrics on the report and select Page-by. All metrics must be moved together. You cannot have one metric in the page-by pane and others on the report grid.
-
The report is automatically re-displayed to show only the subset of data shown in the current page-by field.
-
-
By default, page-by selections are saved with the report, but you can change the setting. (For details, see Saving a report.)
-
Save the report. (For steps to do this, see Saving a report.)
To remove a page-by field from a report
-
Open the report.
-
From the View menu, choose Page-by.
-
In the area that contains the page-by fields, drag and drop the page-by field to the desired location on the report.
-
You can further adjust where objects appear on your grid report by selecting the column header and, from the Move menu, selecting Move Left or Move Right.
-
Save the report. (How?)
Related Topics
For information on page-by in documents, see Using Page-by on a document.
