Strategy One
Integrate Strategy with Google BigQuery using Workload Identity Federation with AWS or Azure Virtual Machines
See the following steps to configure and use Workload Identity Federation in Strategy to allow AWS and Azure virtual machine workloads to authenticate to Google BigQuery. See the following Google Cloud Documentation for more information, Configure Workload Identity Federation with AWS or Azure VMs.
Prepare External Identity Provider
To prepare external identity providers, use the steps in Prepare your external identity provider.
AWS
Ensure the AWS EC2 instance has IAM roles assigned by running the following command in the EC2 instance:
aws sts get-caller-identity --output jsonIf the role is attached and working, the output should be similar to the following:
{
  "UserId": "AROA...:i-0123456789abcdef0",
  "Account": "123456789012",
  "Arn": "arn:aws:sts::123456789012:assumed-role/MyInstanceRole/i-0123456789abcdef0"
}
Note the Account ID and Arn.
Azure
Prerequisite:
-
Create a Microsoft Entra ID application and service principal.
-
Set an Application ID URI for the application. You can use the default Application ID URI (
APPID) or specify a custom URI.Ensure to Create a managed identity and Assign the managed identity to your virtual machine or another resource that runs your application. Run the following command, replacing APP_ID_URI with the value you set above.
Copycurl \
"http://169.254.169.254/metadata/identity/oauth2/token?resource=APP_ID_URI&api-version=2018-02-01" \
-H "Metadata: true" | jq -r .access_tokenFrom the output, you can confirm a token can be issued by the managed identity.
-
In a web browser, go to
https://jwt.ms/and copy and paste the access token and decode. Ensure it is a valid token and review the claim tables for entries such as issuer and sub. Note these values.
Create the Workload Identity Pool and Provider
To create the workload identity pool and provider, use the steps in Create the workload identity pool and provider.
Create a Workload Identity Pool
Create a workload identity pool by replacing POOL_ID, DESCRIPTION, and DISPLAY_NAME in the following with your preferred values:
gcloud iam workload-identity-pools create POOL_ID \
    --location="global" \
    --description="DESCRIPTION" \
    --display-name="DISPLAY_NAME"
Create a Workload Identity Pool Provider
AWS
Run the following command in gcloud, replacing PROVIDER_ID with the pool ID you created above and replacing account-id with your AWS account ID.
gcloud iam workload-identity-pools providers create-aws PROVIDER_ID \
  --location="global" \
  --workload-identity-pool="POOL_ID" \
  --account-id="123456789000" \
  --attribute-mapping="attribute.aws_role=assertion.arn.contains('assumed-role') ? assertion.arn.extract('{account_arn}assumed-role/') + 'assumed-role/' + assertion.arn.extract('assumed-role/{role_name}/') : assertion.arn,google.subject=assertion.arn"
Define the attribute similar to above. Defining the attribute allows you to authenticate to Google Resource by mapping the AWS role or by the arn (which contains the instance ID).
google.subject=assertion.arn is used to map the Google subject to the AWS ARN that appears in the token.
attribute.aws_role=... is used to define parsing logic like the following:
If the ARN contains 'assumed-role', it extracts the section up to assume-role/. It also extracts the {role_name} section from assumed-role/ROLE_NAME/INSTANCE_ID. It concatenates those sections with 'assumed-role/' in the middle. This provides a normalized role ARN. If it does not contain 'assumed-role', it uses the full assertion.arn unchanged. You can also define simpler mapping logic based on your actual case.
Azure
Run the following command in gcloud, replacing POOL_ID with the pool ID you created above and replacing ISSUER_URI and APPLICATION_ID_URI with the values from above. Also define a PROVIDER_ID.
gcloud iam workload-identity-pools providers create-oidc PROVIDER_ID \
    --location="global" \
    --workload-identity-pool="POOL_ID" \
    --issuer-uri="ISSUER_URI" \
    --allowed-audiences="APPLICATION_ID_URI" \
    --attribute-mapping="google.subject=assertion.sub,google.groups=assertion.groups"
Define the attribute mapping to map the Google subject to the sub value from the Azure token claim table. You can then authenticate to Google Resource by mapping the sub value (object ID of managed identity).
Authenticate a Workload
To allow your external workload to access your Google Bigquery, use Authenticate a workload.
You can authenticate and access Google BigQuery Resource using Impersonation and Direct.
To get the PROJECT_NUMBER, run the following command:
gcloud projects describe "$PROJECT_ID" --format="value(projectNumber)"Direct
Run the following command to grant the whole workload:
## Grant the principalSet with bigquery.dataViewer, bigquery.jobUser, serviceusage.serviceUsageConsumer as the minimal set

gcloud projects add-iam-policy-binding $PROJECT_ID \
  --role="roles/bigquery.dataViewer" \
  --member="principalSet://iam.googleapis.com/projects/${PROJECT_NUMBER}/locations/global/workloadIdentityPools/${POOL_ID}/*"

gcloud projects add-iam-policy-binding $PROJECT_ID \
  --role="roles/bigquery.jobUser" \
  --member="principalSet://iam.googleapis.com/projects/${PROJECT_NUMBER}/locations/global/workloadIdentityPools/${POOL_ID}/*"

gcloud projects add-iam-policy-binding $PROJECT_ID \
  --role="roles/serviceusage.serviceUsageConsumer" \
  --member="principalSet://iam.googleapis.com/projects/${PROJECT_NUMBER}/locations/global/workloadIdentityPools/${POOL_ID}/*"
Refer to the Google Documentation to grant access by mapping the Subject or Attribute values.
Impersonation
Run the following command to let the service account represent the whole workload:
## Assume we now have service account: yahuang-gbq@microstrategy-sr.iam.gserviceaccount.com

gcloud iam service-accounts add-iam-policy-binding \
  yahuang-gbq@microstrategy-sr.iam.gserviceaccount.com \
  --role="roles/iam.workloadIdentityUser" \
  --member="principalSet://iam.googleapis.com/projects/${PROJECT_NUMBER}/locations/global/workloadIdentityPools/${POOL_ID}/*"

## Grant the service account with bigquery.dataViewer, bigquery.jobUser, serviceusage.serviceUsageConsumer as the minimal set

gcloud projects add-iam-policy-binding $PROJECT_ID \
  --member="serviceAccount:yahuang-gbq@microstrategy-sr.iam.gserviceaccount.com" \
  --role="roles/bigquery.dataViewer"

gcloud projects add-iam-policy-binding $PROJECT_ID \
  --member="serviceAccount:yahuang-gbq@microstrategy-sr.iam.gserviceaccount.com" \
  --role="roles/bigquery.jobUser"

gcloud projects add-iam-policy-binding $PROJECT_ID\
  --member="serviceAccount:yahuang-gbq@microstrategy-sr.iam.gserviceaccount.com" \
  --role="roles/serviceusage.serviceUsageConsumer"
Refer to the Google Documentation to grant access by mapping the Subject or Attribute values under the workload.
Generate Credential Files
To generate credential files to access Google BigQuery, use Download or create a credential configuration.
AWS
Run the following command in gcloud to generate credential file, replacing PROJECT_NUMBER, POOL_ID, SERVICE_ACCOUNT_EMAIL, and FILEPATH with your preferred values. If you use the Direct authentication method, remove the --service-account flag.
gcloud iam workload-identity-pools create-cred-config \
    projects/PROJECT_NUMBER/locations/global/workloadIdentityPools/POOL_ID/providers/PROVIDER_ID \
    --service-account=SERVICE_ACCOUNT_EMAIL \
    --aws \
    --output-file=FILEPATH.json
Azure
Run the following command in gcloud to generate credential file, replacing PROJECT_NUMBER, POOL_ID, SERVICE_ACCOUNT_EMAIL, APPLICATION_ID_URI, and FILEPATH with your preferred values. service-account is an optional field if you use the Direct authentication method.
gcloud iam workload-identity-pools create-cred-config \
    projects/PROJECT_NUMBER/locations/global/workloadIdentityPools/POOL_ID/providers/PROVIDER_ID \
    --service-account=SERVICE_ACCOUNT_EMAIL \
    --azure \
    --app-id-uri APPLICATION_ID_URI \
    --output-file=FILEPATH.json
Create Database Connections Using Credential Files
This option is only supported if you are using Google BigQuery JDBC driver.
- Open the Workstation window with the Navigation pane in smart mode.
- In the Navigation pane, click the plus icon (+) next to Data Sources.
- Select Google BigQuery.
- Enter a name for the data source and select the project(s) that will use it.
- Expand the Default Database Connection drop-down and click Add New Database Connection.
-
The Create New Database Connection module appears.
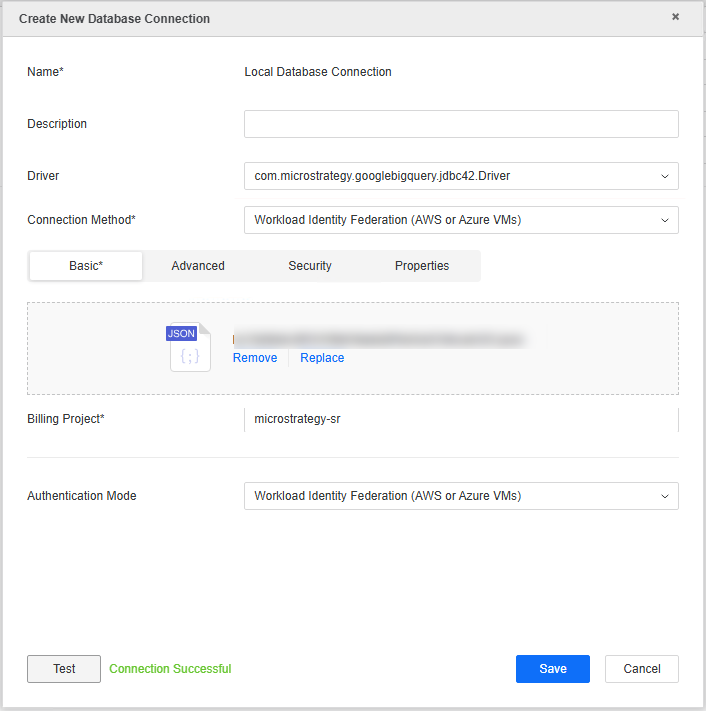
- Enter values in the following fields:
- Name: A name for the database connection.
- Driver: Choose your JDBC driver.
- Connection Method: Choose Workload Identity Federation (AWS or Azure VMs).
- Basic: Upload the credential file generate above.
- Billing Project: The Google billing project ID.
- Click Test.
- If the connection is successful, click Save.
- Click Save.