Strategy One
Integrate Strategy with Microsoft Entra ID (Formerly Azure AD) OIDC for Google BigQuery Single Sign-On
Strategy One (January 2026) adds support for Workload Identity Federation to connect to Google BigQuery.
The Entra ID OIDC for Google BigQuery Single Sign-On is the simplest data source connection for users because it leverages Strategy authentication and users only need to sign in once.
Before following the steps below, you must create an Azure App and note it's Client ID, Client Secret, and Directory/Tenant ID. You must also have access to at least one Azure account.
Create and Map a Strategy User to the Entra ID User
- Open the Workstation window with the Navigation pane in smart mode.
- In the Navigation pane, click Environments.
- Log into your environment. You must have the Administrator privileges.
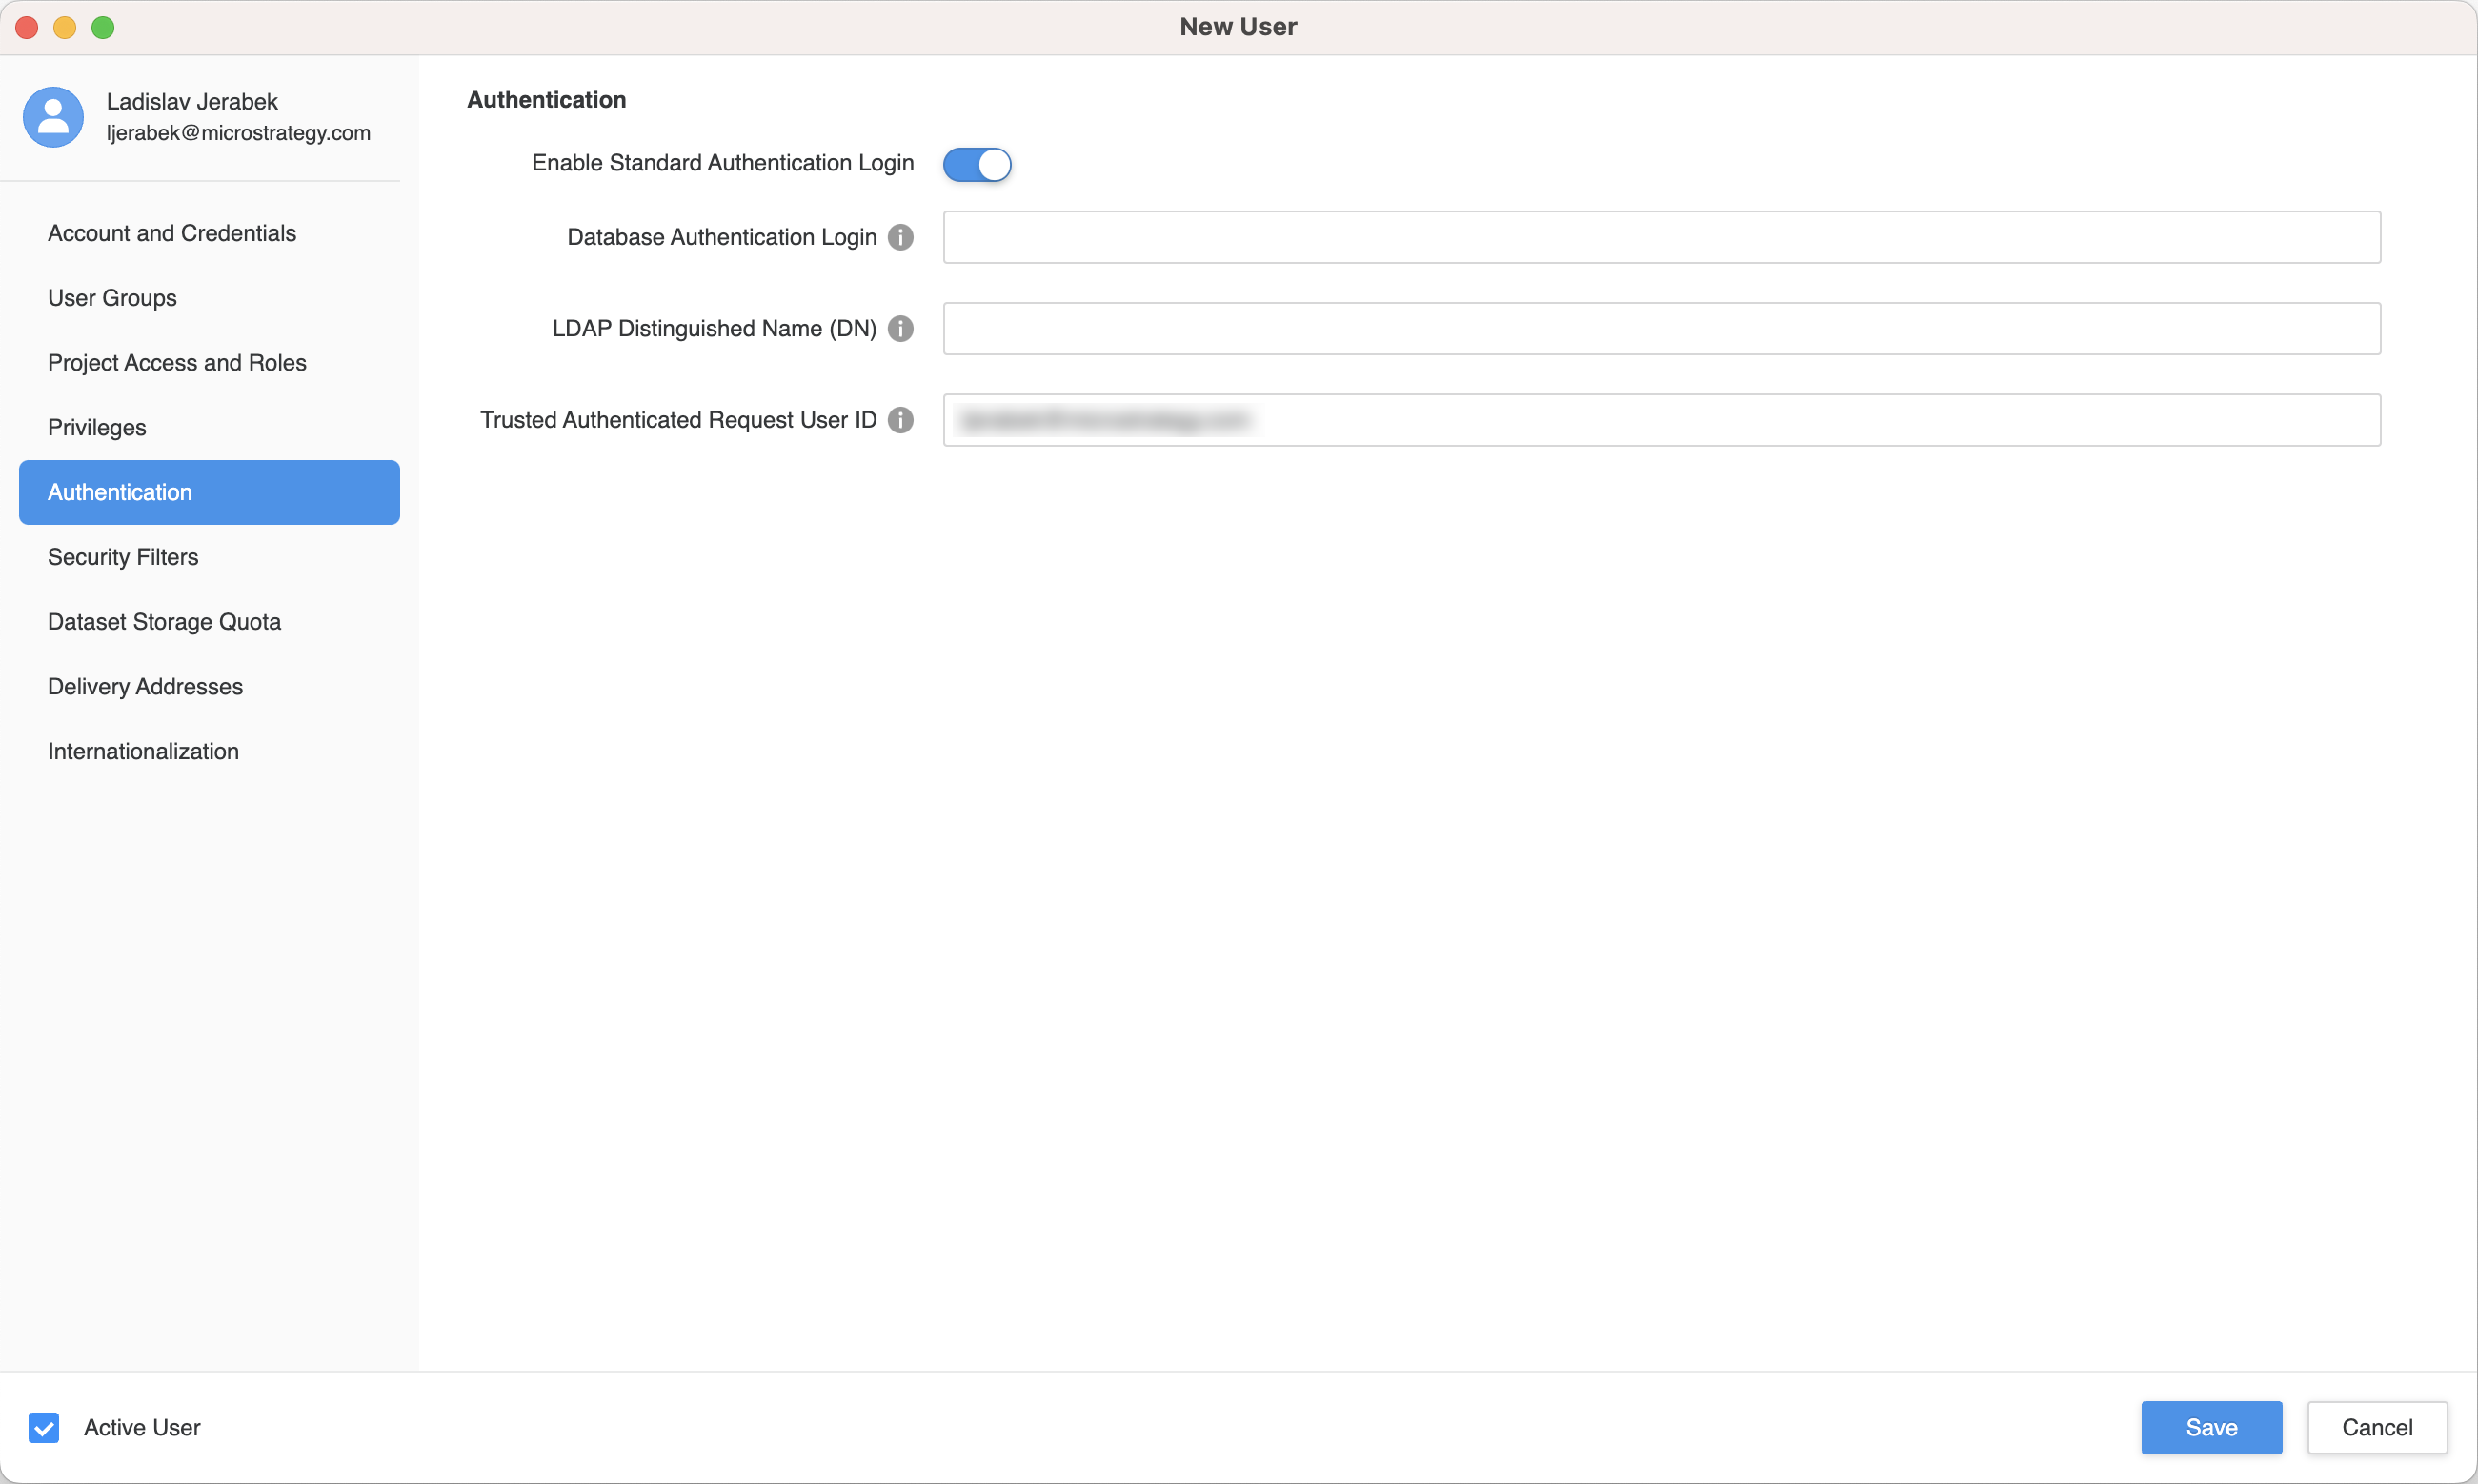
- In the Navigation pane, click Users and Groups.
- Click the plus icon (+) next to All Users and enter the required fields.
- In the left pane, click Privileges and add the following privileges:
- Create dataset in Workstation
- Access data from Databases, Google BigQuery, BigData, OI
- Create configuration objects
- Monitor Database Connections
- Create and edit database instances and connections
- Create and edit database logins
- Configure project data source
- Use Workstation
- In the left pane, click Authentication.
- Enter your Entra ID email address in Trusted Authenticated Request User ID.
For more information on mapping existing users, see Mapping OIDC Users to Strategy.
Integrate OIDC Support with Entra ID
Integrate your Strategy applications with Entra ID using OIDC authentication by following Integrating OIDC Support with Entra ID. You do not need to perform the steps in the Configure and Enable OIDC Auth Mode for Strategy Web/Strategy Mobile section.
Setup Google Workforce Identity Federation
You must set up gcloud utility to perform the following procedure. For more information on setting up gcloud utility, see gcloud CLI overview.
- Set the default billing/quota project using the following command:
gcloud config set billing/quota_project google-project-id- Create a Google Workforce identity pool using the following command and replace the organization value with your Google organization ID:
gcloud iam workforce-pools create azure-ad-workforce-identity-pool \
    --organization=123456789012 \
    --description="Azure AD Workforce Identity Pool" \
--location=global-
Create a Workforce pool provider using the following command. Replace 4ca8943a-c1a7-4bfe-868e-c5bdb4d59fee with your Entra ID directory or tenant ID and replace 92e890be-8367-4f57-84ea-9cd34cc0e5cd with your Entra ID application or client ID.
gcloud iam workforce-pools providers create-oidc azure-provider \
    --workforce-pool=azure-ad-workforce-identity-pool \
    --display-name="Azure AD Provider" \
    --description="Azure AD Workforce Identity Pool" \
    --issuer-uri="https://login.microsoftonline.com/4ca8943a-c1a7-4bfe-868e-c5bdb4d59fee/v2.0" \
    --client-id="92e890be-8367-4f57-84ea-9cd34cc0e5cd" \
    --attribute-mapping="google.subject=assertion.preferred_username" \
--location=global-
Set the workforce pool privileges for your organization's needs and set the following minimum privileges:
gcloud projects add-iam-policy-binding microstrategy-sr \
    --role="roles/bigquery.dataViewer" \
    --member="principalSet://iam.googleapis.com/locations/global/workforcePools/azure-ad-workforce-identity-pool/*"

gcloud projects add-iam-policy-binding microstrategy-sr \
    --role="roles/bigquery.jobUser" \
    --member="principalSet://iam.googleapis.com/locations/global/workforcePools/azure-ad-workforce-identity-pool/*"

gcloud projects add-iam-policy-binding microstrategy-sr \
    --role="roles/serviceusage.serviceUsageConsumer" \
--member="principalSet://iam.googleapis.com/locations/global/workforcePools/azure-ad-workforce-identity-pool/*"- Make note of your Google Audience URI.
Setup Google Workload Identity Federation
You must set up gcloud utility and sign-in to choose the default project to perform the following procedure. For more information on setting up gcloud utility, see gcloud CLI overview.
-
Create a Google Workload identity pool using the following command and choose the preferred name. Note the
$POOL_IDvalue, in Strategy's example it is"azuread-workload-identity-pool".Copygcloud iam workload-identity-pools create azuread-workload-identity-pool \
--location="global" \
--description="AzureAD Workload Identity Pool" \
--display-name="AzureAD-Workload-Identity-Pool" -
Create a Workload pool provider using the following command. Refer to the workload identity pool name you created in Step 1 and replace it with your Entra ID directory tenant ID and client ID. Define the
attribute-mappingas"google.subject=assertion.preferred_username". Note the$PROVIDER_IDvalue, in Strategy's example it is"aad-oidc-provider".Copygcloud iam workload-identity-pools providers create-oidc aad-oidc-provider \
--location="global" \
--workload-identity-pool="azuread-workload-identity-pool" \
--issuer-uri="https://login.microsoftonline.com/${TENANT_ID}/v2.0" \
--allowed-audiences="${CLIENT_ID}" \
--attribute-mapping="google.subject=assertion.preferred_username" -
Get the current projectId using the following command and noted as
$PROJECT_ID.Copygcloud config get-value project -
Get the ProjectNumber using the following command and noted as
$PROJECT_NUMBER.Copygcloud projects describe "$PROJECT_ID" --format="value(projectNumber)" -
You can authenticate and access Google BigQuery resources using Impersonation or Direct:
-
Impersonation
Copy## Assume we now have service account: yahuang-gbq@microstrategy-sr.iam.gserviceaccount.com
## To let the federated identity impersonate the service account, run the following:
gcloud iam service-accounts add-iam-policy-binding \
yahuang-gbq@microstrategy-sr.iam.gserviceaccount.com \
--role="roles/iam.workloadIdentityUser" \
--member="principalSet://iam.googleapis.com/projects/${PROJECT_NUMBER}/locations/global/workloadIdentityPools/${POOL_ID}/*"
## Grant the service account with bigquery.dataViewer, bigquery.jobUser, serviceusage.serviceUsageConsumer as the minimal set
gcloud projects add-iam-policy-binding $PROJECT_ID \
--member="serviceAccount:yahuang-gbq@microstrategy-sr.iam.gserviceaccount.com" \
--role="roles/bigquery.dataViewer"
gcloud projects add-iam-policy-binding $PROJECT_ID \
--member="serviceAccount:yahuang-gbq@microstrategy-sr.iam.gserviceaccount.com" \
--role="roles/bigquery.jobUser"
gcloud projects add-iam-policy-binding $PROJECT_ID\
--member="serviceAccount:yahuang-gbq@microstrategy-sr.iam.gserviceaccount.com" \
--role="roles/serviceusage.serviceUsageConsumer" -
Direct
Copy## Grant the principalSet with bigquery.dataViewer, bigquery.jobUser, serviceusage.serviceUsageConsumer as the minimal set
gcloud projects add-iam-policy-binding $PROJECT_ID \
--role="roles/bigquery.dataViewer" \
--member="principalSet://iam.googleapis.com/projects/${PROJECT_NUMBER}/locations/global/workloadIdentityPools/${POOL_ID}/*"
gcloud projects add-iam-policy-binding $PROJECT_ID \
--role="roles/bigquery.jobUser" \
--member="principalSet://iam.googleapis.com/projects/${PROJECT_NUMBER}/locations/global/workloadIdentityPools/${POOL_ID}/*"
gcloud projects add-iam-policy-binding $PROJECT_ID \
--role="roles/serviceusage.serviceUsageConsumer" \
--member="principalSet://iam.googleapis.com/projects/${PROJECT_NUMBER}/locations/global/workloadIdentityPools/${POOL_ID}/*"
-
-
Collection authentication parameters:
-
Impersonation
Copy## Generate the credential configuration file
gcloud iam workload-identity-pools create-cred-config \
projects/${PROJECT_NUMBER}/locations/global/workloadIdentityPools/${POOL_ID}/providers/${PROVIDER_ID} \
--service-account="yahuang-gbq@microstrategy-sr.iam.gserviceaccount.com" \
--azure \
--app-id-uri="${CLIENT_ID}" \
--output-file="${FILE_PATH}.json" -
Direct
The audience value should be formatted like the following. Note the value.
Copy//iam.googleapis.com/projects/${PROJECT_NUMBER}/locations/global/workloadIdentityPools/${POOL_ID}/providers/${PROVIDER_ID}
-
Create an Enterprise Security Object
Follow the steps in Manage OAuth Enterprise Security with Identity and Access Management (IAM) Objects to create an enterprise security object.
Create Google BigQuery JDBC or ODBC Data Source with OAuth OBO
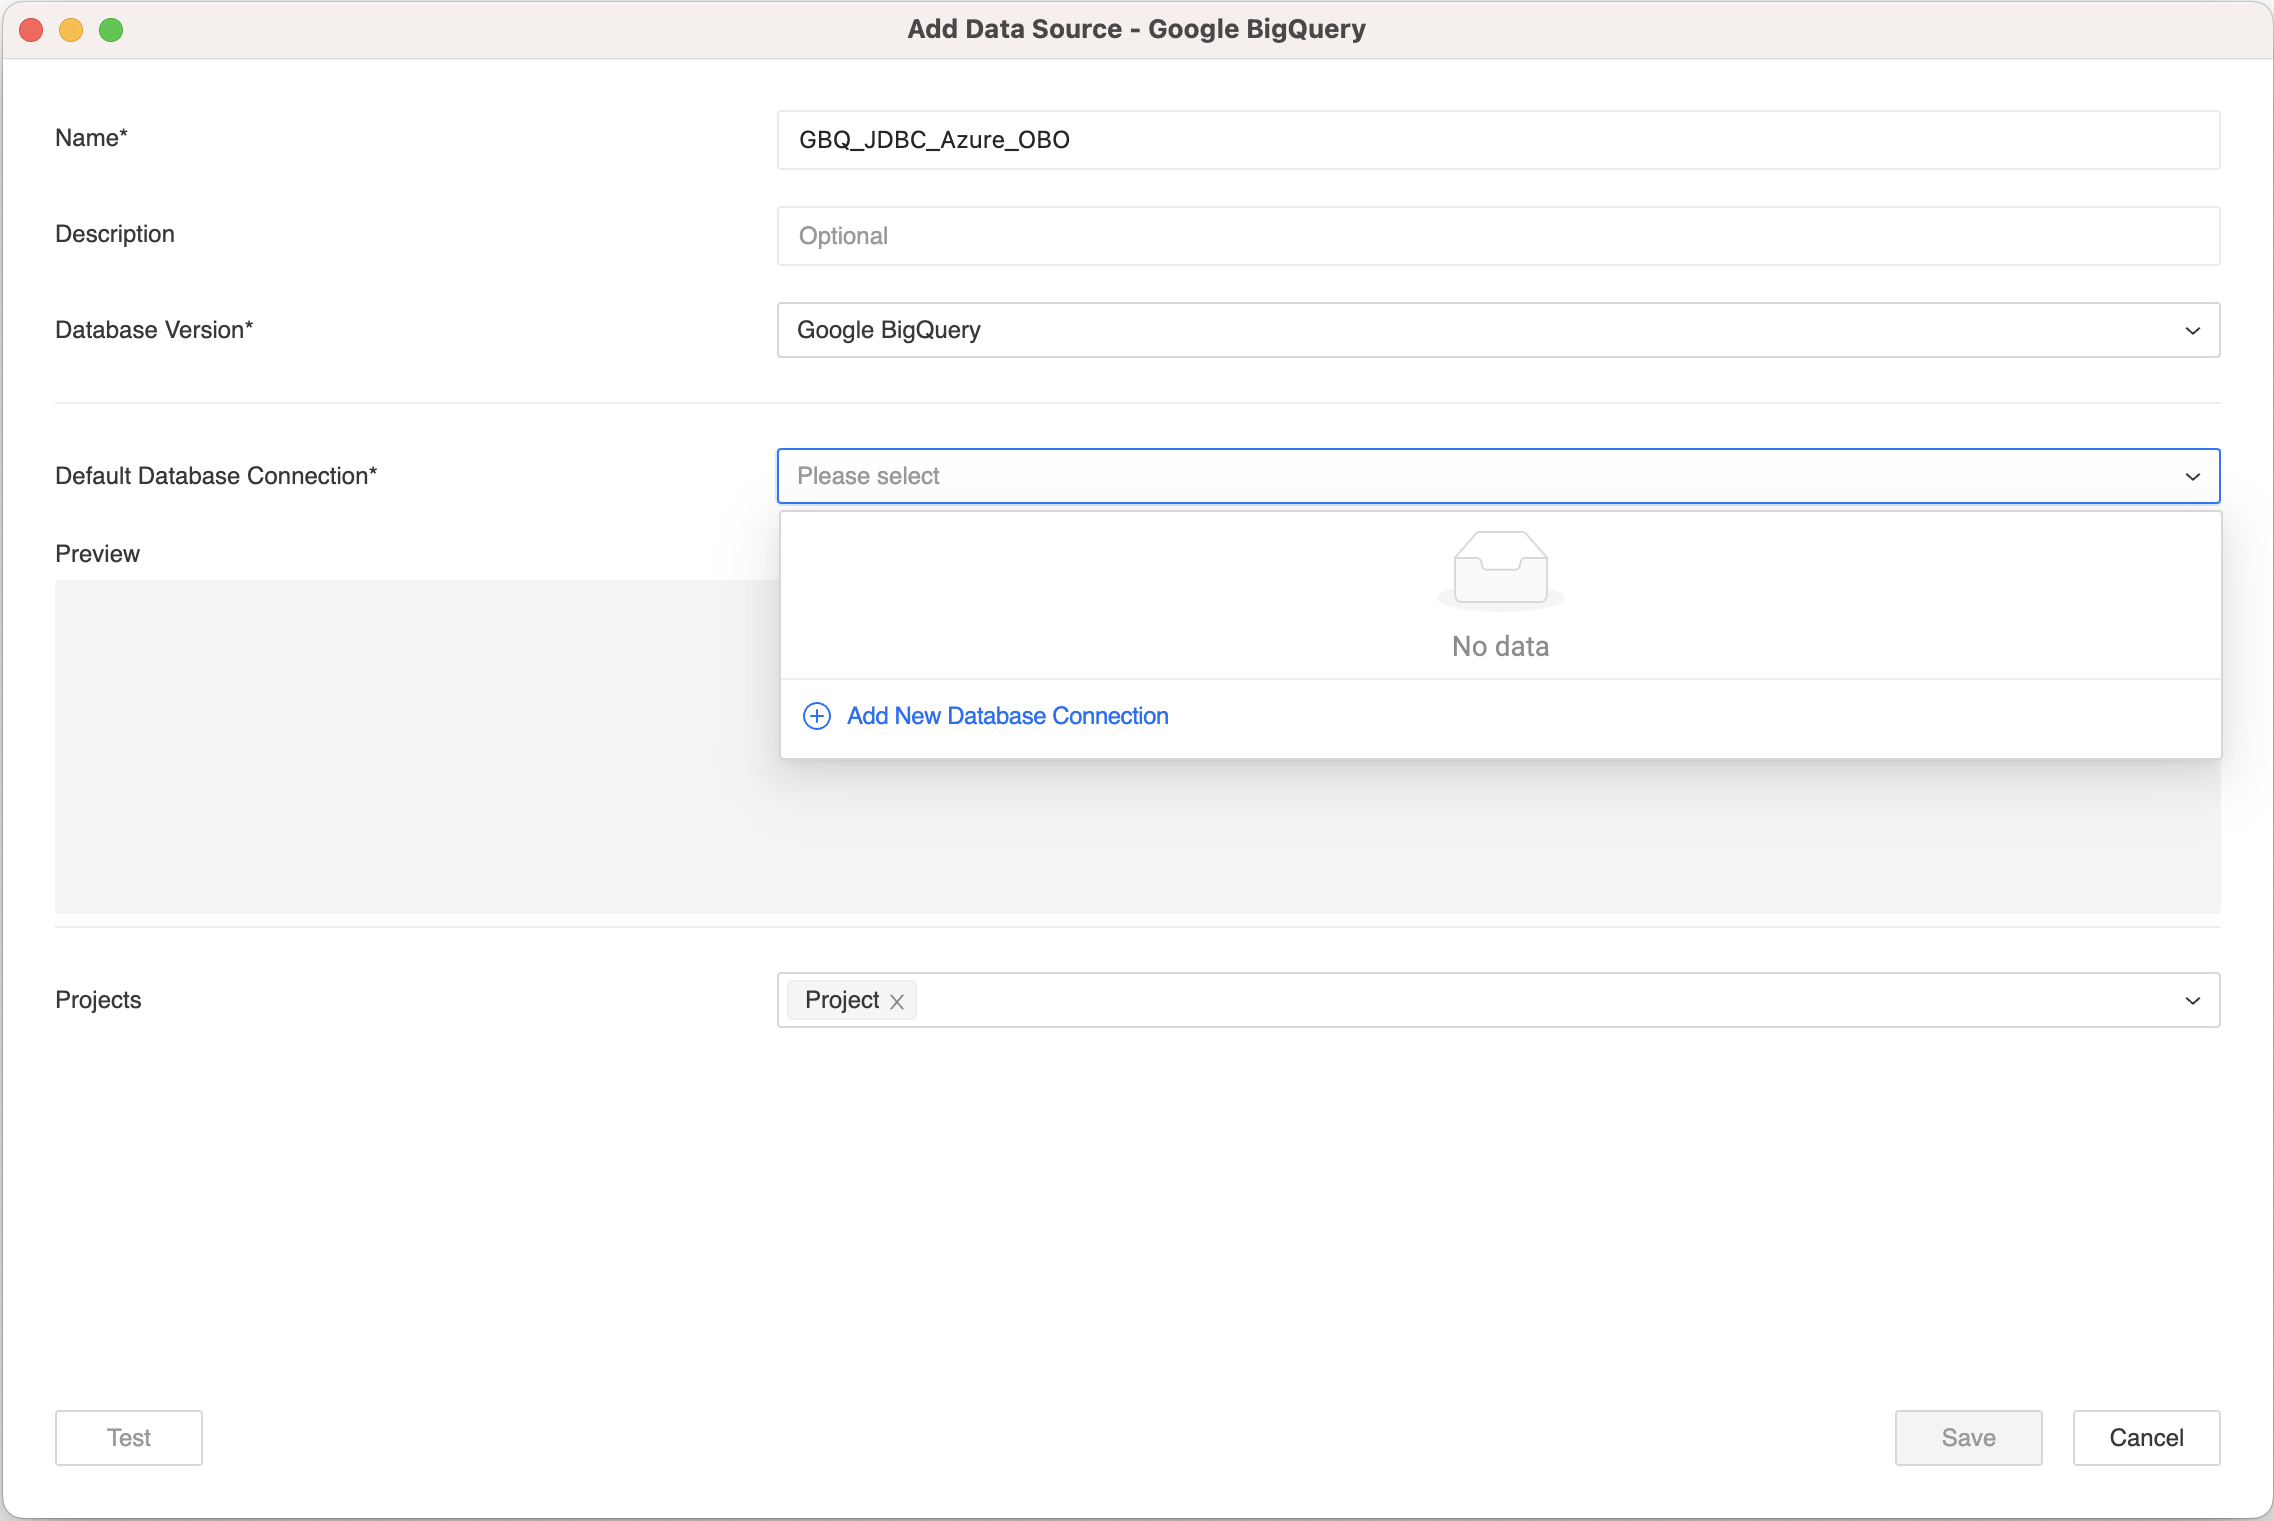
- Open the Workstation window with the Navigation pane in smart mode.
- In the Navigation pane, click the plus icon (+) next to Data Sources.
- Select Google BigQuery.
- Enter a name for the data source and select the project(s) that will use it.
- Expand the Default Database Connection drop-down and click Add New Database Connection.
- The Create New Database Connection module appears.
- Enter values in the following fields:
- Name: A name for the database connection.
- Driver Type: Select "JDBC" or "ODBC".
- Billing Project: The Google billing project ID.
- Authentication Mode: Select "OAuth".
- Authentication Service: The enterprise security object that you created above.
- Audience: The Audience URI that you created above.
- Impersonation URI: Starting in Strategy One (January 2026), to use Impersonation to authenticate and access Google BigQuery resources, enter a service account impersonation URI for workload identity federation.
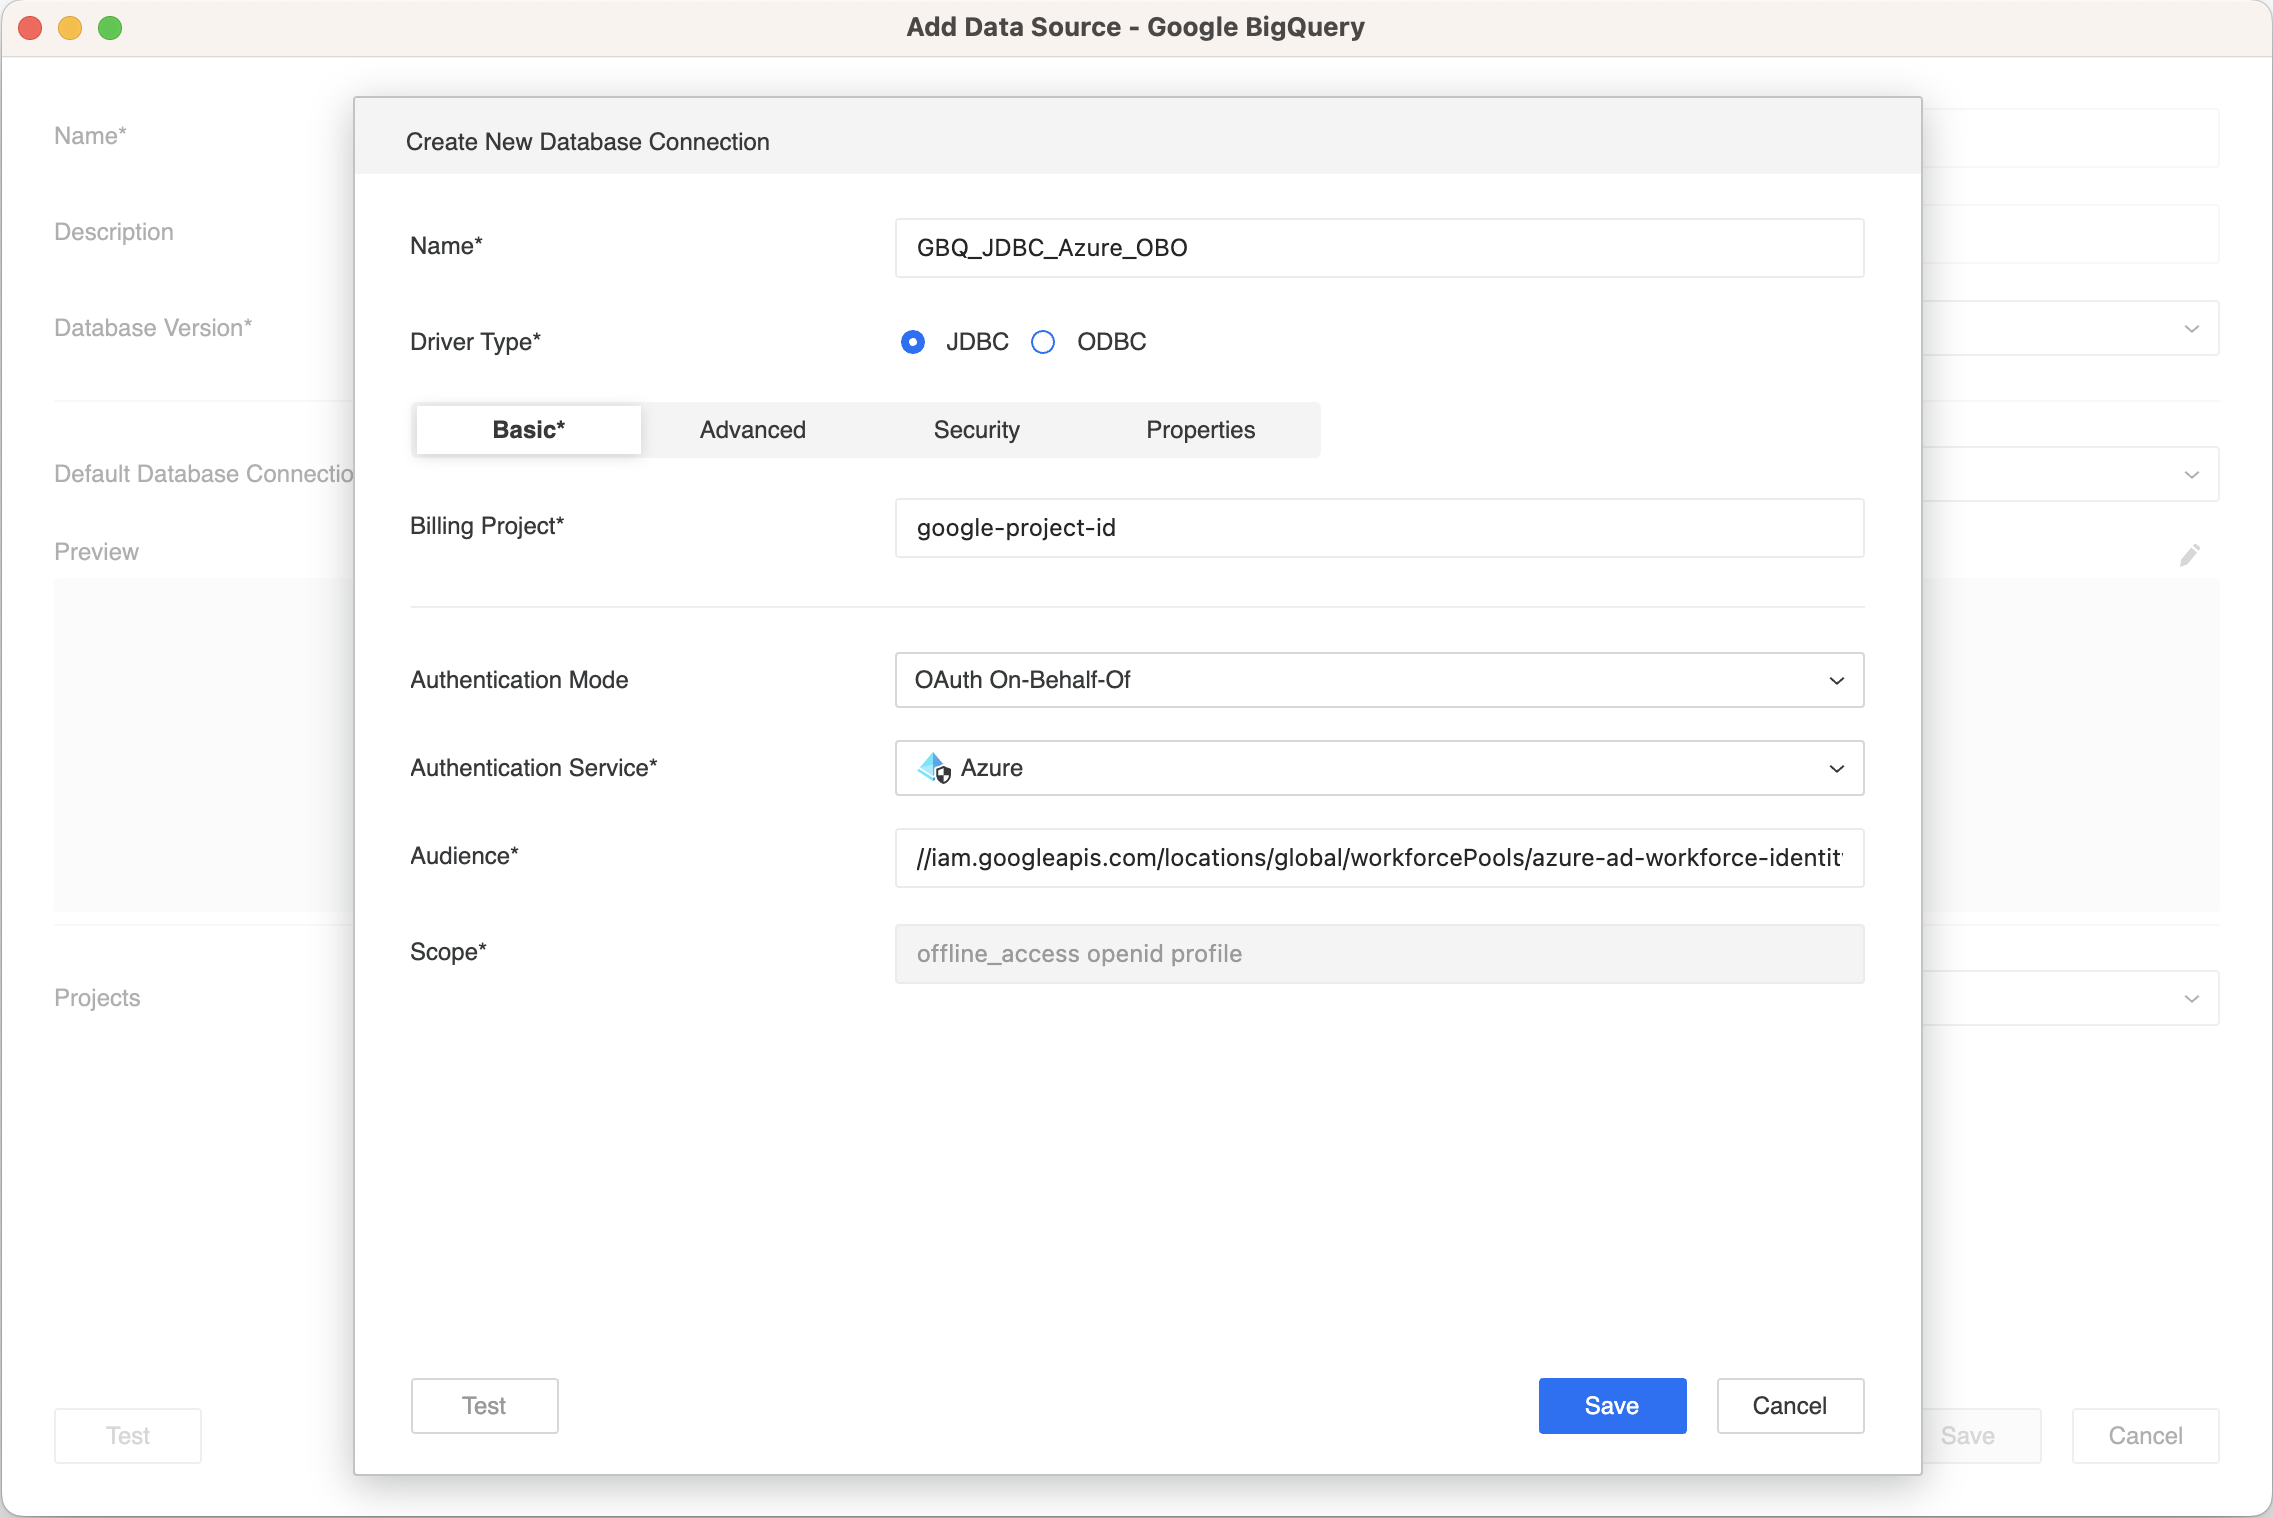
- Click Save.
- Click Save.
Test the Google BigQuery Data Source
- Open the Workstation window with the Navigation pane in smart mode.
- Check that the environment is using the Default OIDC authentication mode.
- Click Environments in the Navigation pane.
- Right-click the environment you want to use and click Edit Environment Information.
- Check that the Authentication Mode is set to "Default OIDC".
- Login to your Strategy environment using your Entra ID username and password.
- In the Navigation pane, click the plus icon (+) next to Datasets.
- Select Data Import Cube and click Ok.
- Select Google BigQuery (Driver) or Google BigQuery (JDBC).
- Leave Select Tables selected and click Next.
- Select the GBQ_JDBC_Azure_OBO data source.
- The projects and datasets list displays.