Strategy ONE
Custom Ad Hoc Selector Sample in iOS
Sample name: CustomAdHocSelectorSample
Understanding how a custom selector works: You create the custom selector in the Xcode project, but you tell MicroStrategy Mobile which class should render the selector by the style you apply to the selector in MicroStrategy Web. Here is how it works. In MicroStrategy Web, you create a document with a selector and a target. You create a custom style and apply it to the selector. The style is defined in a MicroStrategy Web plug-in, in a configuration file called widgets.xml. The style has attributes that specify the style key, indicate that this is a selector style, and provide the style name that will appear in the selector style drop-down. The style is saved in the metadata as a property of the selector. Because the style is defined as a selector style, it is displayed in the selector style drop-down for appropriate selectors. From the standpoint of MicroStrategy Mobile, the sole purpose of this style is to provide the key that allows the mobile client to know what class to use for the selector when the document is executed on a mobile device. The link between the style applied in MicroStrategy Web and the selector class used by MicroStrategy Mobile is provided in a custom property list file (selector.plist) in the Xcode project. This property list file has a key:value pair that has the style key defined in MicroStrategy Web and the name of the selector class used by the MicroStrategy Mobile project. When you run the document on a mobile device, MicroStrategy Mobile looks for the style key to determine which class should generate the selector in the document on the mobile device.
This sample describes how to create a custom selector to use in a document viewed on a mobile device. If you also want to view that document and its selector in MicroStrategy Web or Desktop, you would need to do additional work to make sure that your custom style displayed properly in those environments.
A description and sample code for the MicroStrategy Web plug-in and the MicroStrategy Mobile custom property list file are provided below. Downloadable files are provided in the step-by-step instructions.
-
MicroStrategy Web plug-in for the custom style
The plug-in should have the following structure and be copied to the plugins folder in the MicroStrategy Web installation directory.Copy<plug-in name>
WEB-INF
xml
xml
config
widgets.xmlThe widgets.xml file should look like the code shown below. The value of the scope attribute (which must be 111) specifies that this is a selector style, the value of the fqcn attribute is the key for the style, and the value of the title attribute provides the style name that will be displayed in the list of styles that can be applied to a selector.
Copy<widgets>
<widget id="CustomSelectorStyle" scope="111" fqcn="CustomSelectorKey" title="Custom Selector" />
</widgets>The value of the fqcn attribute (the style key) is used by MicroStrategy Mobile to determine what class should render the selector on a mobile device.
-
MicroStrategy Mobile property list file
The property list file links the style applied to the selector in MicroStrategy Web to the class that renders the custom selector in MicroStrategy Mobile. In the .plist file, you use the custom style key as the value of the <key> node and the name of the custom selector class as the value of the <string> node.Copy<?xml version="1.0" encoding="UTF-8"?>
><!DOCTYPE plist PUBLIC "-//Apple//DTD PLIST 1.0//EN" "http://www.apple.com/DTDs/PropertyList-1.0.dtd">
<plist version="1.0">
<dict>
<key>CustomSelectorKey</key>
<string>TextInputSelector</string>
</dict>
</plist>
The value of the style key in these two files—the plug-in and the property list file—is used to link the style applied to the custom selector in MicroStrategy Web to the class used by MicroStrategy Mobile to render the custom selector. When you run the document on a mobile device, MicroStrategy Mobile uses the style key to determine which class should render the selector in the document on the mobile device.
Functionality showcased: This sample illustrates how to create a custom selector with a search feature that allows users to limit the available selector values.
The Custom Ad Hoc Selector sample includes three custom files that must be added to the MicroStrategy Mobile project in Xcode:
- TextInputSelector.h and TextInputSelector.mm
In this sample, the custom selector is defined by the TextInputSelector class. - selector.plist
The custom selector property list file, selector.plist, maps the custom style applied to the selector in MicroStrategy Web to the custom selector class that renders the selector on a mobile device.
You can use these sample files as the basis for creating and using your own custom selector with a search feature. However, you can also create a custom selector that does other things, with or without a search feature. As long as your custom selector class extends MSISelector, you have access to the selector model and APIs to implement your custom logic. For example, you can create a custom selector with selection values from outside the MicroStrategy platform. These external selection values could be codes obtained from a barcode scanner or user identities from a third-party system. In this case, your custom selector class would need to contain logic to map the external values to MicroStrategy values and apply the MicroStrategy values to the target.
Using the sample: The instructions below explain how to :
In MicroStrategy Web:
- Create and add a plug-in to add a custom selector style
- Create a sample document with a selector and a target control
- Apply the custom selector style to the selector
In MicroStrategy Mobile:
- Build the sample in Xcode
- Deploy the project to a mobile device or simulator
- Open MicroStrategy Mobile and use the document with the custom selector
These instructions use the Customer Income Analysis dataset, but you can use any dataset you want.
Creating a sample document with a custom selector: The following instructions help you create a sample document with a custom selector that you will use on a mobile device.
- Add the plug-in that defines the custom style for the custom ad hoc selector.
- Download the plug-in.
- Extract the contents of the plug-in to the plugins folder of your MicroStrategy Web installation directory.
- Restart your web server.
- Open MicroStrategy Web and create a new document.
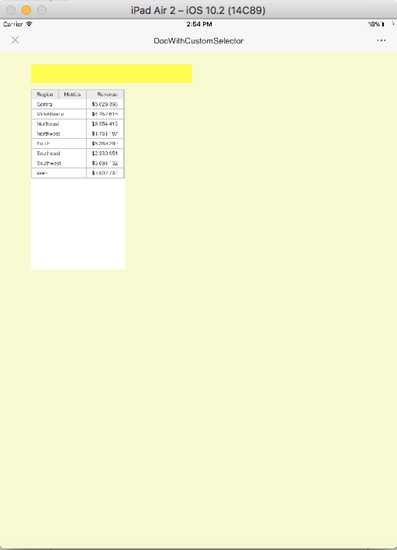
In this example, make the background color of the document a pale yellow. - Add a dataset to the document.
In this example, navigate to MicroStrategy Tutorial -> Public Objects -> Shared Reports -> .MSTRTutorial -> Subject Areas -> Customer Analysis-> Customer Income Analysis. - Add the control that will be the target of the selector.
- Choose a target control and insert it into the document.
In this example, from the Insert menu, choose Grid. - Add one or more attributes and metrics to the target control.
In this example, drag and drop the Region attribute and the Revenue metric from the Customer Income Analysis dataset to the grid.
- Choose a target control and insert it into the document.
- Add a selector control.
Insert a selector into the document.
In this example, from the Insert menu, choose Selector -> Listbox.
For MicroStrategy Mobile, it does not matter what selector you use because the selector on the mobile device will be rendered by the custom selector class in the Xcode project.
Make the grid the target of the selector.
Right-click the selector and choose Select Target. In the MicroStrategy Web dialog box, click the green check-mark and answer OK to manually maintain targets.
The grid you created earlier should be automatically selected as the target. You can confirm this by right-clicking the selector and choosing Properties and Formatting, then choosing Selector under Properties in the Properties and Formatting dialog. The grid should be displayed under Selected in the Targets section. If it is not, you can move it from Available to Selected. For MicroStrategy Web, it must be a selector that you can apply the custom style to, such as a Listbox or Dropdown. For example, you cannot apply a custom style to a Searchbox.
Add an attribute to the selector.
In this example, drag and drop the Region attribute from the Customer Income Analysis dataset to the selector.
- Apply the custom selector style to the selector.
- Right-click the selector and select Properties and Formatting.
- Select Layout under Properties on the left, and in the Selector section on the right, choose Custom Selector as the Flash Style.
- Click Apply and OK.
- Save the document with a name that you will recognize when you test the sample. For example, DocWithCustomSelector.
Building the sample: The following instructions will help you set up, build and deploy this sample to your mobile device or simulator.
- Install the Mobile SDK on your development machine.
On a Mac® computer, go to the MicroStrategy Download site and download the iOS Client file for the latest Mobile SDK. To get the latest, click Feature Releases under Home on the left.
The latest Mobile SDK may or may not be the same version as the version of Intelligence Server you are using.
Double-click the downloaded MicroStrategy Mobile SDK.dmg file.
Click Agree to accept the terms of the license agreement. This opens the disk image.
Copy all the folders to your local drive.
Eject the disk image.
-
Copy all the header files under the folder /Library/LegacyResources/Headers into the folder /Library/MicroStrategyMobileSDK.framework/Headers/.
-
Build and deploy the sample.
-
Download the .zip file containing the custom files for the sample and unzip it to a location on your machine.
-
Launch the MicroStrategy Mobile project in Xcode®.
Double-click MicroStrategyMobile.xcodeproj.
-
Add the custom files for the sample to the project.
- Expand MicroStrategyMobile, right-click the Custom folder, and choose "Add Files to MicroStrateg Mobile".
- Navigate to the location where you unzipped the custom files for the sample and select them.
- Click Options.
- Make sure the check box for Destination: Copy items if needed is not selected.
- Select the radio button for Added folders: Create folder references.
- Select the appropriate check boxes for Add to targets.
- Click Add. The files are added to the Custom folder.
-
Choose the target and click the Build button to compile and deploy the application to a simulator. Confirm that it compiles and deploys successfully.:
To upload the application to a device, set the destination in the scheme to the mobile device and then build and run. For other requirements on deploying to a device, refer to documentation from Apple. You can access useful links to the Apple documentation from the Distributing iPhone or iPad Applications topic.
-
Using the custom selector
-
If it is not already open, launch MicroStrategy Mobile from the mobile device or simulator.
- Configure MicroStrategy Mobile so that you can access your test document.
- Configure the app to use the mobile server that is connected to the Intelligence Server where you created the test document.
- Add the project where you saved the test document.
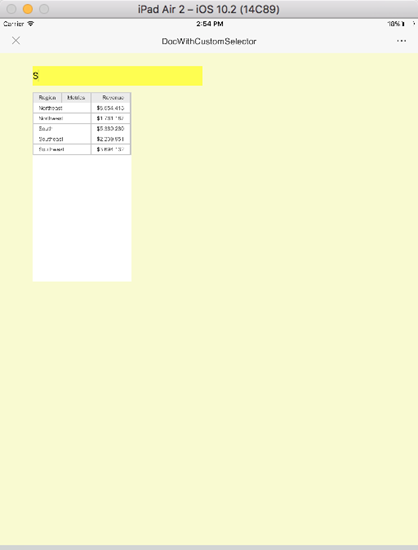
- Open the test document you created. In this example, you open DocWithCustomSelector.
- Enter some search text in the selector. For example, enter W. It should filter the target grid to show only revenue for the regions whose names contain a W—Northwest, Southwest, and Web.