Strategy ONE
Integrate with AppConfig-Compliant EMM Providers
Strategy HyperMobile can be integrated with any Enterprise Mobility Management (EMM) provider that supports AppConfig guidelines. App Configuration for the Enterprise (AppConfig) delivers the first standard approach to configuring and securing applications in the enterprise. The goal of the AppConfig initiative is to define a collection of best practices for enterprise application developers to interpret application configurations and security policies from EMM (Enterprise Mobility Management) systems, and for EMM systems to configure and secure mobile applications. AppConfig lets enterprises leverage their existing investments in EMM systems, VPNs, and identity management solutions.
- iOS
- Android
- App Configuration
Configure information such as Intelligence Server connectivity, project information, home screen configurations, and general app settings to eliminate the need to educate end users about first time setup.
-
Help prevent man-in-the-middle attacks by providing a trusted certificate hash to help establish a secure connection.
-
Security Policies and Access Control
Restrict apps to run only on approved devices and enforce security policies such as required encryption and data loss prevention at the app level.
-
Selectively enable approved apps to use an app tunnel to connect to backend and corporate networks.
The workflow for integrating Strategy HyperMobile with an EMM provider that supports AppConfig is described below. Examples are given for VM Workspace ONE UEM (formerly AirWatch) and Microsoft Intune, but the instructions can be extrapolated to integrate Strategy HyperMobile with a different AppConfig-compliant EMM provider.
Add the Strategy HyperMobile Application and Set Up the Application Configurations
- Log into the VM Workspace ONE UEM Console.
-
Go to Resources > Apps > Native > Public.
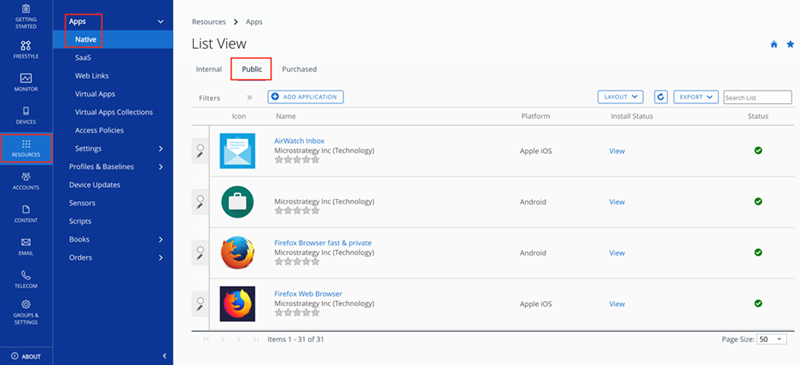
- Click Add Application.
- In the Add Application dialog, choose Apple iOS from the Platform drop-down.
- Select Search App Store as the Source.
-
In the Name field, enter Strategy HyperMobile.
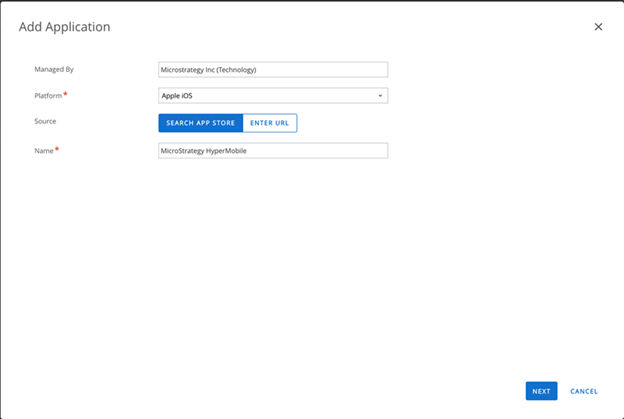
- When the application appears, click on the application.
- On the following screen, click Select to add it.
- Click the Save & Assign button to assign the application to devices.
- On the Add Assignment screen, input a name and assignment groups.
- Modify the assignment from the Restrictions and Tunnel and Other Attributes tabs.
- Go to the Application Configuration tab and enable the Send Configuration toggle.
- Add desired Configuration Keys, Value Types, and found in the Custom Security Settings section.
-
Complete all required fields and click Create to finish the configuration.
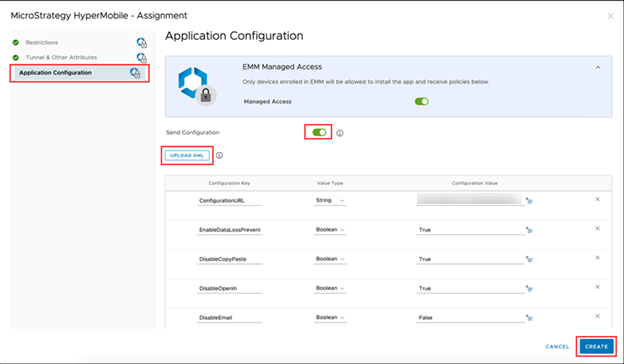
- Publish the app to the devices in the distribution list.
- Log into the Intune portal.
-
Go to Apps > iOS/iPadOS > + Add and select iOS store app from App Type drop-down.
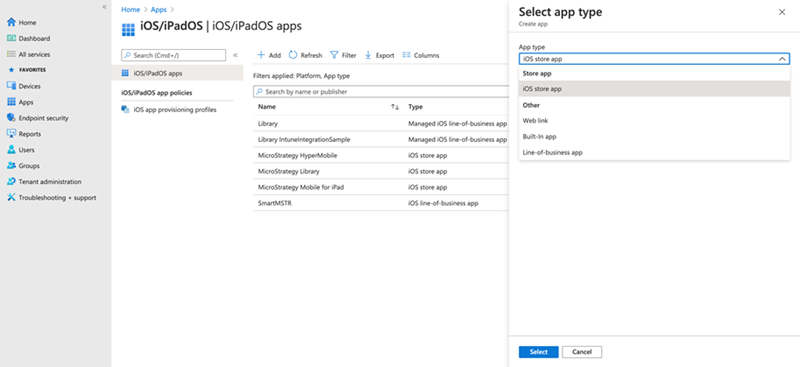
- Tap on Search the Apple Store.
-
Search for Strategy HyperMobile and select the application.
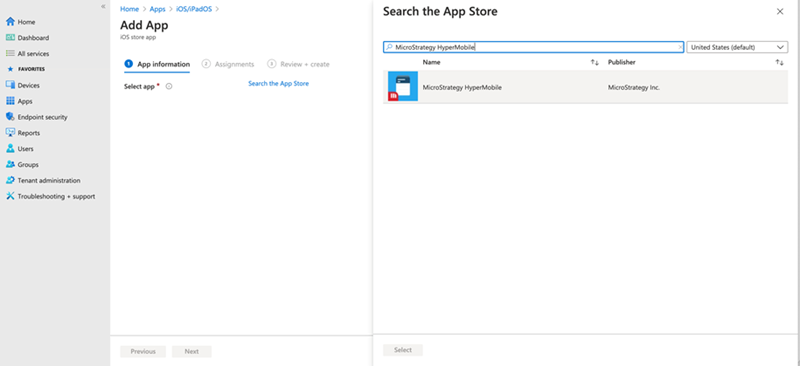
- Fill in App information and Assignments and create the application.
- Go to Apps > App Configuration Policies > + Add and select Managed Devices.
- Input the policy name and platform.
- Select the Strategy HyperMobile app that was created in Steps 1-4 and tap Next.
-
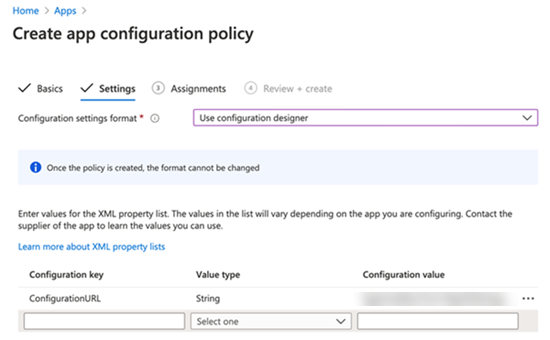
In the Configuration Settings tab, choose Use configuration designer to input customized keys and values found in the Custom Security Settings section.
The sections below explain how to use the AppConfig integration to push configurations to the Strategy HyperMobile app, configure App Tunnel, and configure security restrictions.
App Configuration
With AppConfig, a mobile administrator can define a set of configuration keys that the Strategy HyperMobile app will accept from the EMM server. These configuration keys are defined in the EMM administration console, normally stored as part of a profile assigned to the app for deployment. You can set up these configurations on the VM Workspace ONE UEM Console during the process of application distribution. The EMM provider also has the ability to update the configurations over the air at any point in the future to an existing application, without requiring the app itself to be reinstalled. You can create different profile assignments to deploy the application to different groups of devices, thereby applying different configuration settings to each.
One of the configuration keys that can be pushed to the Strategy HyperMobile app is the ConfigurationURL which is a link to connect to the Library Server, where your Hyper card is deployed. End users are prompted to log in with the corresponding authentication options so that it’s effortless to set up connectivity information.
To set up App Configuration on the VM Workspace ONE UEM Console, during the application and configuration setup described above, set the value of the ConfigurationURL key to the URL that has the configuration information.

Obtain the ConfigurationURL
- Open Strategy Workstation.
- Go to the Environments tab.
- Right-click an environment, choose Properties, and click HyperIntelligence for Mobile Configuration URL.
Certificate Pinning
Certificate pinning helps prevent man-in-the-middle attacks by using a trusted certificate hash to validate the connection to a server. A trusted certificate hash can be passed from an EMM platform, such as VM Workspace One UEM, to be used to verify the identity of the server. To leverage the certificate pinning feature available with AppConfig, navigate to Resources > Apps > Native > Public > Strategy HyperMobile > Assignment. Then, click on the assignment name, navigate to Application Configuration, and supply the certificate hash to the CertificateMap field in the following format:
hostnameA,certificateHashAFor example, the following could be the CertificateMap string.
yourLibraryServer.com,sha256/yourCertificateHashTo support certificate pinning for multiple environments or to provide additional certificate hashes for one host, please separate all hostname,certificateHash pairs with a vertical bar (“|”). For example,
hostnameA,certificateHashA1|hostnameB,certificateHashB|hostnameA,certificateHashA2The certificate hash must begin with sha256/.
Security Policies and Access Control
Organizations require granular security and data loss protection within their enterprise applications to prevent sensitive data and documents from leaking outside company control. For example, an app may include functionality that an enterprise wants to disable for security reasons, such as the ability to synchronize data with a public cloud like Dropbox. AppConfig leverages the out-of-the-box capabilities that iOS provides to enforce security settings and access control on enterprise apps.
Custom Security Settings
In addition to the mobile configuration specified by ConfigurationURL, administrators can restrict the availability of some app features for the purpose of preventing data leakage or data loss. These restrictions are passed to Strategy HyperMobile by adding key-value pairs to the Application Configuration section on the Add Assignment screen. The following restrictions can be added as BOOLEAN key-value pairs:
| Custom Security Keys | Functionality |
| EnableDataLossPrevention | The main switch for all of the app restrictions. Other options, such as DisableEmail or DisableCopyPaste, take effect only when EnableDataLossPrevention is set to true |
| DisableEmail | Disable email functionality across the app (only limited to iOS native mail app) |
| DisableOpenIn | Disable all sharing functionality in Strategy HyperMobile, including sharing of cards or files. Also disable all the links on Hyper cards. |
| DisableCopyPaste | Disable copy or paste options on all text fields and text boxes |
| DisableCameraAccess | Disable the QR code and barcode scanner feature |
| DisableSaveToPhotos | Disable the “Save to Photo“ menu on the iOS native popover when sharing Hyper cards |
| DisableSpotlightSearch | Disable spotlight search functions |
To verify the security settings in Strategy HyperMobile, go to Account > View Log. When viewing the log, you can see the security settings.
App Tunnel
An application may require access to web services residing behind a corporate firewall, which requires a secure App Tunnel. The per-app VPN protocol achieves the goal of a secure App Tunnel. For example, VM Workspace ONE UEM can distribute VPN profiles to its managed devices and let apps such as Strategy HyperMobile set up their own VPNs following the profiles. The VPN settings are included in device profiles on the VM Workspace ONE UEM Console.
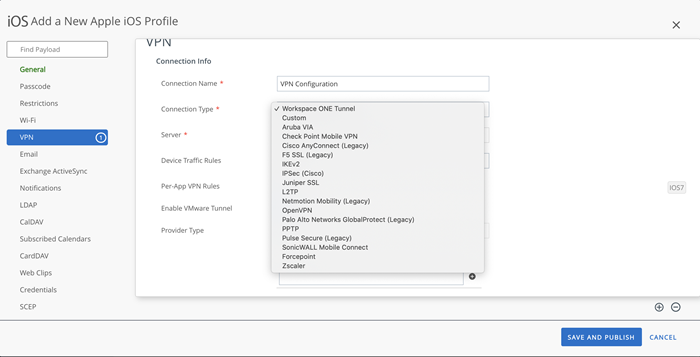
- Create a device profile with AppProxy VPN enabled, and assign it to your device. For example, on the VM Workspace ONE UEM Console, configure and distribute the VPN profile in Devices > Profiles & Resources > Profiles > Add or edit iOS Profile > VPN, where you can specify the domains/hostnames in the profile to auto-trigger the VPN.
-
Configure VPN in the device profile by going to VPN > Configure and setting the Connection Type to the desired VPN.
-
Publish the device profile to your device groups. Set the Assigned Groups in the General page of the device profile and Save & Publish the device profile to your device groups.
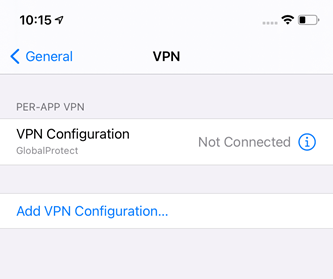
After you have assigned the device profile to your device, you can see all the app-layer VPN settings in Settings > VPN.
-
Configure the Per-App VPN Profile for Strategy HyperMobile and entitle it to use the VPN by choosing its device profile in the Per-App VPN Profile. Click Strategy HyperMobile in Apps > Native. Click Assign and edit the assignment.
- Install the chosen VPN on the device and open it.
- On the Microsoft Intune console, create a configuration profile for VPN:
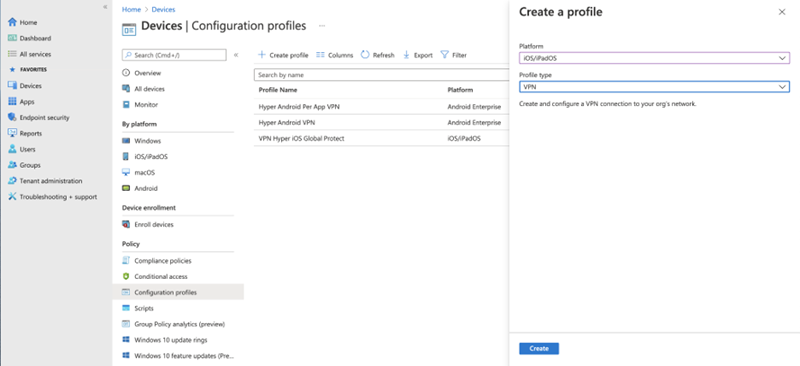
Go to Devices > Configuration profiles > Create profile.
- From the Platform drop-down, choose iOS/iPadOS.
- From the Profile type drop-down, choose VPN.
-
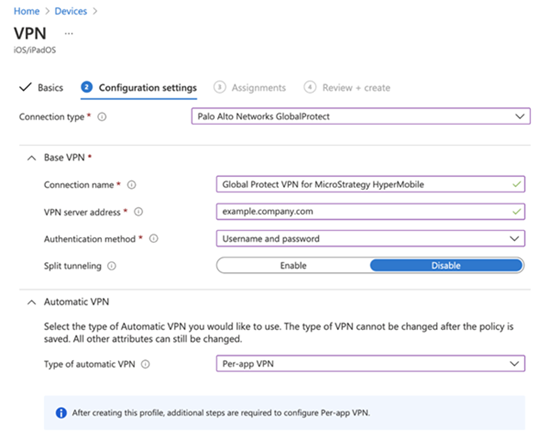
Fill out the relevant basic and configuration settings. Assign the settings to the corresponding groups and create the profile. Here’s an example of the VPN configuration for Palo Alto Networks GlobalProtect.
- From the Type of automatic VPN drop-down, choose Per-app VPN.
-
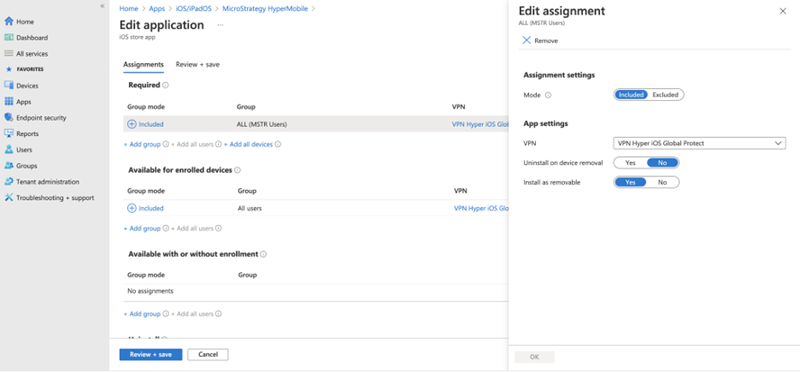
Go to Apps > iOS/iPadOS and edit the Strategy HyperMobile application. Edit Assignment > App Settings > VPN by selecting the VPN profile created in Step 2 and then save the changes.
- Open the chosen VPN application on device.
For more information, please refer to the official Microsoft documentation.
These settings take effect after Strategy HyperMobile is pushed to the device. When Strategy HyperMobile is launched, it automatically connects to the VPN server, and the VPN icon is shown on the left side of the status bar.
- App Configuration
Configure information such as Intelligence Server connectivity, project information, home screen configurations, and general app settings to eliminate the need to educate end users about first time setup.
-
Help prevent man-in-the-middle attacks by providing a trusted certificate hash to help establish a secure connection.
-
Security Policies and Access Control
Restrict apps to run only on approved devices and enforce security policies such as required encryption and data loss prevention at the app level.
-
Selectively enable approved apps to use an app tunnel to connect to backend and corporate networks.
The workflow for integrating Strategy HyperMobile with an EMM provider that supports AppConfig is described below. Examples are given for VM Workspace ONE UEM (formerly AirWatch) and Microsoft Intune, but the instructions can be extrapolated to integrate Strategy HyperMobile with a different AppConfig-compliant EMM provider.
Add the Strategy HyperMobile Application and Set Up the Application Configurations
-
Log into the VM Workspace ONE UEM Console.
-
Go to Resources > Native > Public.
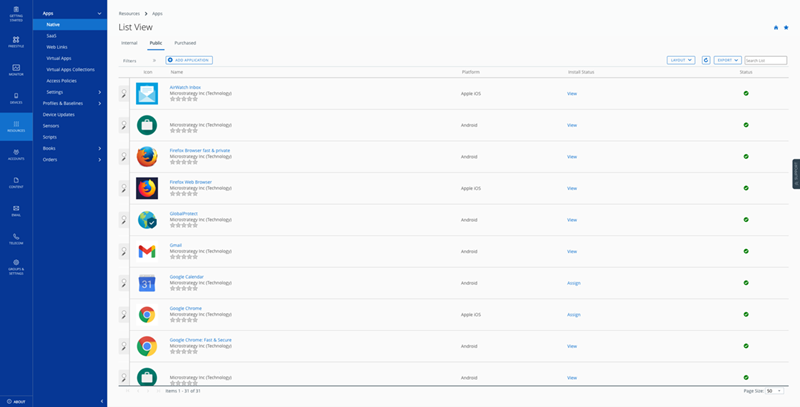
- Click Add Application.
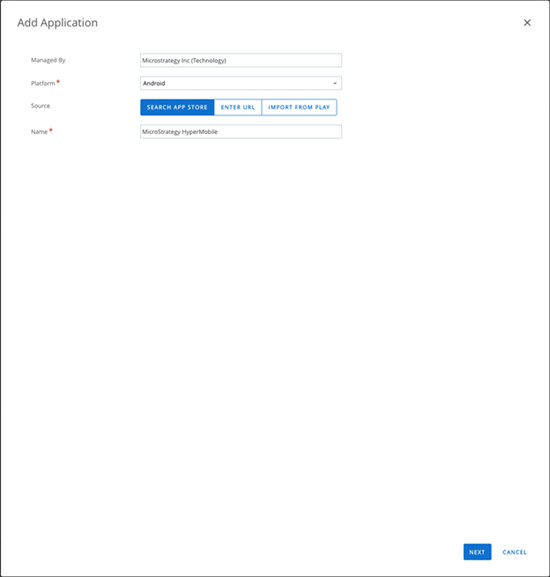
- In the Add Application dialog, choose Android from the Platform drop-down.
- Select Search App Store as the Source.
-
In the Name field, enter Strategy HyperMobile and click Next.
-
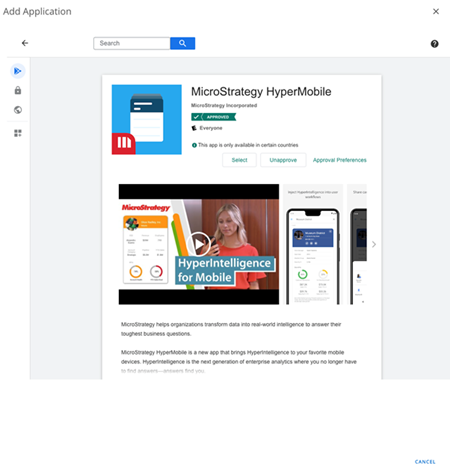
When the application appears, click on the application and then Select on the following screen to add it.
-
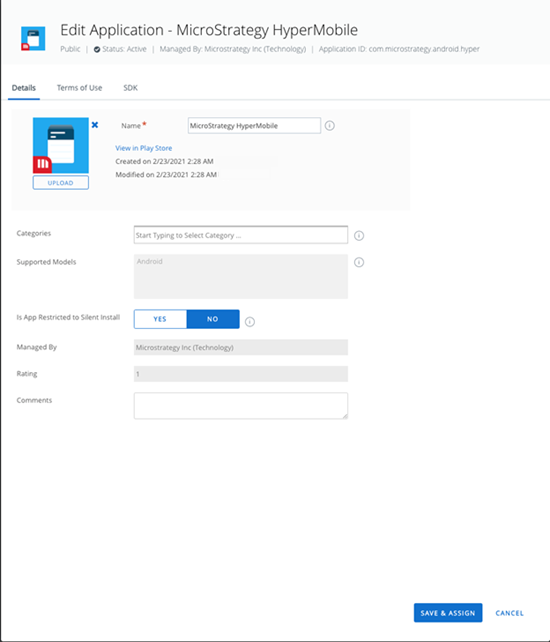
Click the Save & Assign button to assign the application to devices.
-
On the Assignment screen, input a name and assignment groups.
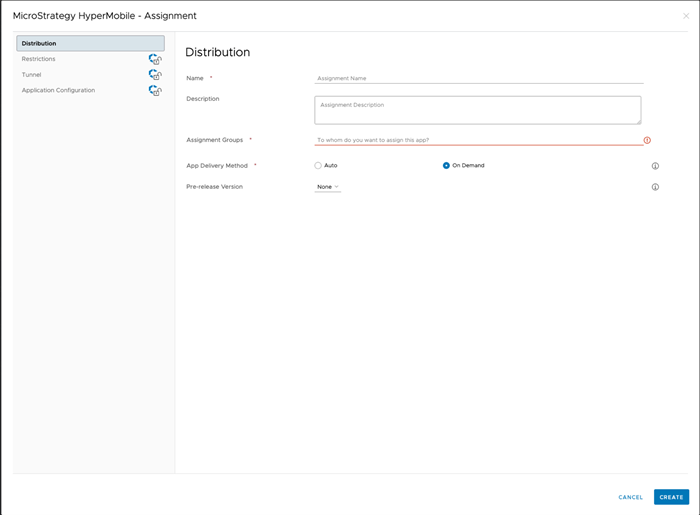
- Go to the Application Configuration tab and enable the Send Configuration toggle.
-
Complete all required fields and click Create to finish the configuration.
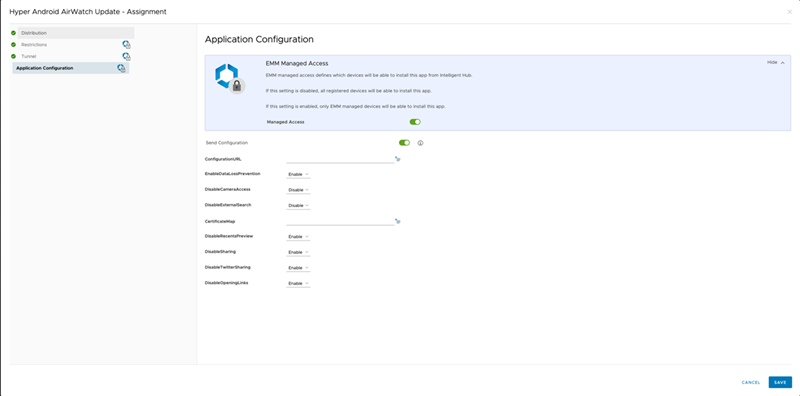
- Publish the app to the devices in the distribution list.
- Log into the Intune portal.
- Go to Apps > Android and click + Add.
-
In the App type drop-down, choose Managed Google Play app then click Select.
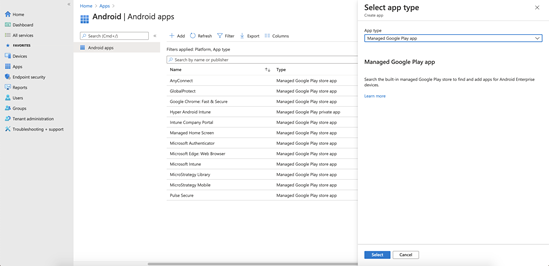
- In the Google Play search bar, search for Strategy HyperMobile.
-
Click on the Strategy HyperMobile app in the results and click on the Approve button.
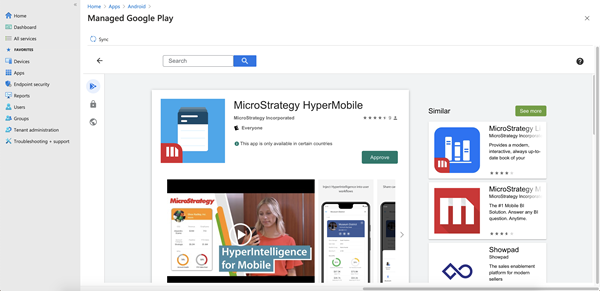
- Click the Sync button in the upper left corner. Strategy HyperMobile should appear in the list of Android apps. If it does not appear, click on the Refresh button to refresh the app list.
-
Click on the Strategy HyperMobile app, then click on Properties. Find the Assignments section and click Edit. Assign the app to the required groups and users.
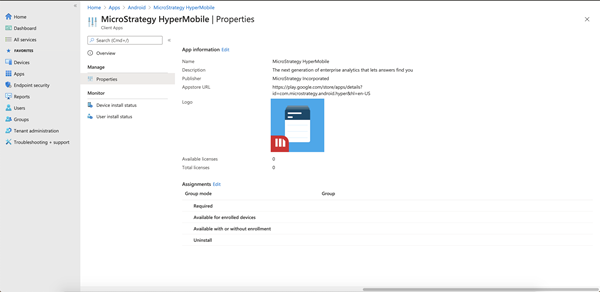
- Go to Apps > App configuration policies and click + Add > Managed devices.
-
Give the configuration a name. In the Platform drop-down, choose Android Enterprise. In the Profile Type drop-down, choose an option. For the Targeted app, choose Strategy HyperMobile and click Next.
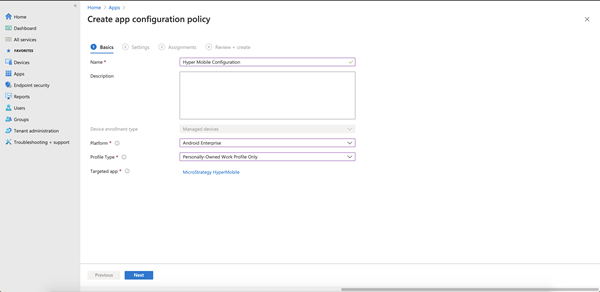
- In the Configuration Settings, choose Use configuration designer and click + Add.
-
In the panel on the right, the available configuration keys for the Strategy HyperMobile app appears. Check the box for the keys to be added and click OK.
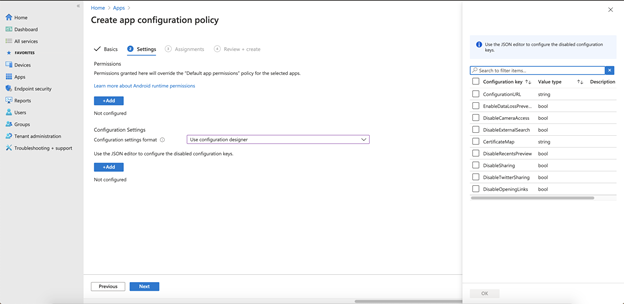
- Fill in the Configuration value for the chosen Configuration keys and click Next.
- On the Assignments page, assign the app configuration to the required groups, users, and devices.
- On the last screen, click Create. The app configuration is applied to the specified groups, users, and devices for the Strategy HyperMobile app.
The sections below explain how to use the AppConfig integration to push configurations to the Strategy HyperMobile app, configure App Tunnel, and configure security restrictions.
App Configuration
With AppConfig, a mobile administrator can define a set of configuration keys that the Strategy HyperMobile app will accept from the EMM server. These configuration keys are defined in the EMM administration console, normally stored as part of a profile assigned to the app for deployment. You can set up these configurations on the VM Workspace ONE UEM Console during the process of application distribution. The EMM provider also has the ability to update the configurations over the air at any point in the future to an existing application, without requiring the app itself to be reinstalled. You can create different profile assignments to deploy the application to different groups of devices, thereby applying different configuration settings to each.
One of the configuration keys that can be pushed to the Strategy HyperMobile app is the ConfigurationURL which is a link to connect to the Library Server, where your Hyper Card is deployed. End users are prompted to log in with the corresponding authentication options so that it’s effortless to set up connectivity information.
To set up App Configuration on the VM Workspace ONE UEM Console, during the application and configuration setup described above, set the value of the ConfigurationURL key to the URL that has the configuration information.

Obtain the ConfigurationURL
- Open Strategy Workstation.
- Go to the Environments tab.
- Right-click an environment, choose Properties, and click Environment URL.
Certificate Pinning
Certificate pinning helps prevent man-in-the-middle attacks by using a trusted certificate hash to validate the connection to a server. A trusted certificate hash can be passed from an EMM platform, such as VM Workspace One UEM, to be used to verify the identity of the server. To leverage the certificate pinning feature available with AppConfig, navigate to Resources > Apps > Native > Public > Strategy HyperMobile > Assignment. Then, click on the assignment name, navigate to Application Configuration, and supply the certificate hash to the CertificateMap field in the following format:
hostnameA,certificateHashAFor example, the following could be the CertificateMap string.
yourLibraryServer.com,sha256/yourCertificateHashTo support certificate pinning for multiple environments or to provide additional certificate hashes for one host, please separate all hostname,certificateHash pairs with a vertical bar (“|”). For example,
hostnameA,certificateHashA1|hostnameB,certificateHashB|hostnameA,certificateHashA2The certificate hash must begin with sha256/ or sha1/.
Security Policies and Access Control
Organizations require granular security and data loss protection within their enterprise applications to prevent sensitive data and documents from leaking outside company control. For example, an app may include functionality that an enterprise wants to disable for security reasons, such as the ability to synchronize data with a public cloud like Dropbox. AppConfig leverages the out-of-the-box capabilities that Android provides to enforce security settings and access control on enterprise apps.
Custom Security Settings
In addition to the mobile configuration specified by ConfigurationURL, administrators can restrict the availability of some app features for the purpose of preventing data leakage or data loss. These restrictions are passed to Strategy HyperMobile by adding key-value pairs to the Application Configuration section on the Add Assignment screen. The following restrictions can be added as BOOLEAN key-value pairs:
| Custom Security Keys | Functionality |
| EnableDataLossPrevention | The main switch for all of the app restrictions. Other options, such as DisableSharing or DisableCameraAccess, take effect only when EnableDataLossPrevention is set to true |
| DisableSharing | Disable sharing the card image and exporting the log file |
| DisableTwitterSharing | Disable Twitter sharing |
| DisableOpeningLinks | Disable opening links on cards |
| DisableCameraAccess | Disable the QR code and barcode scanner feature |
| DisableRecentsPreview | Disable screenshot on recent apps screen |
App Tunnel
An application may require access to web services residing behind a corporate firewall, which requires a secure App Tunnel. The per-app VPN protocol achieves the goal of a secure App Tunnel. For example, VM Workspace ONE UEM can distribute VPN profiles to its managed devices and let apps such as Strategy HyperMobile set up their own VPNs following the profiles. The VPN settings are included in device profiles on the VM Workspace ONE UEM Console.
-
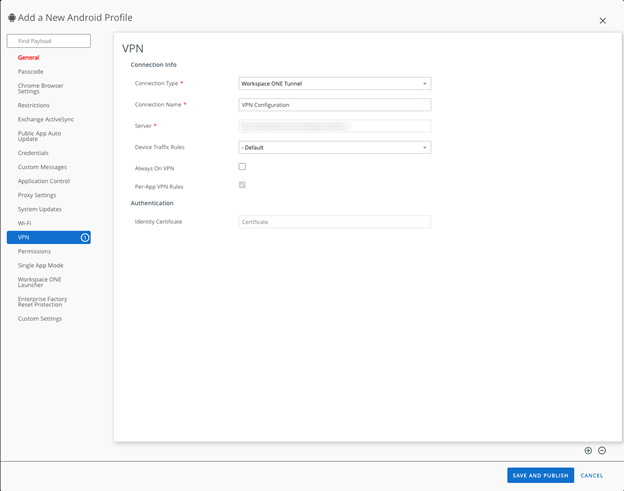
Create a device profile with AppProxy VPN enabled, and assign it to your device. For example, on the VM Workspace One UEM Console, configure and distribute the VPN profile in Resources > Profiles & Baselines > Profiles > Add or edit profile > VPN, where you can specify the domains/hostnames in the profile to auto-trigger the VPN.
-
Configure VPN in the device profile by setting the Connection Type to the desired VPN.
-
Publish the device profile to your device groups. Set the Assigned Groups in the General page of the device profile and Save & Publish the device profile to your device groups.
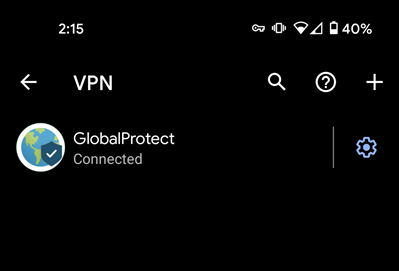
After you have assigned the device profile to your device, you can see all the app-layer VPN settings in Settings > Network & internet > Advanced > VPN.
-
Configure VPN in the device profile by setting the Connection Type to the desired VPN.
-
Publish the device profile to your device groups. Set the Assigned Groups in the General page of the device profile and Save & Publish the device profile to your device groups.
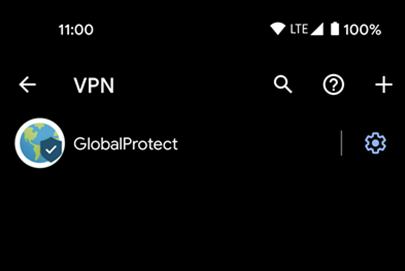
After you have assigned the device profile to your device, you can see all the app-layer VPN settings in Settings > Network & internet > Advanced > VPN.
-
Configure the Per-App VPN Profile for Strategy HyperMobile and entitle it to use the VPN by going to the Assignment page > Tunnel tab. Here, a profile can be selected by choosing Select a Profile for Android devices.
-
Install the chosen VPN on the device and then open it.
- Create a VPN profile. To do this, go to Devices > Configuration profiles and click + Create profile.
- In the Platform drop-down, choose Android Enterprise. In the Profile type drop-down, choose VPN. Click Create.
-
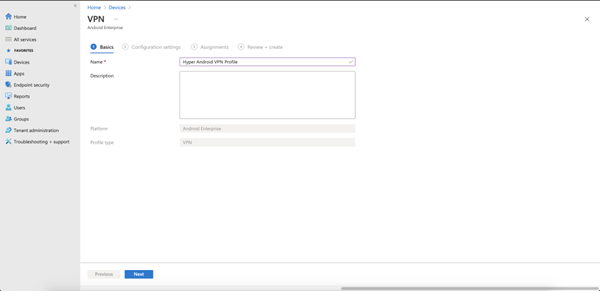
On the Basics screen, provide a Name for the VPN profile and an optional description. Click Next.
-
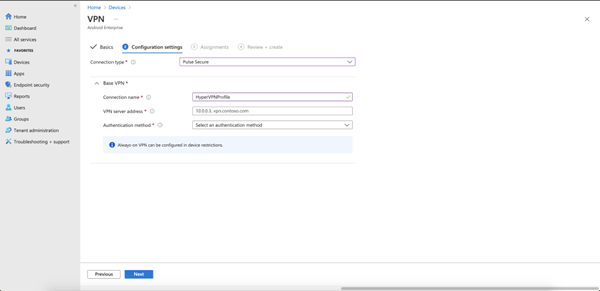
On the Configuration settings screen, choose a Connection type from the drop-down based on your VPN provider.
-
After choosing your VPN provider, there is a section to add your Connection Name, VPN server address, and Authentication method. Take note of the Connection Name, as the name will be needed in a later step. In the screenshot below, the Connection Name is HyperVPNProfile. Click Next.
- On the Assignments screen, add the groups, users, and devices that should use this VPN profile. Click Next.
- On the Review + create screen, click Create.
- Create a custom configuration policy by going to Devices > Configuration profiles and click + Create profile.
- From the Platform drop-down, choose Android Enterprise. In the Profile type drop-down, choose Custom. Click Create.
-
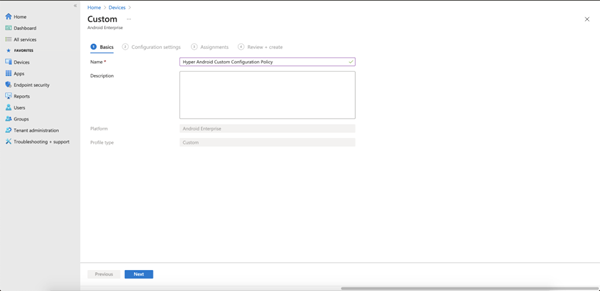
On the Basics screen, provide a Name for the VPN profile and an optional description. Click Next.
-
On the Configuration settings screen, click Add and provide the following values for the setting. Click Save.
- Name: Provide a name for the setting.
- Description: Provide an optional description for the setting.
- OMA-URI: Enter ./Vendor/MSFT/VPN/Profile/*Name*/PackageList, where Name is the connection name noted above. In this example, the string is ./Vendor/MSFT/VPN/Profile/HyperVPNProfile/PackageList.
- Data type: Choose String from the drop-down.
-
Value: Provide the package name for the Strategy HyperMobile for Android app: com.microstrategy.android.hyper.
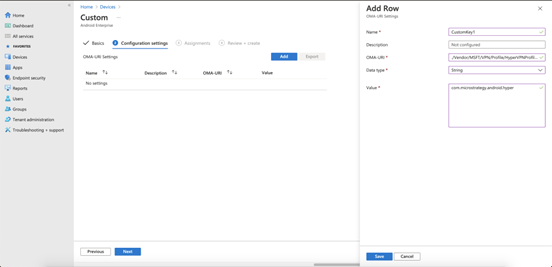
-
Click on the Add button again to add a setting to specify blocked and allowed apps. Provide the following values for the setting. Click Save.
- Name: Provide a name for the setting.
- Description: Provide an optional description for the setting.
- OMA-URI: Enter ./Vendor/MSFT/VPN/Profile/*Name*/Mode, where Name is the VPN profile name you noted above. In this example, the string is ./Vendor/MSFT/VPN/Profile/HyperVPNProfile/Mode.
- Data type: Choose String from the drop-down.
-
Value: Enter BLACKLIST or WHITELIST. Use the BLACKLIST value to enter a list of apps that cannot use the VPN connection. All other apps connect through the VPN. Use the WHITELIST value to enter a list of apps that can use the VPN connection. Apps that aren't on the list don't connect through the VPN
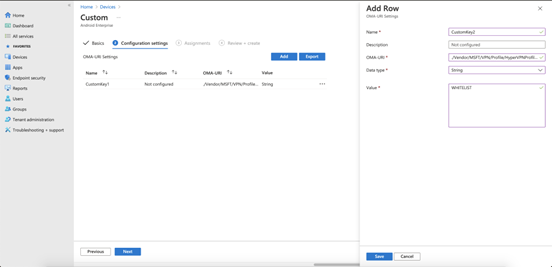
- Click Next. On the Assignments screen, add the groups, users, and devices that should use this custom configuration policy. Click Next.
- On the Review + create screen, click Create.
- Users need to configure the VPN profile on their Android device. Make sure the Android app for the VPN provider has been added as an approved app through Intune so that users can install it on their device.
-
Open the Intune Company Portal app. Under Devices, select your device name. Click Check device settings. The device will sync with the server to get the VPN profile and custom configuration policy.
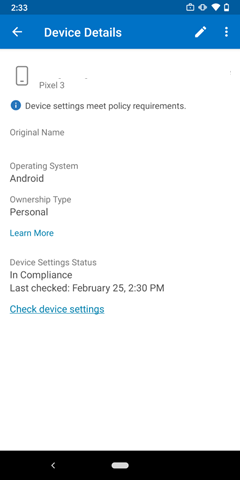
-
Open the app for your VPN provider. You should see that the VPN profile has been installed on the device. The Strategy HyperMobile for Android app should now use this VPN profile.
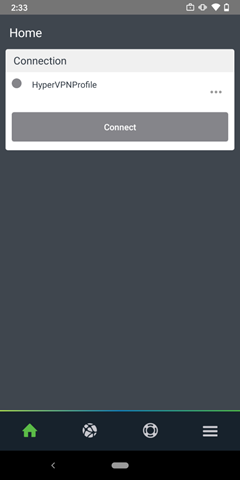
For more information, please refer to the official Microsoft documentation.
These settings take effect after Strategy HyperMobile is pushed to the device. When Strategy HyperMobile is launched, it automatically connects to the VPN server and a key icon appears in the status bar.
