Strategy One
Custom Group Editor
Using custom groups, you can group attribute elements in a way that is not defined in the data warehouse. A custom group is a report object made up of an ordered collection of components called custom group elements, each consisting of a header and one or more qualifications that must be met for data to be included in the custom group element.
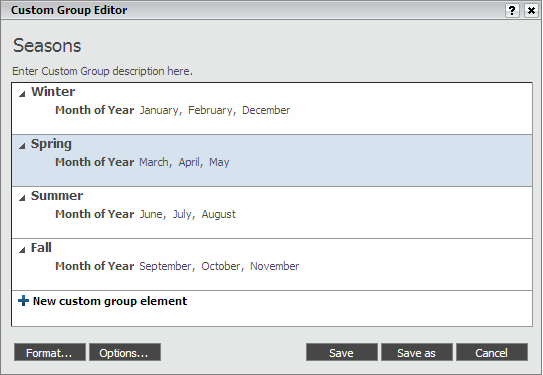
For example, you want to display data in a report for each season in a year. You can create a custom group with elements representing each season, such as Winter and Spring, then add a condition to each custom group element to display data only for months in a specific season. In the image below, the Winter custom group element displays data for the months of December, January, and February, the Spring element displays data for March, April, and May, and so on.

You can combine different types of filtering qualifications in the same custom group element. For example, you can combine "Region = Northeast" (an attribute qualification) with "Revenue > $1 million" (a metric qualification). Each set of conditions resolves into a list of custom group elements after the report is run.
For more information and examples of custom groups, see the Advanced Reporting Help. For information on qualifications in general, see the sections on filters in the Basic Reporting Help and the Advanced Reporting Help.
You must have the Web Use Custom Group Editor privilege to access the Custom Group Editor.
To Create a Custom Group
- On any page, click Create on the icon bar on the left, and then click New Custom Group. The Custom Group Editor is displayed.
- Type a name for the custom group in the Enter Custom Group name here field.
- Type a description for the custom group in the Enter Custom Group description here field.
To Define Custom Group Elements
- Click New Custom Group Element. The Condition Editor opens.
- Define conditions to use to filter data by selecting an attribute, metric, report, or filter, then specifying the appropriate options. For detailed steps to define a condition, see Condition Editor.
- If you create multiple conditions
for the element, you can:
- Change the order that the conditions are evaluated. Conditions at the top of the custom group element are evaluated first. Click the name of the condition, then drag it to a new location.
- Change the logical operator between two conditions. Click the operator to change, then select a new logical operator from the menu that is displayed. The operator is changed and the two conditions are grouped together.
- Group conditions to be evaluated together, if the element has at least three conditions. Click the right arrow between the two conditions to group. The conditions are grouped together and indented to the right.
- Ungroup conditions. Click the left arrow between the conditions to be ungrouped. The conditions are ungrouped.
- Specify a name for the custom group element by clicking on the name of the element and typing a name in the field.
- You can determine how the items
in the custom group element are displayed when the element is displayed
in a report or document. Click the Element
Display Options
 icon.
For descriptions of the options, see Element Options Dialog Box. Click Save
to return to the Custom Group Editor.
 - Repeat the steps above, beginning at To Define Custom Group Elements, to define each additional custom group element.
- To move a custom group element, click the custom group element, then drag it to a new location.
To Format and Define the Custom Group
- For each element, you can specify
the font, number, alignment, background color, and borders to use
to display the:
- Element header (the name of the custom group element, which appears in the row or column heading)
- Element value (values appear in the cells of a grid report)
- Individual items header (the individual items in the element)
Individual items value (the data for each individual item)
Click Format. For detailed descriptions of the options, see Format Custom Group Dialog Box. Click OK.
- You can define the custom group,
by specifying the following options:
- The position of individual items in a custom group element (displayed indented or not)
- The position of custom group element names (displayed above or below the individual items in the element)
- Whether subtotals can be displayed
How the custom group interacts with the report filter
Click Options. For descriptions of the options, see Custom Group Options Dialog Box. Click OK.
- Click Save.
Related Topics
Format Custom Group Dialog Box
