Strategy ONE
Customize Agent Display Using the General Panel
Beginning in Strategy One (September 2025), enhanced bots are available out of the box and have been renamed to agents to reflect the improvements and advancements.
-
For details on the 2.0 enhancements, see Agent Enhancements.
Use the General panel to customize the agent's display and behavior to align with specific industry requirements or personal preferences. You can:
-
Customize how the agent displays by changing the agent's name, logo, greeting, colors (using the panel theme), and color palette for visualizations
-
Customize how bar and line charts display in the agent by setting the Y-axis origin and whether data labels display, beginning in Strategy One (June 2025)
-
Enable or disable saving answers as snapshots to refer to later
-
Enable or disable interpretation of your agent answers
-
Enable or disable automatically-generated question suggestions and define how they work
-
Add links to external websites to provide more extensive or detailed information
Customize the Agent's Display
- Create a new agent or open an existing agent and click the Edit
 icon in the upper right.
 - Click the General panel
 .
. 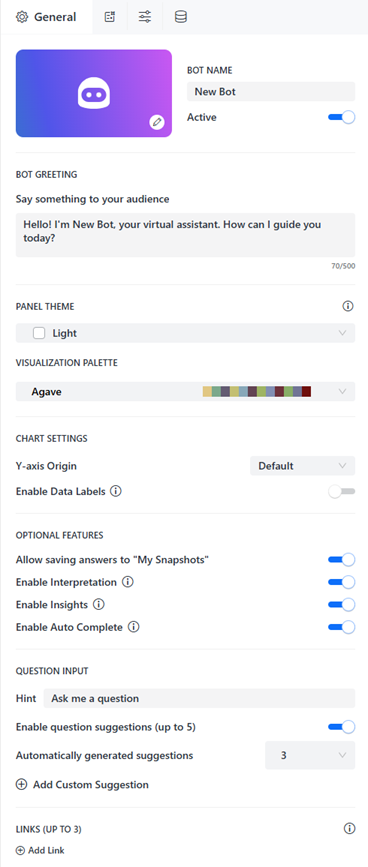
- Customize the display of the agent:
-
Agent Name: Type a name, which can be different than the name displayed in Library. The Agent Name displays within the agent.
You can manually set i18n strings in this field. The Agent Name should not exceed 50 characters.
-
Active: Click the toggle to enable or disable the agent.
When you disable a agent, it is unaffected in authoring mode. Once you click Save, the agent is disabled as indicated by the inactive status message.

-
Agent Cover Image: Click Edit
 to change the cover image that displays in Library. You can select one of the sample images or paste a URL to your own image. Click Save.
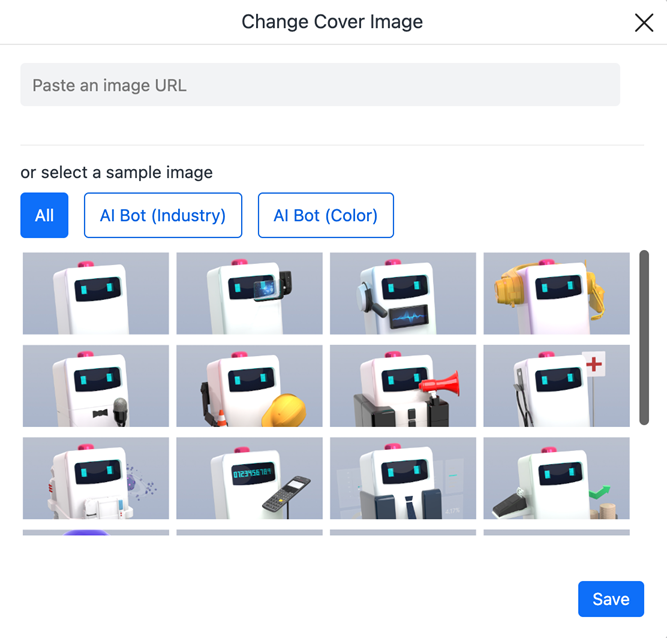
-
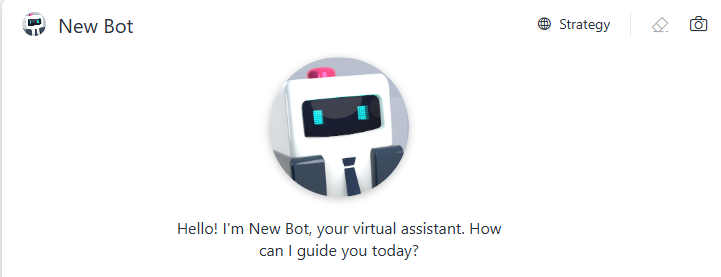
Agent Greeting: Type the greeting text. A greeting can help users by setting expectations regarding the agent's capabilities and purpose while adding a personality.
You can manually set i18n strings in this box. The agent Greeting should not exceed 500 characters.
-
Define the agent's colors:
-
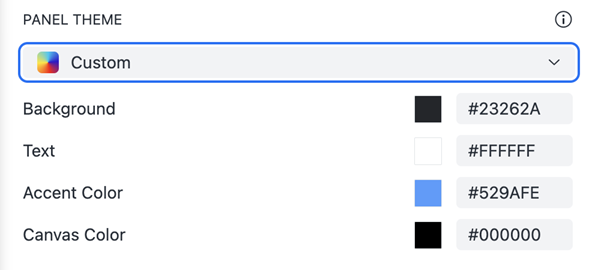
Panel Theme: The panel theme defines the colors for different elements on the agent. In the drop-down list, choose a predefined theme or Custom to create your own theme.
- If you choose Custom, specify a color for the Background, Text, Secondary Color, Accent Color, and Canvas Color by using the color picker or typing a hex code.
The Canvas color displays behind the Background color, like a border.
-
- Visualization Palette: Select the color palette for visualizations created by the agent. A color palette applies to the objects, such as a graph's bar risers or heat map's rectangles, in all visualizations throughout the agent. You can create custom palettes using the Application Editor in Workstation.
-
Beginning in Strategy One (June 2025), you can customize how charts display in the agent with these settings:
- Y-axis Origin: By default, the Y-axis origin of line charts is determined by the lowest values of the data. Select Zero from the drop-down list to set the origin at zero.
- Enable Data Labels: Bar and line charts do not display labels by default. Enable this setting so users can more easily identify data and directly compare values. Beginning in Strategy One (September 2025), if data labels overlap, making them hard to read, some labels are automatically hidden to increase readability. Users can hover over a data point to view the value.
- You can enable or disable saving answers to My Snapshots. When enabled, users can save the agent responses they want to refer back to later in the My Snapshots panel. Click the toggle for Allow Saving Answers to "My Snapshots".
- Beginning in Strategy One (July 2025), you can show the Ask About panel to display the agent's content. The panel lists the available columns and their descriptions (if available), which is helpful if end users are not familiar with the agent's data. For more information, see Explore the Agent's Data Using the Ask About Panel. Click the toggle for Enable "Ask About".
- You can enable or disable interpretation, which provides transparency into how the agent interpreted and executed your question. Viewing the interpretation affirms the logic and criteria used, building trust and confidence in the agent's responses. For more information, see View AI Interpretation. Click the toggle for Enable Interpretation.
- You can enable or disable insights, which provides insights beyond a basic response. Click the toggle for Enable Insights.
- Beginning in Strategy One (June 2025), you can enable or disable auto complete, which displays a list of matching column names as a user types. Using auto complete helps with accuracy because the exact object needed is selected. It helps avoid ambiguity and incorrect responses, especially when multiple objects share a similar name. Click the toggle for Enable Auto Complete.
- Beginning in Strategy One (September 2025), you can enable deep research to answer your queries in the agent. Click the toggle for Enable Research.
- Beginning in Strategy One (December 2025), you can use voice commands to interact with the agent; the agent displays the answers onscreen and reads them aloud. Click the toggle for Enable Voice Agent.
- You can Enable Data Export so you can export data from agent responses.
- If data export is enabled, you can allow Export Full Data so no row limits are imposed on data export.
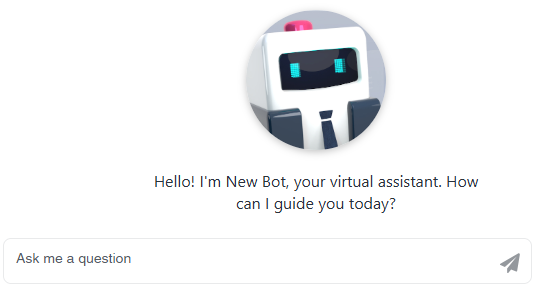
- Type a Hint to display in the input field of the agent. For example, the image below shows the default hint of "Ask me a question".
You can manually set i18n strings in this box. The hint should not exceed 50 characters.
- You can enable or disable question suggestions by clicking the toggle for Enable Question Suggestions. If you enable question suggestions, customize the behavior:
- Automatically Generated Suggestions: Select the number of automatically-generated question suggestions to display. The default is three and the maximum is five.
- Add Custom Suggestion: Click Add
 and type a custom suggestion. You can Delete
  any custom suggestion that you create.
 - Question suggestions are overwritten by prompt visualizations.
- Sometimes the information a user needs might be extensive or detailed. To avoid long text in the chat, you can add a relevant link to an external website. You can add up to three links, which display at the top right of the agent panel. You can Delete
 any link that you create. To add a link:
 - Click Add Link and type a link name, up to 50 characters. This name displays on the agent when Display Format is set to Text Only or Icon + Text. It appears as a tooltip when only the icon is displayed.
- In the drop-down list next to the link's name, select the icon to display. Icons display when Display Format is set to Icon Only or Icon + Text.
- In Paste a URL, type or paste the link's URL.
- In the Display Format drop-down list, choose how the links display on the agent. In the image below, a link displays with a globe icon and the text "Strategy".
- To continue creating or editing an agent, see Create an Agent.