Strategy One
Use Bookmarks in a Dashboard, Document, or Report
Starting in Strategy One (May 2025), you can create, edit, and delete bookmarks in documents and reports.
Bookmarks allow you to save personal views unique to analysis. In addition to filters, bookmarks store a series of manipulations (such as in-canvas filtering, drilling, or sorting). You can easily save and view multiple bookmarks.
- Web
- Mobile

Add a Bookmark
Click Bookmarks
 .
.- Click Add New.
- Enter a name for the bookmark and click OK.
Rename or Delete a Bookmark
- Click Bookmarks
 .
. - On an existing bookmark, click Edit
 to rename the bookmark.
 - Click Delete
 to remove the bookmark.
Use a Bookmark
- Click Bookmarks
 .
. - Click a specific bookmark. The saved prompt answers or manipulations are applied.
Share a Bookmark
The Collaboration license is required to share bookmarks.
Do one of the following:
Click Bookmarks
 . Hover over an existing bookmark and click Share This Bookmark
  .
. From the Share
 menu, select Share Dashboard, Share Document, or Share Report.
- In the Share window, select the Include Bookmark check box, if it is not already selected.
- From the drop-down list, choose your bookmarks. You can select a single bookmark, multiple bookmarks, or All bookmarks,
- Add at least one recipient.
- If the application designer allowed it, you can grant permission to the dashboard, document, or report for the recipients. From the drop-down list, select the permission.
- Type an optional message.
Do one of the following:
To send the bookmarks, click Share.
To share the bookmarks using a link, click Copy.
Once the user accepts a shared bookmark, the shared icon
 appears next to your bookmark, signifying that it has been shared with other users. Recipients receive updates when the bookmark is modified.
Recipient of a Shared Bookmark
Click on View from an email notification or Accept in the Notification panel.
You can delete the email to ignore the bookmarks or click Ignore in the Notification panel. This will not add the bookmarks to the Bookmark panel.
If the dashboard, document, or report is not already in your Library, click Add to Library.
After adding the object to your Library, a notification on the Bookmark icon appears, signifying that new bookmarks are available in the Bookmark panel.
If the object is already in your Library, the first bookmark is automatically applied.
If more than one bookmark was sent, the first is applied and the others appear as New in the Bookmark panel. You can delete them at any time. If the author of the bookmark makes updates, the bookmark appears as Updated.
Add a Bookmark
- Tap Bookmarks
 .
. - Tap Add New.
- Enter a name for the bookmark and tap Done.
Delete a Bookmark
- Tap Bookmarks
 .
. - Tap Edit.
- Select the bookmark and tap Delete.
Use a Bookmark
- Tap Bookmarks
 .
. - Tap a specific bookmark. The saved prompt answers or manipulations are applied.
Pre-cache a Bookmark
Starting in MicroStrategy ONE (December 2024), you can pre-cache a single bookmark so that it is available for offline use in iOS Mobile. Starting in Strategy One (March 2025), you can pre-cache a single bookmark so that it is available for offline use in Android Mobile. When a bookmark is available for offline use, a green check displays next to it in the Bookmarks list.
Tap Bookmarks
 .
.- Swipe left on a bookmark and tap More.
- Tap Pre-cache
 .
.
Once the pre-cache download is complete, a notification displays indicating that the bookmark is available for offline use.
You can also pre-cache multiple bookmarks.
Tap Bookmarks
 .
.- Tap Edit.
- Select the bookmarks to download and then tap Pre-cache
 .
.
Once the pre-cache download is complete, a notification displays indicating that the bookmarks are available for offline use.
Share a Bookmark
The Collaboration license is required to share bookmarks.
Tap Bookmarks
 .
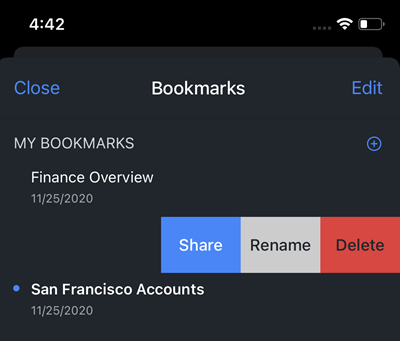
.- Swipe left on a bookmark to view the Share option.
- Tap Share.
- From the drop-down list, choose your bookmarks.
- Add recipients and a message.
Tap Send to send the bookmarks or copy the link.
Once the user accepts a shared bookmark, the shared icon
 appears next to your bookmark, signifying that it has been shared with other users. Recipients will receive updates the bookmark is modified.
 You can use the More option to share the bookmarks through native messaging or other applications.
Recipient of a Shared Bookmark
Click on View from an email notification or Accept in the Notification panel.
You can delete the email to ignore the bookmarks or click Ignore in the Notification panel. This will not add the bookmarks to the Bookmark panel in your dashboard, document, or report.
If the object is not already in your Library, click Add to Library.
After adding the object to your Library, a notification on the Bookmark icon appears, signifying that new bookmarks are available in the Bookmark panel.
If the object is already in your Library, the first bookmark is automatically applied.
If more than one bookmark was sent, the first is applied and the others appear as New in the Bookmark panel. You can delete them at any time. If the author of the bookmark makes updates, the bookmark appears as Updated.

