Strategy ONE
Displaying MicroStrategy Intelligence Server Statistics
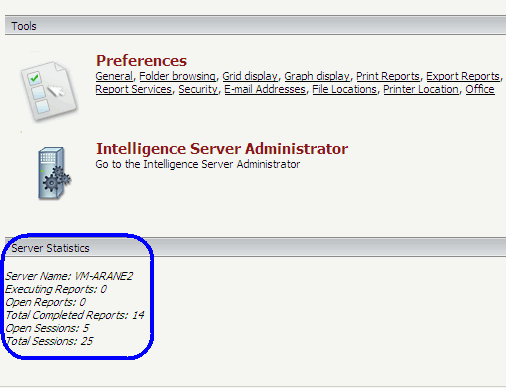
The Performance Monitor API allows you to gather several different statistics from MicroStrategy Intelligence Server and display them on any MicroStrategy Web page. There are several different counters provided by the Performance Monitor API for tracking MicroStrategy Intelligence Server statistics. You can display statistics such as the number of the reports that are currently being executed, total number of executed reports, and current number of sessions. See ServerStatisticsBeanImpl.java for a list of all the available counters.
In this customization scenario, you modify the Desktop page to display different statistics from MicroStrategy Intelligence Server in the content section of the page. You accomplish this by creating a monitor bean, adding different counters to monitor activity on MicroStrategy Intelligence Server, retrieving their values, and displaying them in MicroStrategy Web page. You must have administrative privileges to perform this customization.
This scenario customizes the Desktop page, but you can perform the same customization on any other page.
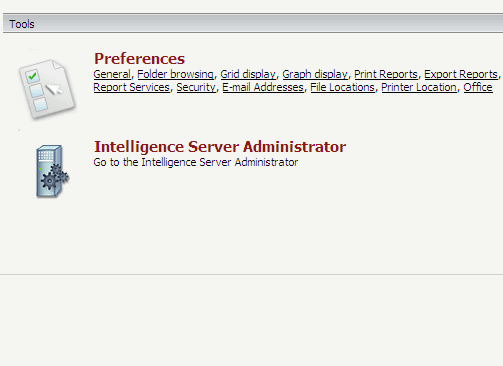
Before customization:

After customization:

This customization can be accomplished using either of the following methods:
Deploying the plug-in provided with MicroStrategy SDK
MicroStrategy SDK provides a plug-in (ZIP file) that can simply be extracted to thepluginsfolder to view the customization in MicroStrategy Web. The following steps guide you in locating the plug-in and deploying it.
-
Access the plug-in: JSP version or ASP .NET version.
-
Extract the plug-in to the plugins subfolder inside the MicroStrategy Web installation folder.
-
Launch MicroStrategy Web to view the customization.
Using the Web Customization Editor to create a plug-in
MicroStrategy SDK provides a Web Customization Editor that can be used to create a customization plug-in. The following steps guide you in creating the plug-in and deploying it.
-
Create a new plug-in and give it a meaningful name. For example: DisplayingIServerStats.
-
Exit the Web Customization Editor.
-
Use the Eclipse IDE to create a custom monitor bean. The sample ServerStatisticsBean.java contains the code for this custom monitor bean.
-
Compile ServerStatisticsBean.java and place the class file inside the classes folder of this customization plug-in adhering to the package structure. For example: plugins\DisplayingIServerStats\WEB-INF\classes\com\microstrategy\sdk\samples\beans.
-
If the Web Customization Editor is closed, launch it again and access your plug-in.
-
Click on MicroStrategy Web Configuration inside the Application Settings view to expand the hierarchical tree. The expanded list comprises the different settings that can be modified to perform customizations.
-
Right-click Styles and select Create Transform to launch the Transform Creation Wizard.
-
Click Browse... next to the Source folder text field to select the src folder and click OK.
-
Enter the following information for the rest of the text fields.
Package: com.microstrategy.sdk.samples.transforms
Name: ServerStatisticsTransform
Transform description: This transform displays Intelligence Sever statistics
Superclass: com.microstrategy.web.app.transforms.AbstractAppTransform
-
Click Next.
-
Click the radio button for Uncheck all methods.
-
Click Next.
-
Click Finish. ServerStatisticsTransform.java opens in the editor. The sample, ServerStatisticsTransform.java, contains the entire code for this custom transform. You can use this code in ServerStatisticsTransform.java that is open for editing.
-
Save your changes.
-
Exit the Web Customization Editor.
-
Use the Eclipse IDE to create an implementation of the custom monitor bean. The sample ServerStatisticsBeanImpl.java contains the code for this custom monitor bean.
-
Compile ServerStatisticsBeanImpl.java and place the class file inside the classes folder of this customization plug-in adhering to the package structure. For example: plugins\DisplayingIServerStats\WEB-INF\classes\com\microstrategy\sdk\samples\beans.
-
If the Web Customization Editor is closed, launch it again and access your plug-in.
-
Click on MicroStrategy Web Configuration inside the Application Settings view to expand the hierarchical tree. The expanded list comprises the different settings that can be modified to perform customizations.
-
Right-click Styles and select New Style to launch the Style Creation Wizard.
-
Make the following entries.:
Name: ServerStatisticsStyle
Description: Style: Display statistics for the MicroStrategy Intelligence Server to admin users
Transform: ServerStatisticsTransform -
Click Next.
-
Do not select transform parameters, and click Next.
-
Do not select any layout definition file, and click Next.
-
Click Finish.
-
Navigate to Pages->desktop (Desktop).
-
Double-click desktop (Desktop) page.
-
Click the Template Properties tab at the bottom in the right frame to make changes to the Default page template.
-
Right-click the content page section and select Edit current file.
-
Click the Yes button in the prompt to edit Desktop_Content.jsp/ascx.
-
Add the following code shown in bold below directly before the <table> that displays the version information.:
J2EE environment:
Copy...
<div class="mstrProjectStatus"><web:displayBean bean="projectStatus"/></div>
</web:else></web:ifBeanValue>
</web:then></web:ifBeanValue>
<web:ifShowAdminPage >
<web:then>
<div class="desktopSection" id="dktpSectionTools">
<div class="mstrDesktopSectionTitle">Server Statistics</div>
<web:displayBean bean="serverStatistics"/>
</div>
</web:then>
</web:ifShowAdminPage >
<table class="mstrVersionInfoLink"><tr><td align="right">
<web:urlEvent eventID="com.microstrategy.web.app.beans.EnumServletEvents.WebEventOpenAbout"><web:descriptor key="mstrWeb.2564" desc="Version information..."/></web:urlEvent><br />
</td></tr>
</table>.NET environment:
Copy...
<div class="mstrProjectStatus"><web:displayBean runat="server" bean="projectStatus"/></div>
</web:melse></web:ifBeanValue>
</web:mthen></web:ifBeanValue>
<web:ifShowAdminPage runat="server" >
<web:mthen runat="server">
<div class="desktopSection" id="dktpSectionTools">
<div class="mstrDesktopSectionTitle">Server Statistics</div>
<web:displayBean runat="server" bean="serverStatistics"/>
</div>
</web:mthen>
</web:ifShowAdminPage >
<table class="mstrVersionInfoLink">
<tr><td align="right">
<web:urlEvent runat="server" eventID="com.microstrategy.web.app.beans.EnumServletEvents.WebEventOpenAbout"><web:descriptor runat="server" key="mstrWeb.2564" desc="Version information..."/></web:urlEvent><br />
</td></tr>
</table> -
Save your changes.
-
Navigate to Pages->desktop (Desktop)->Beans.
-
Right-click on Beans and select New Bean to launch the New Web Bean Wizard.
-
Enter the following information:
Name: serverStatistics
Fully qualified bean class: com.microstrategy.sdk.samples.beans.ServerStatisticsBeanImpl
Persist Mode: None -
Click Next.
-
Do not select any Web Features, and click Next.
-
Select No to specify that custom event handler is not used for this bean.
-
Click Next.
-
Do not select any initialization parameters, and click Next.
-
Do not select any request parameters, and click Next.
-
Click Finish. serverStatistics opens in the Bean Properties editor.
-
Click Bean Styles in the editor.
-
Click Add below the text area for styles.
-
Select ServerStatisticsStyle and click >>.
-
Click OK.
-
Save your changes.
-
Launch MicroStrategy Web to view the customization.
See Also
-
Fundamentals of customization: Page Configuration file
-
Fundamentals of customization: Style Catalog Configuration file
