Strategy ONE
Retrieving Report XML in a Custom Format
Integrating MicroStrategy functionality into an external application can require you to provide MicroStrategy report XML in a custom format such as XBRL, FinXML, Accounting XML, etc. so that it can be consumed by the external application.
In this customization scenario, you extract data from MicroStrategy Web and render it in a sample custom XML format. Since different applications have different data input requirements (that is, they each specify the particular XML format which they can consume), you must modify the code sample provided for the transform in this customization scenario so that it renders report data in the particular XML format (such as XBRL, FinXML, Accounting XML, etc.) required in your environment.
It is important to note that this customization scenario is applicable only for reports that are displayed in a tabular mode and only for reports that do not have merged row headers. A report in a tabular mode is defined as a report that has only attributes in rows and only metrics in columns. Reports displayed in a non-tabular mode and reports with merged row headers do not return the correct report XML.
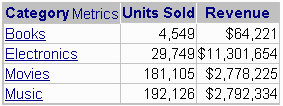
The diagrams below show a tabular report displayed in MicroStrategy Web and its corresponding report data in the custom XML format produced by the code samples used in this customization scenario. The <error> node in the report XML displays "Error message" on the report if an error is thrown. In the sample tabular report shown below, there is no error and thus no error message. This scenario uses the Units Sold, Revenue by Category report in Shared Reports>MicroStrategy Platform Capabilities>MicroStrategy SDK inside of MicroStrategy Tutorial.
MicroStrategy report data rendered as a grid in MicroStrategy Web:
MicroStrategy report data rendered in a custom XML format in MicroStrategy Web:
<?xml version="1.0" encoding="utf-8" ?>
<mstr-report>
  <information>
    <report-name>Units Sold, Revenue by Category</report-name>
    <report-id>433CD21B4AD6168A2C952E985039CEE9</report-id>
    <report-desc />
    <number-of-rows>4</number-of-rows>
    <number-of-cols>2</number-of-cols>
    <message-id>8DA6A5964CF1008C9927A692EE8C94F5</message-id>
    <state-id>0</state-id>
    <block-begin>1</block-begin>
    <block-count>-1</block-count>
  </information>
  <report-data>
    <titles>
      <col index="1">Category</col>
      <col index="2">Units Sold</col>
      <col index="3">Revenue</col>
    </titles>
    <rows>
      <row index="1">
        <col index="1">Books</col>
        <col index="2">249,600</col>
        <col index="3">$4,024,235</col>
      </row>
      <row index="2">
        <col index="1">Electronics</col>
        <col index="2">170,940</col>
        <col index="3">$58,837,793</col>
      </row>
      <row index="3">
        <col index="1">Movies</col>
        <col index="2">202,954</col>
        <col index="3">$3,188,745</col>
      </row>
      <row index="4">
        <col index="1">Music</col>
        <col index="2">156,972</col>
        <col index="3">$2,315,694</col>
      </row>
    </rows>
  </report-data>
</mstr-report>
This customization can be accomplished using either of the following methods:
Deploying the plug-in provided with MicroStrategy SDK:
MicroStrategy SDK provides a plug-in (ZIP file) that can simply be extracted to the plugins folder to view the customization in MicroStrategy Web. The following steps guide you in locating the plug-in and deploying it.
-
Access the plug-in: JSP version or ASP .NET version.
-
Extract the plug-in to the plugins subfolder inside the MicroStrategy Web installation folder.
-
Launch the Task Administrator application.
The domain where you are running the Task Administrator application and the domain of the MicroStrategy server must be the same. If the domains don't match, the browser will not allow the javascript request to go through and you will get an error.
-
Click the Builder tab at the top.
-
Select reportDataService from the Task ID drop-down menu.
-
Select xml from the Task Envelope drop-down menu.
-
Select xml [Default] from the Task Content Type drop-down menu.
-
Enter appropriate values for the following parameters and check the Include box:
-
server: The value should be the IP address or name of your MicroStrategy server::
The domain where you are running the Task Administrator application and the domain of the MicroStrategy server must be the same. If the domains don't match, the browser will not allow the javascript request to go through and you will get an error.
- styleName: For this example, the value for this should be the CustomXMLReportStyle style that you created above.
- project: For this example, the value should be MicroStrategy Tutorial.
- userid: The value should be administrator.
- password: The value should be blank.
- reportID : For this example, the value should be 433CD21B4AD6168A2C952E985039CEE9 if you are using the Units Sold, Revenue by Category report in Shared Reports>MicroStrategy Platform Capabilities>MicroStrategy SDK inside of MicroStrategy Tutorial).
The values for the remaining parameters can be left blank or you can add values relevant to your customization.
-
-
Click the Update URL button to generate the URL.
-
Click the Invoke URL button to retrieve the Task Response.
Using the Web Customization Editor to create a plug-in
MicroStrategy SDK provides a Web Customization Editor that can be used to create a customization plug-in. The following steps guide you in creating the plug-in and deploying it.
-
Click on MicroStrategy Web Configuration inside the Application Settings view to expand the hierarchical tree. The expanded list comprises the different settings that can be modified to perform customizations.
-
Right-click Styles and select Create Transform to launch the Transform Creation Wizard.
-
Click Browse... next to the Source folder text field to select the src folder and click OK.
-
Enter the following information for the rest of the text fields.
- Package: com.microstrategy.sdk.samples.transforms
- Name: CustomXMLReportTransform
- Transform description: This transform renders a simplified version of the report xml
- Superclass: com.microstrategy.web.transform.AbstractTransform
- Package: com.microstrategy.sdk.samples.transforms
-
Click Next.
-
Click the radio button for Uncheck all methods.
-
Click Next.
-
Click Finish. CustomXMLReportTransform.java opens in the editor. The sample, CustomXMLReportTransform.zip, contains the entire code for this custom transform. You can use this code in CustomXMLReportTransform.java that is open for editing. This custom transform parses the ReportBean and renders its properties in a specified XML format.
-
Save your changes.
-
Right-click Styles and select New Style to launch the Style Creation Wizard.
-
Make the following entries.
- Name: CustomXMLReportStyle
- Description: Style: Display report in xml format
- Transform: CustomXMLReportTransform
- Name: CustomXMLReportStyle
-
Click Next.
-
Click Next.
-
Click Finish.
-
Save your changes.
-
Exit the Web Customization Editor.
-
Launch the Task Administrator application.
-
Click the Builder tab at the top.
-
Select reportDataService from the Task ID drop-down menu.:
This task automatically logs you out after retrieving the report XML. If you wish to keep the login session open, use thereportExecute task along with the getSessionState task.
-
Select xml from the Task Envelope drop-down menu.
-
Select xml [Default] from the Task Content Type drop-down menu.
-
Enter appropriate values for the following parameters and check the Include box:
-
server: The value should be the IP address or name of your MicroStrategy server.:
he domain where you are running the Task Administrator application and the domain of the MicroStrategy server must be the same. If the domains don't match, the browser will not allow the javascript request to go through and you will get an error.
- styleName: For this example, the value for this should be the CustomXMLReportStyle style that you created above.
- project: For this example, the value should be MicroStrategy Tutorial.
- userid: The value should be administrator.
- password: The value should be blank.
- reportID : For this example, the value should be 433CD21B4AD6168A2C952E985039CEE9 if you are using the Units Sold, Revenue by Category report in Shared Reports>MicroStrategy Platform Capabilities>MicroStrategy SDK inside of MicroStrategy Tutorial).
The values for the remaining parameters can be left blank or you can add values relevant to your customization.
-
-
Click the Update URL button to generate the URL.
-
Click the Invoke URL button to retrieve the Task Response.
See Also