Strategy ONE
Applying a Bulleted List View on Folder Browsing Pages
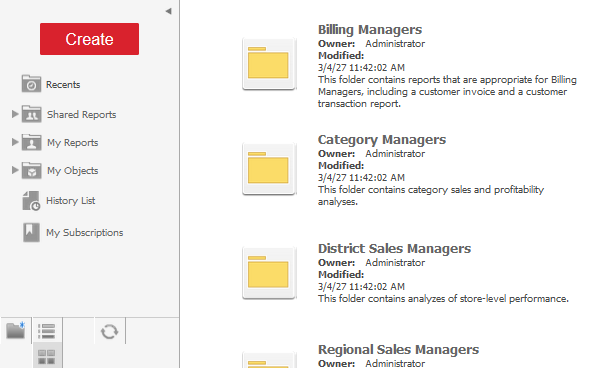
By default, the folder contents on a MicroStrategy Web Folder Browsing page can be viewed in either the List View mode or the Large Icon View mode. However, there may be instances in which you want to view the folder contents in a different customized presentation.
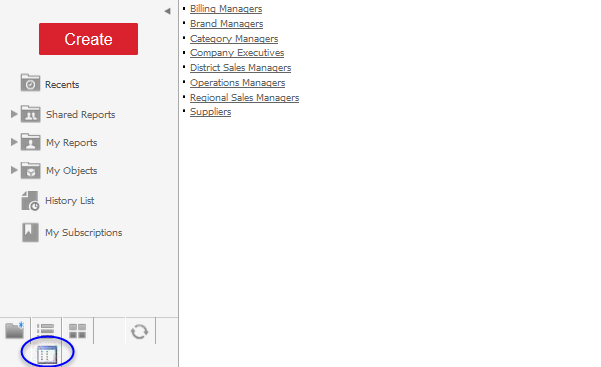
In this customization scenario, you add a custom view mode— called "Bulleted List View"— that displays the folder contents in a bulleted list format. You also add a new icon to represent this Bulleted List View so it can be selected similar to the List View and Icon View.
Before customization:

After customization:

This customization can be accomplished using either of the following methods:
Deploying the plug-in provided with MicroStrategy SDK
MicroStrategy SDK provides a plug-in (ZIP file) that can simply be extracted to thepluginsfolder to view the customization in MicroStrategy Web. The following steps guide you in locating the plug-in and deploying it.
-
Access the plug-in: JSP version or ASP .NET version.
-
Extract the plug-in to the plugins subfolder inside the MicroStrategy Web installation folder.
-
Launch MicroStrategy Web to view the customization.
If you decide not to keep this customization, then before removing this plug-in from the plugin folder, switch to Icon View or List View and then remove the plug-in.
Using the Web Customization Editor to create a plug-in
MicroStrategy SDK provides a Web Customization Editor that can be used to create a customization plug-in. The following steps guide you in creating the plug-in and deploying it.
-
Create a new plug-in and give it a meaningful name. For example: ApplyingABulletedListView.
-
Navigate to the icon you would like to use to represent the Bullet List mode and paste it in your new customization plug-in folder (plugins/ApplyingABulletedListView/style/images) inside the plugins folder of the MicroStrategy Web installation.:
A sample icon "bulletListMode.gif" is available in the plug-in provided by MicroStrategy SDK.
-
Use the Eclipse IDE to create an interface class called EnumCustomWebFeatures. The sample, EnumCustomWebFeatures.java, contains the entire code for this class.
-
Compile EnumCustomWebFeatures.java and place the class file inside the classes folder of this customization plug-in adhering to the package structure. For example: plugins\ApplyingABulletedListView\WEB-INF\classes\com\microstrategy\sdk\samples\beans.
-
Use the Eclipse IDE to create a class for custom Web features. The sample, CustomFeatures.java, contains the entire code for this class.
-
Compile CustomFeatures.java and place the class file inside the classes folder of this customization plug-in adhering to the package structure. For example: plugins\ApplyingABulletedListView\WEB-INF\classes\com\microstrategy\sdk\samples\beans.
-
If the Web Customization Editor is closed, launch it again and access your plug-in.
-
Enable the Property Files setting from the Show Advanced Options in MicroStrategy Preferences.
-
Click on MicroStrategy Web Configuration inside the Application Settings view to expand the hierarchical tree. The expanded list comprises the different settings that can be modified to perform customizations.
-
Click on Property Files to expand the list of property files used in MicroStrategy Web.
-
Navigate to WEB-INF->classes->resources and double-click on MessagesBundle_en_US.properties to launch the Web Properties Editor.
-
Enter a new property-value pair in the text field at the bottom confirming to the syntax nameOfProperty=value. For example: scenario1.5=View: Bullet List.
-
Click Add.
-
Save your changes.
-
Navigate to MicroStrategy Web Configuration->Styles.
-
Right-click Styles and select New Style. This launches the Style Creation Wizard.
-
Enter FolderStyleBulletList in the Name text field.
-
Enter Display Folder contents as a Bulleted List in the Description text field.
-
Select FolderBulletTransform from the drop-down menu for Transform.
-
Click Next.
-
Select parameters cssPrefix and maxObjectTypeCount and add them to the style by clicking >>.
-
Click Next.
-
Select cssPrefix and enter bullet- in the Value text field.
-
Select maxObjectTypeCount and enter -1:-1 in the Value text field.
-
Click Next.
-
Leave the Layout Definition field empty, and click Next.
-
Click Finish.
-
Save your changes.
-
Navigate to MicroStrategy Web Configuration->Toolbars->folderToolbar->folderView.
-
Right-click folderView and select New Shortcut.
-
Enter tbBulletView as the name of the shortcut and click OK.
-
Enter View: Bullet List in the Descriptor text field.
-
Click Modify next to the text field for Descriptor ID and select scenario 1.5.
-
Click OK.
-
Select Button from the Type drop-down menu.
-
In the text field for Image Source, enter ../plugins/ApplyingABulletedListView/style/images/bulletListMode.gif.
-
Click the Modify button for the text field Check this item if the following feature(s) is(are) available to launch the Add Elements shopping cart.
-
Select check-mode-bullet-view and click >>.
-
Click OK to close the Add Elements shopping cart.
-
Click Advanced Properties at the bottom of the editor.
-
Click Add Event in the Events section.
-
To select the event enumeration class, click Browse and enter EnumPageEvents.
-
Select EnumPageEvents from your project and click OK.
-
Select WebEventChangeFolderViewMode from the drop-down menu for Event to trigger when menu element is selected.
-
Click Add in the Event Arguments section.
-
Select WebEventArgumentFolderViewMode from the drop-down menu and click OK.
-
Enter FolderStyleBulletList in the text field for Argument Value.
-
Click OK.
-
Navigate to MicroStrategy Web Configuration->Pages.
-
Right-click shared (Shared Reports) and select Create New Add-on. This launches the Add-on Creation wizard.
-
Click Browse to select the source folder for the project.
-
Enter com.microstrategy.sdk.samples.addons in the Package text field.
-
Enter AggregatedFeaturesAddOn in the Name text field.
-
Enter Addon for aggregating Web features in the Description text field.
-
Click Next.
-
Click Finish. AggregatedFeaturesAddOn.java opens in the editor. The sample, AggregatedFeaturesAddOn.java, contains the entire code for this custom add-on.
-
Save your changes.
-
Double-click shared (Shared Reports) and click the Add-on Properties tab at the bottom in the right frame.
-
With com.microstrategy.sdk.samples.addon.AggregatedFeaturesAddOn selected in the Add-ons section, click Add New in the Add-on properties section.
-
Select customFeaturesClassName and targetBean, and click >>.
-
Click OK.
-
In the Add-on properties section, enter com.microstrategy.sdk.samples.beans.CustomFeatures as the value for add-on property customFeaturesClassName.
-
In the Add-on properties section, enter fb as the value for add-on property targetBean.
-
Save your changes.
-
Double-click my (My Reports) (under MicroStrategy Web Configuration->Pages) to launch the Basic Properties editor.
-
Click the Add-on Properties tab at the bottom.
-
Click Add in the Add-ons section to launch the Add-on Creation wizard.
-
Click Modify.
-
Enter AggregatedFeaturesAddOn in the text field.
-
Select AggregatedFeaturesAddOn from your project and click OK.
-
Click Next.
-
Select customFeaturesClassName and targetBean, and click >>.
-
Click Next.
-
Select customFeaturesClassName and enter com.microstrategy.sdk.samples.beans.CustomFeatures in the Value text field.
-
Select targetBean and enter fb in the Value text field.
-
Save your changes.
-
Launch MicroStrategy Web to view the customization.
If you decide not to keep this customization, then before removing this plug-in from the pluginsfolder, switch to Icon View or List View and then remove the plug-in.
See Also
-
Fundamentals of Customization: Data Presentation, Styles and Layout Definitions
-
References: Transform Parameters Reference
