Strategy ONE
Defining the dimensionality of metrics: Level prompts
Before You Begin
This topic assumes that you are familiar with the following concepts:
A level prompt allows the user to select, during report execution, the level of calculation for a metric. For example, a report shows sales totals by time and allows the user to choose whether the totals are for the year, the month, the week, and so on.
When the definition of multiple metrics differs only in level, create a level prompt to avoid having to create multiple metrics.
You can define a default prompt level, which is displayed when the prompt is executed. This allows users to complete report execution more quickly, since they do not need to answer the prompt, but can simply run the report using the default level. The user can select the default, or specify his own level. A default prompt level is particularly useful if a large percentage of your users will select the same level for this prompt. By default, the default level is the report level, with standard filtering and standard grouping. You can remove or edit this level, and add more levels.
An object prompt allows prompting only on the target, while a level prompt allows prompting on all components of the metric—target, filtering, and grouping. For more information on level metrics, see level metrics.
Level prompt example
For example, a report lists items with sales calculated at either the Category or the Subcategory level. The item's revenue is displayed as a percent of the Category or Subcategory revenue. At runtime, the user must be able to select the Category or Subcategory level, as well as the filtering and grouping properties of the metric, as shown below:

To do this, a level prompt with Category and Subcategory is defined as the target of the level on a revenue metric. This metric is named Category/Subcategory Revenue. When the report is executed, the user is prompted to specify the complete level of the metric, including the target, filtering, and grouping.
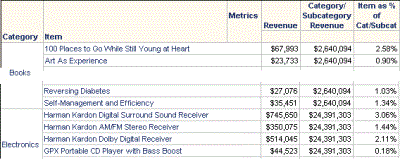
When the prompt is answered with Category, the report looks like the following:

This report contains 360 rows, so only portions of the report have been reproduced above.
The Category/Subcategory Revenue amount is the same for each item; it changes only when the Category changes, as determined by the prompt answer. The item revenue is divided by the category revenue, to yield the percentage.
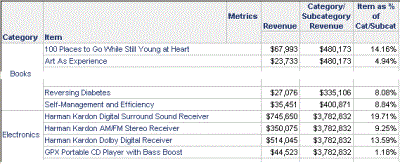
If the prompt is answered with Subcategory instead, the report looks like the following:

This report contains 360 rows, so only portions of the report have been reproduced above.
While the Revenue values are still the same, the Category/Subcategory Revenue amounts change when the Subcategory (not shown on the report) changes. The percentages are now greater, since the item revenue is compared to the subcategory revenue, not the larger category revenue.
Prerequisites
Before you create this type of prompt, you should understand Level metrics, including the target, filtering, and grouping level elements. Additionally, if you want to use the results of a search in the prompt, create a search object. You can also create it while creating the prompt.
To create a level prompt
-
Open the Prompt Generation Wizard. How?
-
On the Welcome page, select Levelprompt, then click Next. The Level Prompt page opens.
-
To select the objects for the prompt
-
Select the attributes and/or hierarchies available to the user to determine the metric level when the report is run.
-
-
Do one of the following:
-
To choose specific objects, complete the following steps:
-
Select Use a pre-defined list of objects.
-
Click Add. The Select Objects dialog box opens.
-
Select the objects from the Available objects list and click > to move them to the Selected objects list.
You can choose multiple objects by pressing CTRL or Shift while selecting the objects.
-
Click OK to return to the Prompt Generation Wizard.
-
You can add more objects by clicking Modify, which opens the Select Objects dialog box so you can select additional objects.
-
To remove the selected object, click Remove.
-
To delete all the objects in the list, click Clear.
-
To change the order that the objects are displayed in the prompt, select the object to move and click the Up or Down arrow.
-
To use a set of objects from a search object, select Use the results of a search object. To display the object path (folder hierarchy) when using a search, select Display using folder structure, which is useful when the same object with the same name is saved in multiple folders. A search object searches for and displays specific project objects when the user executes the report. This allows you to prompt the user with the most up-to-date objects in the project. Do one of the following:
-
To use an existing search, click ... (the browse button). Navigate to the search object, select it, and click OK to return to the Prompt Generation Wizard.
-
To create a new search, click New. The Search for Objects dialog box opens. Create a new search.
-
To allow users to choose from all the attributes and hierarchies available in the project, select List all attributes and hierarchies (no restriction).
-
-
-
Click Next. The General Information page opens.
-
Type a Title, which is used as the default object name when you save the prompt, although you can change it. The title is also displayed to users when the prompt is run during report execution.
For considerations when determining a title and description, see Title and instructions.
To display a blank title, type a space in the Title field. If you leave Title blank, a default name, such as Region for an attribute prompt on Region, is displayed when the prompt is run.
-
Type text in the Instructions field, which is displayed when the prompt is run during report execution.
-
To display blank instructions, type a space in the Instructions field. If you leave Instructions blank, default instructions, such as Choose from a list of attributes/hierarchies to define level, are displayed when the prompt is run.
-
Personal answers allow a user to save prompt answers for this prompt, and then reuse the answers on any report that this prompt is used on. For a more detailed description of personal answers and how they can be used, see Allowing personal answers for prompts.
-
-
To determine whether personal answers can be saved for this prompt, select one of the following options from the Personal answers allowed drop-down list:
-
None: No personal answers can be saved. Every time a user sees the prompt, he must answer it manually (if it is required) or ignore it.
-
One: Only one personal answer can be saved for this prompt. When the prompt is used again (on this report or a different one), the personal answer is displayed. A user can keep the personal answer, or add or delete selections. He can save his changes as a new personal answer, but only one personal answer can be saved for the prompt.
-
Multiple: Multiple personal answers can be named and saved, allowing different answers for the same prompt. When the prompt is used again (on this report or a different one), the personal answers are available. The user can select one of them, or answer the prompt manually.
-
-
To require that the user select a minimum number of objects, select the Minimum objects check box. Enter the minimum.
-
To restrict the number of objects that a user can select, select the Maximum objects check box. Enter the maximum.
-
To require that the user answer the prompt at run time, select the Promptanswerrequired check box.
If you select Prompt answer required without providing default answers, the report cannot execute on a schedule. For information on how required prompt answers, default answers, and schedules interact, see Prompts in scheduled reports.
-
Click Next. The Default Prompt Level Selection page opens.
A default answer can allow users to complete report execution more quickly, since they do not need to answer the prompt but can simply run the report using the default answer. The default levels that you define here are displayed when the prompt is executed. The user can select the default level, or specify his own level. For considerations when determining a default answer, see Default prompt answers. You do not need to specify a default answer if you do not want a default answer to appear for users.
-
If you do not want to define default levels, click Finish. The Save As dialog box opens.
-
By default, the default level is the report level, with standard filtering and standard grouping.
-
To add another level, click Modify. The Select Objects dialog box opens. Select the object(s) to use as the target(s) from theAvailable objectslist and clickto move them to theSelected objectslist. ClickOKto return to the Prompt Generation Wizard. The objects are added to the default prompt answer table, with standard filtering and grouping.
-
The target is the attribute level at which the metric calculation groups. For more information, see The context of a calculation: Level metric target.
-
To change the filtering of a level, click in the Filtering column of the level and select the new filtering option.
-
Filtering governs how the report filter interacts with the metric calculation. For more information, see Interaction with report filters: Level metric filtering.
-
To change the grouping of a level, click in the Grouping column of the level and select the new grouping option.
-
Grouping determines how the metric aggregates. For more information, see Defining how aggregation is performed: Level metric grouping.
-
To delete the selected level, click Remove.
-
To return to the default report level and delete any additional levels, click Reset.
-
By default, the metric filter is applied to the metric calculation. You can instead exclude filter attributes, so that filter attributes that are not on the report or in the level of the metric are not included in the metric calculation. For more information on this behavior, see Excluding filter attributes: Level metric advanced options.
-
Click Finish. The Save As dialog box opens.
-
-
Select the folder in which to save the new prompt, enter a name, and click Save to return to MicroStrategy Developer.
You can now add your new prompt to a level metric. For a table showing how to add each prompt type to objects, see Reports: Adding a prompt to a report, metric, filter, or custom group.
Related Topics
For more details and examples, see the Advanced Prompts chapter in the Advanced Reporting Help.
