Strategy ONE
Integrate with AppConfig-Compliant EMM Providers in iOS
MicroStrategy Mobile can be integrated with any Enterprise Mobility Management (EMM) provider that supports AppConfig guidelines. App Configuration for the Enterprise (AppConfig) delivers the first standard approach to configuring and securing applications in the enterprise. The goal of the AppConfig initiative is to define a collection of best practices for enterprise application developers to interpret application configurations and security policies from EMM (Enterprise Mobility Management) systems, and for EMM systems to configure and secure mobile applications. AppConfig lets enterprises leverage their existing investments in EMM systems, VPNs, and identity management solutions.
The AppConfig framework provides the following workflows for configuration, security, and access:
- App configuration
Configure information such as Intelligence Server connectivity, project information, home screen configuration, and general app settings to eliminate the need to educate end users about first time setup. - Security policies and access control
Restrict apps to run only on approved devices and enforce security policies such as required encryption and data loss prevention at the app level. - App Tunnel
Selectively enable approved apps to use an app tunnel to connect to backend and corporate networks. - Single sign-on (SSO)
MicroStrategy supports single sign-on through SAML and HTML Form.
The workflow for integrating MicroStrategy Mobile with an EMM provider that supports AppConfig is described below. In the description, AirWatch is used as the example, but you can extrapolate from these instructions to integrate MicroStrategy Mobile with a different AppConfig-compliant EMM provider. For a generic overview of how AppConfig can be used by EMM providers in an iOS environment, refer to the explanation provided by the AppConfig Community.
Before you begin your integration, you need to make sure you have met the requirements and compiled your MicroStrategy Mobile app.
-
Building and uploading the MicroStrategy Mobile app
You can also download the MicroStrategy Mobile app from the App Store.
The following are required to deploy the MicroStrategy Mobile application with AppConfig support.
- You must have an operational EMM system, such as AirWatch, and users and devices must have been enrolled. You can leverage your existing EMM's App Tunnel or gateway by configuring per-app VPN.
- See What's New in the Mobile SDK for iOS for the Xcode and Apple iOS SDK versions you need to use to develop and compile your application. Previous versions can be downloaded from the Apple Download site.
- Your organization must be enrolled in the Apple Developer Enterprise Program.
- You must create a wildcard App ID for your application, using the iOS Provisioning Portal. A wildcard App ID is of the form [BundleSeedID].*, where:
- BundleSeedID is an alphanumeric code that is generated by Apple when you create the App ID.
- The asterisk (*) is a placeholder for the Bundle Identifier of the App ID. The Bundle Identifier is used by iOS to identify the application on your device. You set the value of the Bundle Identifier property in the property list file of your Xcode project. You replace the value of the asterisk (*) with an appropriate string using reverse-DNS format, com.yourCompanyName.YourAppName. For example, we use the default value—com.microstrategy.iPad for an iPad app or com.microstrategy.MSTRMobile for an iPhone app—to integrate with an EMM provider that follows the AppConfig standard.
Building and uploading the MicroStrategy Mobile app
Once you have met the prerequisites, the first step is to compile the application:
- Download and install the MicroStrategy Mobile SDK
- Configure the MicroStrategy Mobile Xcode project
- Create a distributable archive of the application
- Upload the application
For a list of supported iPhone and iPad devices and operating systems, see the MicroStrategy Readmes.
A detailed description of each step is provided below.
The third-party products discussed below are manufactured by vendors independent of MicroStrategy, and the information provided is subject to change. For detailed instructions to perform the following tasks, refer to the iOS Developer Library.
- Download
and install the MicroStrategy Mobile SDK
On a Mac computer, go to the MicroStrategy Download site and download the latest DMG file for the MicroStrategy Mobile SDK. This includes the MicroStrategy Mobile Xcode project. You must have a username and password to access the download site.
The latest Mobile SDK may or may not be the same version as the version of Intelligence Server you are using.
Double-click the downloaded DMG file.
Click Agree to accept the terms of the license agreement. This opens the disk image.
Copy all the folders to your local drive.
Eject the disk image.
-
Configure the MicroStrategy Mobile Xcode project
Make sure that you have created and installed the distribution certificate for MicroStrategy Mobile on your Mac and created and downloaded the distribution provisioning profile. Use the Keychain Access utility on your Mac and the iOS Provisioning Portal to create these files.
- In the MicroStrategyMobile folder copied from the disk image on your Mac, double-click MicroStrategyMobile.xcodeproj. The MicroStrategy Mobile project opens in Xcode.
- Choose either the MicroStrategyMobileIPhone or MicroStrategyMobileIPad scheme, depending on the type of device you are creating the application for.
- Open the appropriate property list file—Info_IPhone.plist for iPhone or Info_IPad.plist for iPad.
- Update the Bundle Identifier property—for example, to com.microstrategy.iPad for an iPad app or com.microstrategy.MSTRMobile for an iPhone app.
- For the scheme you selected, make sure that your distribution provisioning profile is selected under Code Signing in the Build Settings section.
-
Create a distributable archive of the MicroStrategy Mobile application:
With the project still open in Xcode, do the following:
- From the Build menu, select Build and Archive. An archived version of the application is built, with an .ipa extension.
- Open Xcode’s Organizer window, select the archived application, and click Share Application. The Share Archived Application dialog box opens.
- Click Distribute for Enterprise. The archive is built, and you are prompted to enter information for the application’s manifest file, which devices use to download the application.
- Close Xcode.
-
Upload MicroStrategy Mobile application
-
Upload the .ipa file into your EMM system.
- After the application is uploaded, you will be able to assign a profile with configuration settings for the device. Refer to the documentation from your EMM provider for instructions on how to do this.
-
The sections below explain how to use the AppConfig integration to push configurations to the MicroStrategy Mobile app, configure App Tunnel, and configure security restrictions.
App Configuration
With AppConfig, a mobile administrator can define a set of configuration keys that the MicroStrategy Mobile app will accept from the EMM server. These configuration keys are defined in the EMM administration console, normally stored as part of a profile assigned to the app for deployment. You can set up these configurations on the AirWatch console during the process of application distribution. The EMM provider also has the ability to update the configurations over the air at any point in the future to an existing application, without requiring the app itself to be reinstalled. You can create different profile assignments to deploy the application to different groups of devices, allowing you to apply different configuration settings to each.
MicroStrategy Mobile supports the following configuration keys:
- ConfigurationURL: String value
- EnableDataLossPrevention: Boolean value
- DisableEmail: Boolean value
- DisableOpenIn: Boolean value
- DisablePrint: Boolean value
- DisableCopyPaste: Boolean value
- DisableCameraAccess: Boolean value
- DisableLocationServices: Boolean value
- DisableSaveToPhotos: Boolean value
Administrators can configure these settings on their EMM console based on their requirements. One of the configuration keys that can be pushed to the MicroStrategy Mobile app is the ConfigurationURL which is a link to a full set of configuration settings such as Intelligence Server and Mobile Server connectivity, project information, home screen configuration, and general app settings.
To set up App Configuration on the AirWatch console:
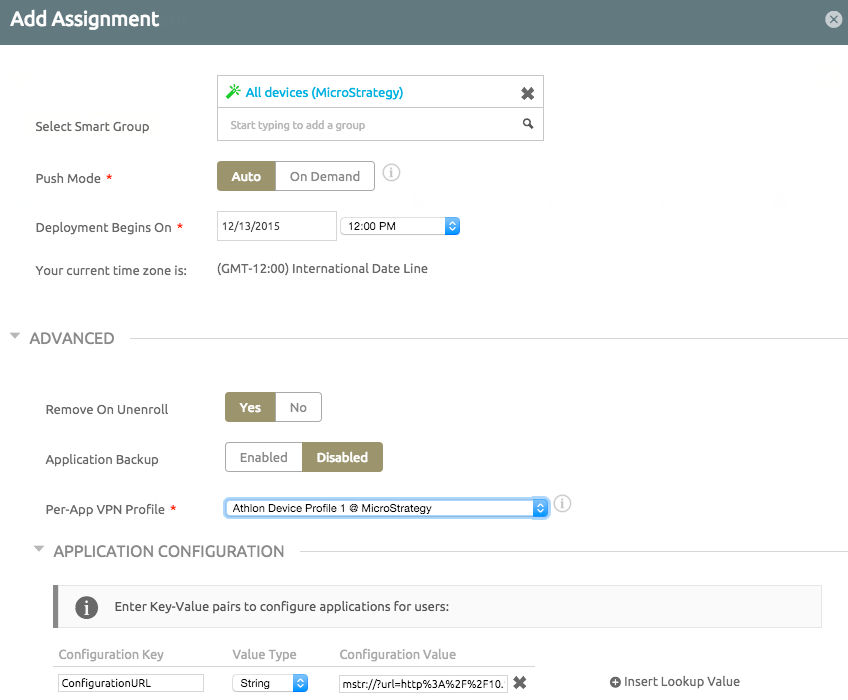
- When you upload MicroStrategy Mobile, click the Save & Assign button to assign the application to devices.
- On the Add Assignment screen, select the device group to specify which devices MicroStrategy Mobile will be delivered to and set the delivery time to control when it will be delivered.
-
To initialize the application with a configuration URL, set a key-value pair in the Advanced -> Application Configuration section. Create a ConfigurationURL key with a String value type. Set the value of the key to the URL that has the configuration information.
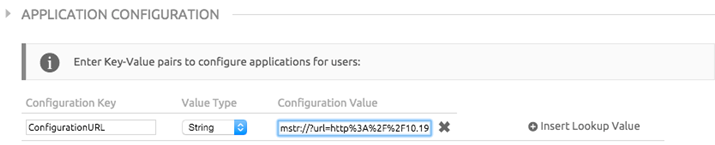
The ConfigurationURL can be obtained from the MicroStrategy Mobile Administrator page, under Mobile Configurations. For information on how to create a mobile configuration, refer to Applying configurations to mobile devices.
Security policies and access control
Organizations require granular security and data loss protection within their enterprise applications to prevent sensitive data and documents from leaking outside company control. For example, an app may include functionality that an enterprise wants to disable for security reasons, such as the ability to synchronize data with a public cloud like file storage services. AppConfig leverages the out-of-the-box capabilities that iOS provides to enforce security settings and access control on enterprise apps.
Security settings and access control are provided by the EMM provider. Administrators should refer to their specific EMM documentation for information on how to use this functionality.
-
Encryption is a device-specific access control feature that is applied across all applications. EMM vendors can enforce iOS “data protection” for enterprise apps by applying a passcode policy on the device.
To enable data protection in AirWatch, go to Device -> Profiles -> iOS -> Passcode and define the enterprise requirements for the passcode.

-
Managed "Open In" is a device-specific access control feature that is applied across all applications. EMM providers that use Apple’s MDM protocol can prevent the accidental movement of data in and out of trusted and untrusted applications. In iOS, an app becomes trusted if it is distributed to the device under management using the Apple MDM protocol. An app that is directly downloaded from the iTunes store is considered unmanaged or untrusted. EMM providers can deliver a configuration profile with restrictions that specify whether to "Allow Open From Managed To Unmanaged" and "Allow Open From Unmanaged To Managed".
To enable the Managed “Open In” capability in AirWatch:
-
Go to Device -> Profiles -> iOS -> Restrictions.
-
Select or deselect the configuration items "Allow documents from managed sources in unmanaged destinations" and "Allow documented from unmanaged sources in managed destinations".
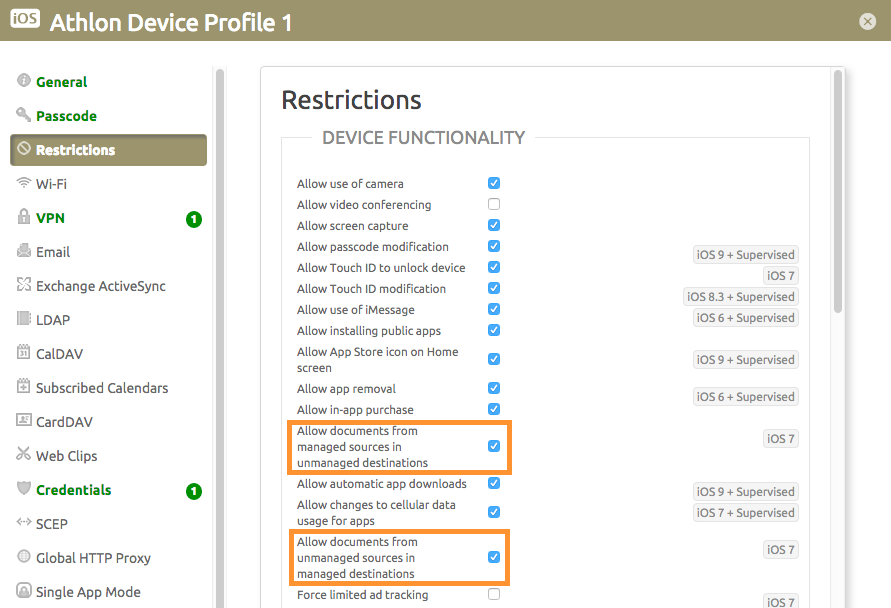
The device profile leverages the restrictions on iOS. For example, when "Allow documents from managed sources in unmanaged destinations" is selected, a MicroStrategy report can be shared from the MicroStrategy Mobile app to other applications. On the other hand, when "Allow documents from managed sources in unmanaged destinations" is not selected, the report cannot be shared from the MicroStrategy Mobile app to other applications.
For iOS, if the corporate email configuration is sent to the native email app in iOS via the MDM protocol, the corporate email configuration will be considered a trusted and managed app and will participate in data sharing between other managed apps.
-
-
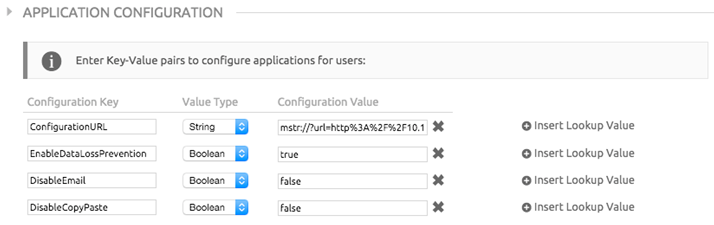
In addition to the mobile configuration specified by ConfigurationURL, administrators can restrict the availability of some app features for the purpose of preventing data leakage or data loss. These restrictions are passed to MicroStrategy Mobile by adding key-value pairs to the Application Configuration section on the Add Assignment screen. The following restrictions can be added as BOOLEAN key-value pairs:
- EnableDataLossPrevention
- DisableEmail
- DisableOpenIn
- DisablePrint
- DisableCopyPaste
- DisableCameraAccess
- DisableLocationServices
-
DisableSaveToPhotos
The EnableDataLossPrevention key is the main switch for all of the app restrictions. Other options, such as DisableEmail or DisableCopyPaste, take effect only when EnableDataLossPrevention is set to "true".
When EnableDataLossPrevention is set to "true", the following features are automatically disabled:
- Open PDF in third-party applications
- Open email URL in third-party applications
- Open telephone, SMS or unknown URL in another application
- Open EPub files in third-party applications
To verify the security settings in MicroStrategy Mobile, go to Settings -> Logging and set the level to Messages. When you view the log, you can see the security settings.
App Tunnel
An application may require access to web services residing behind a corporate firewall, which requires a secure App Tunnel. The per-app VPN protocol in iOS achieves the goal of a secure App Tunnel. To use the per-app VPN protocol:
- An organization deploys any VPN infrastructure that is needed to support per-app VPN. The organization's VPN provider can be contacted for details on how to do this.
- The EMM vendor distributes the VPN app together with a per-app VPN configuration profile.
- The end-user opens an app that requires a backend connection, and the VPN is automatically turned on.
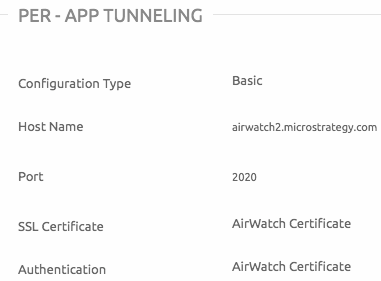
An EMM provider like AirWatch can distribute VPN profiles to its managed devices and let apps such as MicroStrategy Mobile set up their own VPNs following the profiles. The VPN settings are included in device profiles on the AirWatch console. The configurations for per-app tunneling are located at System -> Enterprise Integration -> AirWatch Tunnel on the AirWatch Console.
To enable per-app VPN:
- Create a device profile with AppProxy VPN enabled, and assign it to your device. For example, on the AirWatch console, you configure and distribute the VPN profile in Devices -> Profiles -> iOS -> VPN, where you specify the domains/hostnames in the profile to auto-trigger the VPN.
- Configure VPN in the device profile. For example, on theAirWatch console, go to VPN -> Configure and set the Connection Type to AirWatch Tunnel.
-
Publish the device profile to your device groups. Set the Assigned Groups in the General page of the device profile and Save & Publish the device profile to your device groups.
After you have assigned the device profile to your device, you can see all the app-layer VPN settings in Settings -> General -> Profiles & Device Management -> Mobile Device Management.
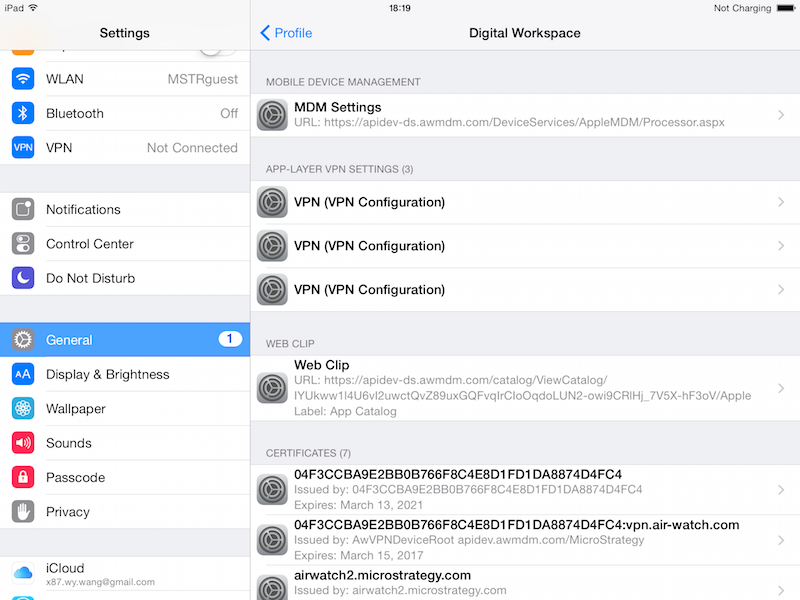
-
Configure the Per-App VPN Profile for MicroStrategy Mobile and entitle it to use the VPN by choosing its device profile in Per-App VPN Profile. Click MicroStrategy Mobile in Apps & Books -> List View, click Assign, and edit the assignment.
- Install AirWatch Tunnel to the device and open AirWatch Tunnel.
These settings take effect after MicroStrategy Mobile is pushed to the device. When MicroStrategy Mobile is launched, it automatically connects to the VPN server, and the “VPN” icon is shown on the left side of the status bar.
Single sign-on (SSO)
The SSO server can be integrated with the MicroStrategy Mobile server and used to authenticate from mobile. To do this, you need to follow the SSO server and MicroStrategy Mobile guide to configure your SSO environment. MicroStrategy supports single sign-on through SAML and HTML Form. For instructions on how to configure MicroStrategy Mobile for SAML single sign-on, see Enabling Single Sign-On with SAML Authentication for ASP Web and Mobile or Enabling Single Sign-On with SAML Authentication for JSP Web and Mobile.