Strategy One
Integrate Strategy With Snowflake for Single Sign-On With SAML Using Microsoft Entra ID (Formerly Azure AD)
Learn how to integrate Strategy with Snowflake for Single-Sign On (SSO) with SAML authentication.
- Create a Microsoft Entra ID Enterprise Application and enable single sign-on with SAML authentication for JSP Web and Mobile
- Integrate a MicroStrategy Library SAML environment with Microsoft Entra ID
- Create Snowflake OAuth applications and integrate with MicroStrategy
- Create Snowflake database instances
Create an Microsoft Entra ID Enterprise Application and Enable Single Sign-On with SAML for JSP Web and Mobile
Steps 1. Create an Entra ID Enterprise Application and assign users to your application and 2. Create single sign-on with SAML authetication for JSP Web and Mobile are dependent on each other. The generated metadata XML files from these steps are required to continue. Please switch operation as needed.
-
Create an Entra ID Enterprise Application and assign users to your application.
-
Follow the Microsoft documentation to configure SAML-based single sign-on to non-gallery applications.
The Application Name cannot include spaces, otherwise you will not be able to proceed after uploading the SPMetadata.xml file.
-
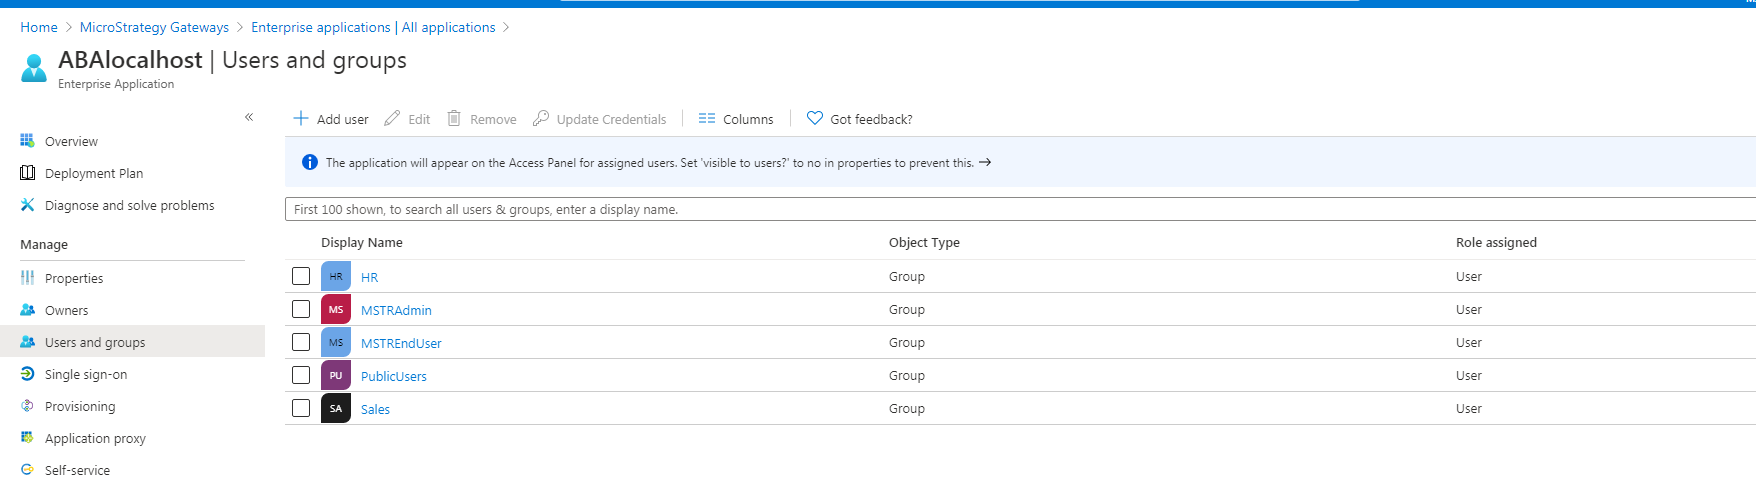
Add users or user groups to your enterprise application.
-
- Create single sign-on with SAML authetication for JSP Web and Mobile.
- Create SAML configuration files for your application.
- Register the application with your Identity Provider (IdP).
- Establish trust to the Strategy Intelligence Server.
- Link SAML users to Strategy users.
Refer to Enabling Sing Sign-On with SAML Authentication and select from the following topics:
Strategy only supports JSP Web. IIS is not supported.
Or you can generate and modify configuration files, create an Entra ID Enterprise Application, manage the SAML signing certificate, enable SAML login from Web Admin, and establish trust between the web server and Intelligence Server.
Generate and Modify Configuration Files
- Open <web application_path>/saml/config/open in your browser.
Enter an Entity ID and click Generate config. The Entity ID is the same as the Application Name created in IdP.
The URL is as follows:
- For Web: https://<FQDN>:<port>/MicroStrategy/saml/config/open
- For Library: https://<FQDN>:<port>/MicroStrategyLibrary/saml/config/open
- For Mobile: https://<FQDN>:<port>/MicroStrategyMobile/saml/config/open
Modify MstrSamlConfig.xml according to the information from IdP.
Locate the XML file in Azure Active Directory > Enterprise applications > <your application> > Single sign-on.
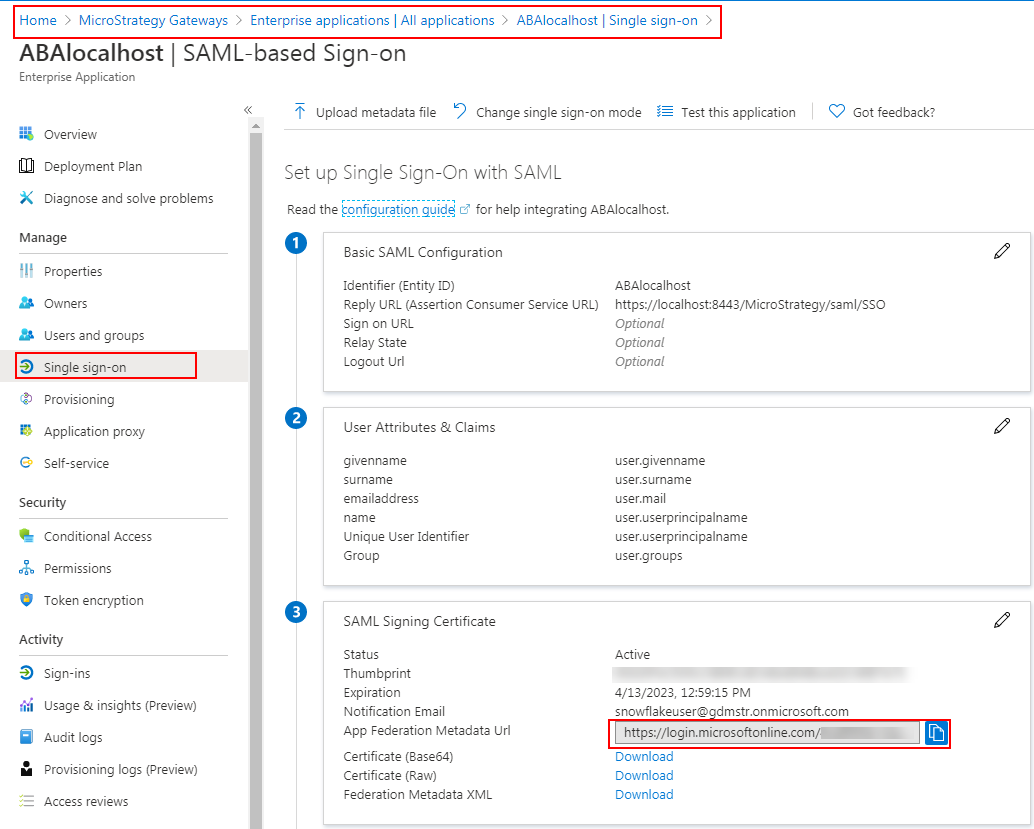


Modify the values in userInfo. The values can be found via the App Federation Metadata URL.
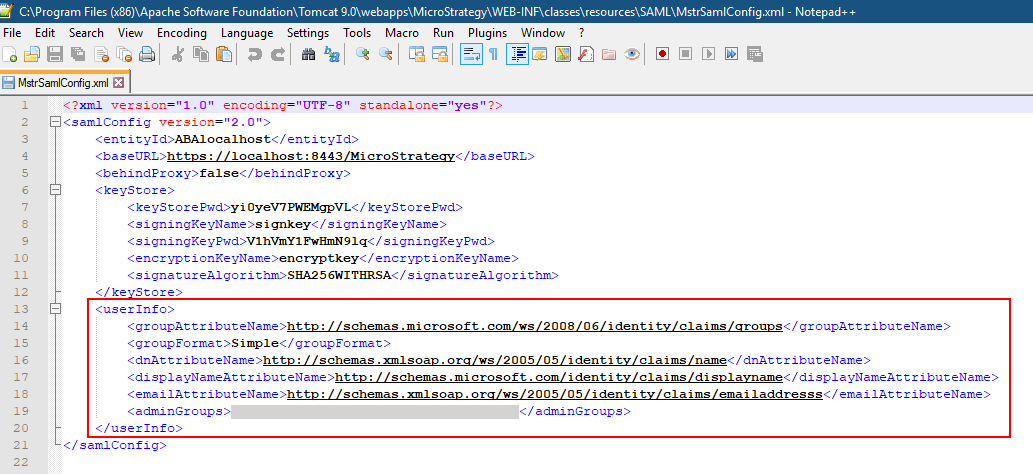
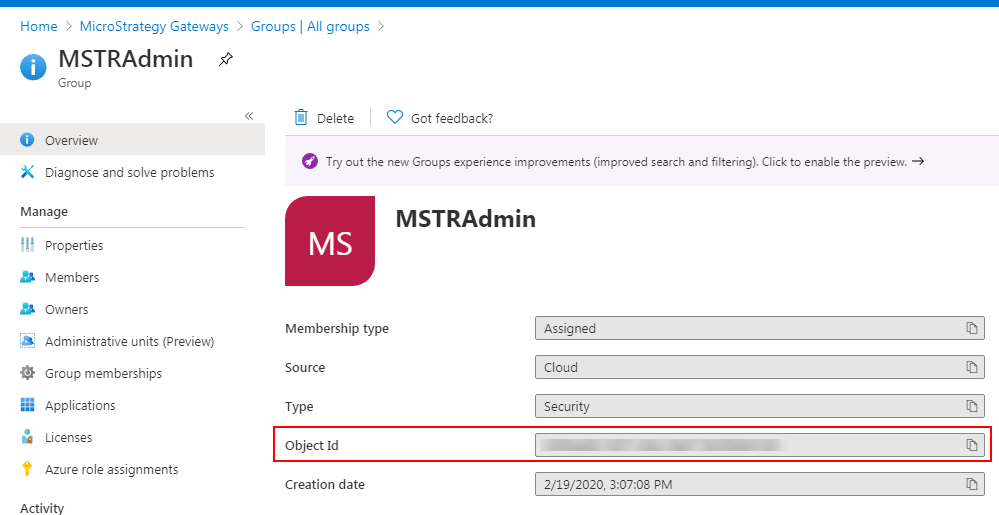
Get the Admin Group ID from Entra ID. Go to Azure Active Directory > Groups > <your admin group> > Object Id.
Check to see if the following two sections exist in [Tomcat]\webapps\MicroStrategy\WEB-INF\classes\resources\SAML\SpringSAMLConfig.xml.
Copy<!-- Handler deciding where to redirect user after successful login -->
<bean id="successRedirectHandler" class="com.microstrategy.auth.saml.SAMLSuccessRedirectHandler">
<property name="defaultTargetUrl" value="/"/>
</bean>Copy<!-- Loads implicit OAuth configuration XML -->
<import resource="custom/SAML2OAuth.xml"/>If they do not exist in SpringSAMLConfig.xml, add them.
Create an Entra ID Enterprise Application
Follow the Microsoft documentation to configure SAML-based single sign-on to non-gallery applications.
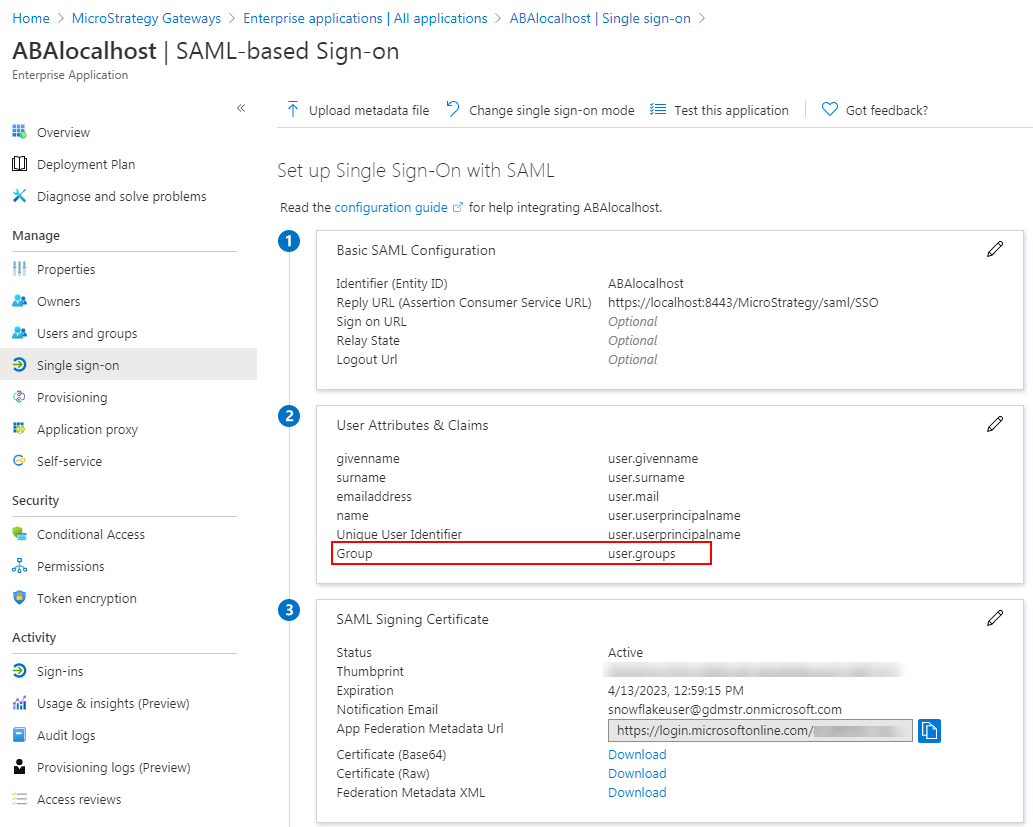
- Edit the Basic SAML Configuration.
- Upload the metadata file created in Generate and Modify Configuration Files, SPMetadata.xml.
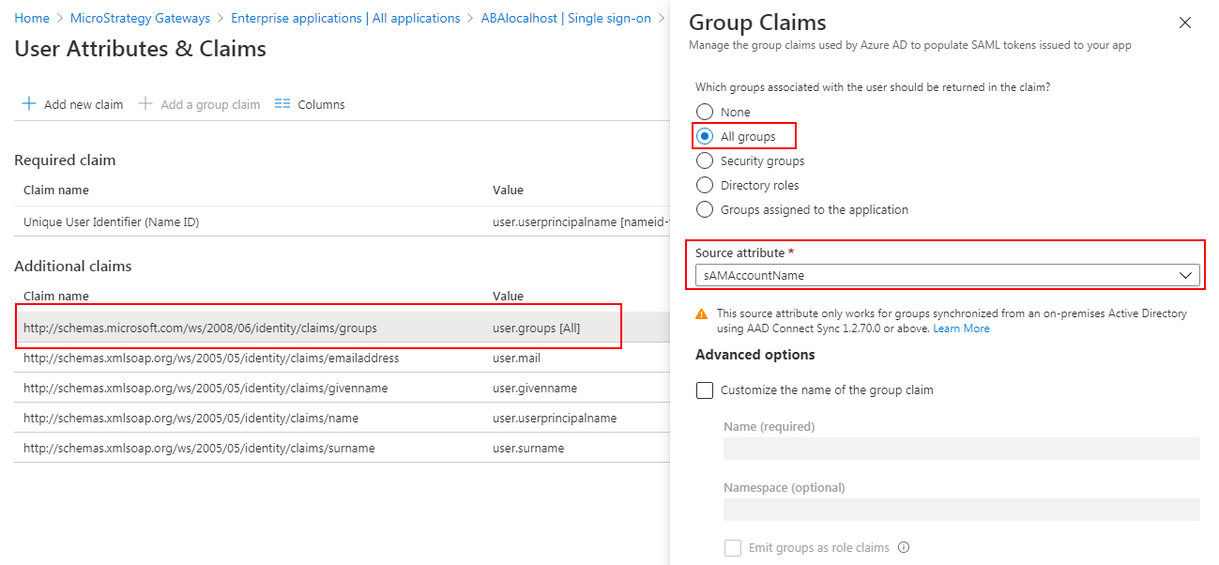
- Configure User attributes and claims.
Add a new group claim or user claims.
Manage the SAML signing certificate
Download the Federation Metadata XML from Azure Active Directory > Enterprise applications > <your application> > Single sign-on.
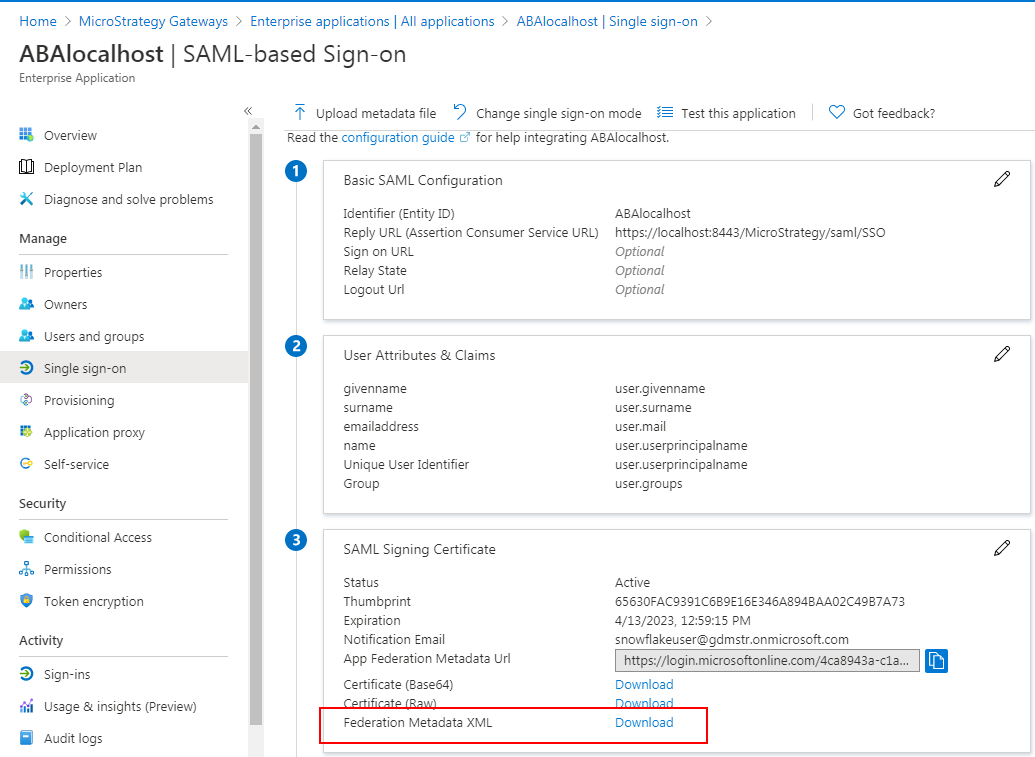
- Rename the XML file to IDPMetadata.xml.
Upload the XML file to the MicroStrategy/WEB-INF/classes/resources/SAML folder.
For Strategy Library, upload the file to the MicroStrategyLibrary/WEB-INF/classes/auth/SAML folder.
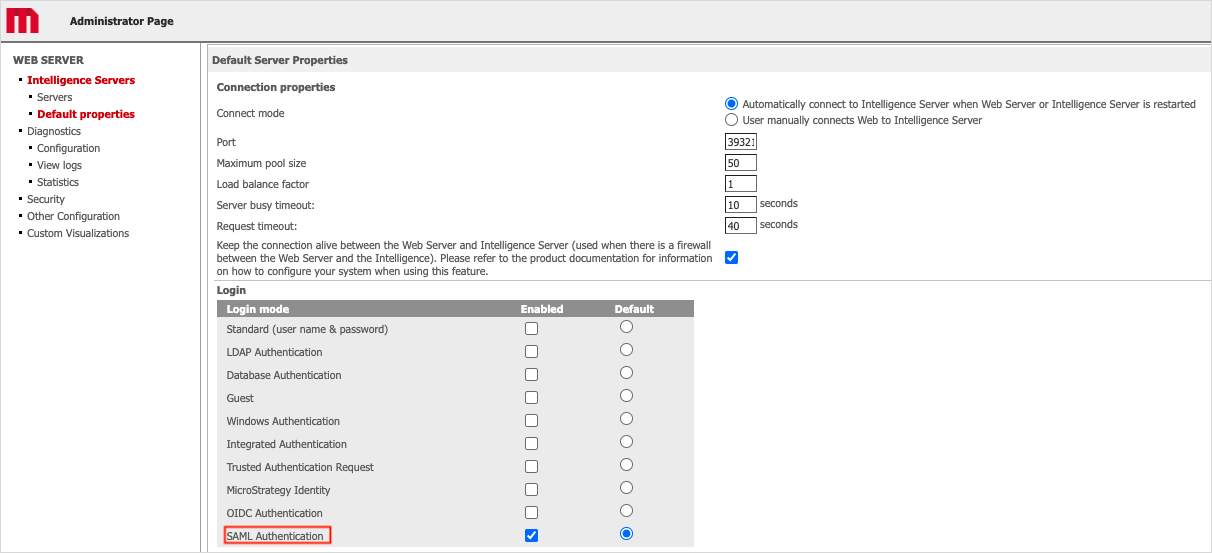
Enable SAML authentication for 2021 Update 1 or later versions
In the Default Properties section of the Web Administrator page, enable SAML authentication and click Save.
- Locate the
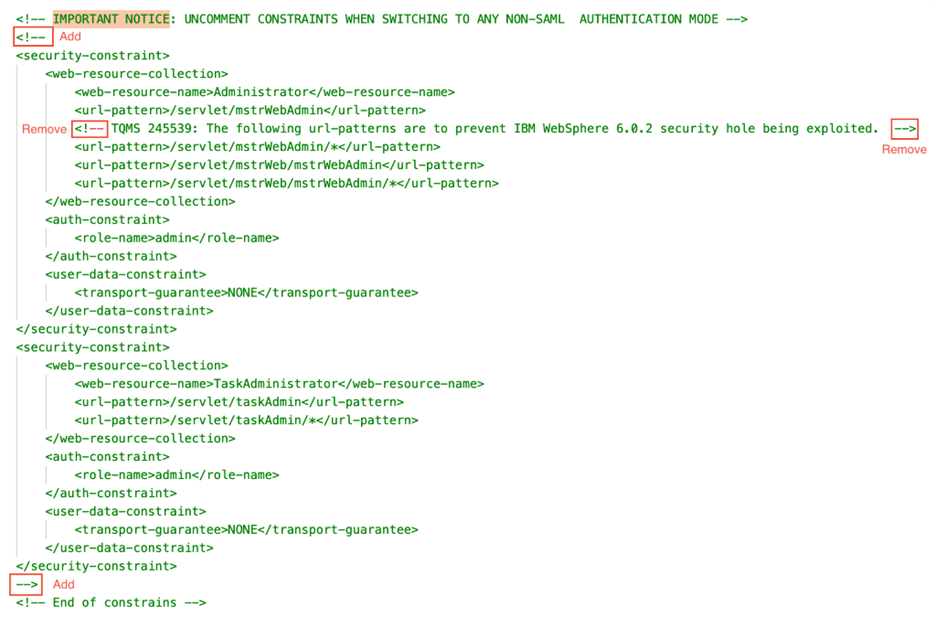
web.xmlfile located in theWEB-INFfolder of the Strategy Web installation directory and open it in a text editor. Comment out the two security-constraints as shown below to disable basic authentication for the Administrator page. Surround the constraints with
<!--and-->tags. Make sure that there are no sub comments in the text, as this may cause an error. If you decide to change to another authentication mode besides SAML in the future, you must reverse the changes done in this step.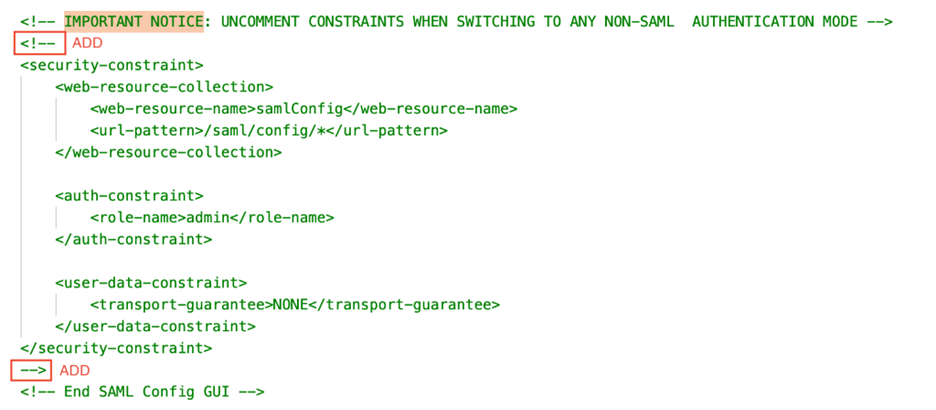
To enable SAML in the Web application for 2021 or older versions, modify the
web.xmlfile located in[Tomcat]/MicroStrategy/WEB-INF/web.xml.Uncomment the following to enable SAML authentication mode for the file.
Copy<!-- ================== SAML Support ================ -->
<context-param>
<param-name>contextConfigLocation</param-name>
<param-value>classpath:resources/SAML/SpringSAMLConfig.xml</param-value>
</context-param>
<context-param>
<param-name>contextInitializerClasses</param-name>
<param-value>com.microstrategy.auth.saml.config.ConfigApplicationContextInitializer</param-value>
</context-param>
<filter>
<filter-name>springSecurityFilterChain</filter-name>
<filter-class>org.springframework.web.filter.DelegatingFilterProxy</filter-class>
</filter>
<filter-mapping>
<filter-name>springSecurityFilterChain</filter-name>
<url-pattern>/servlet/*</url-pattern>
</filter-mapping>
<filter-mapping>
<filter-name>springSecurityFilterChain</filter-name>
<url-pattern>/saml/*</url-pattern>
</filter-mapping>
<listener>
<listener-class>org.springframework.web.context.ContextLoaderListener</listener-class>
</listener>
<!-- SAML Config GUI -->Optional: Comment out or delete the security constraints for
Administrator,TaskAdministrator, andTaskDeveloper.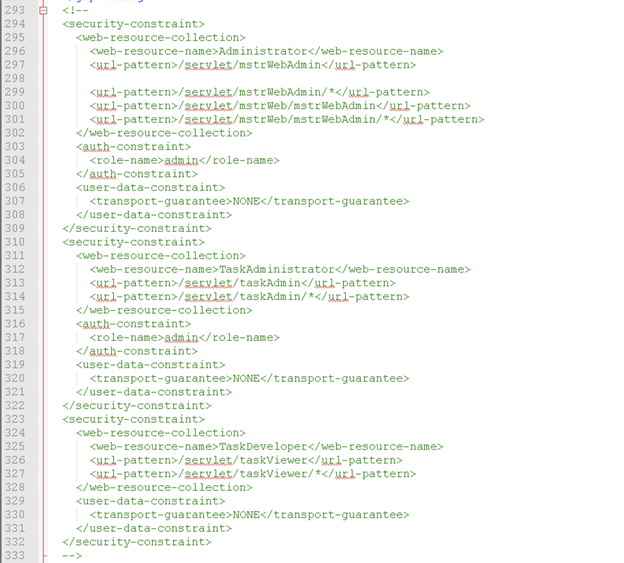
Enable SAML authentication for the 2021 platform release or older versions
Establish trust between the Web Server and Intelligence Server
- Log in to Strategy Web with your Entra ID account in the admin group.
- Connect to the Intelligence Server.
Select your Intelligence Server and next to Trust relationship between Web Server and Strategy Intelligence Server, click Setup.
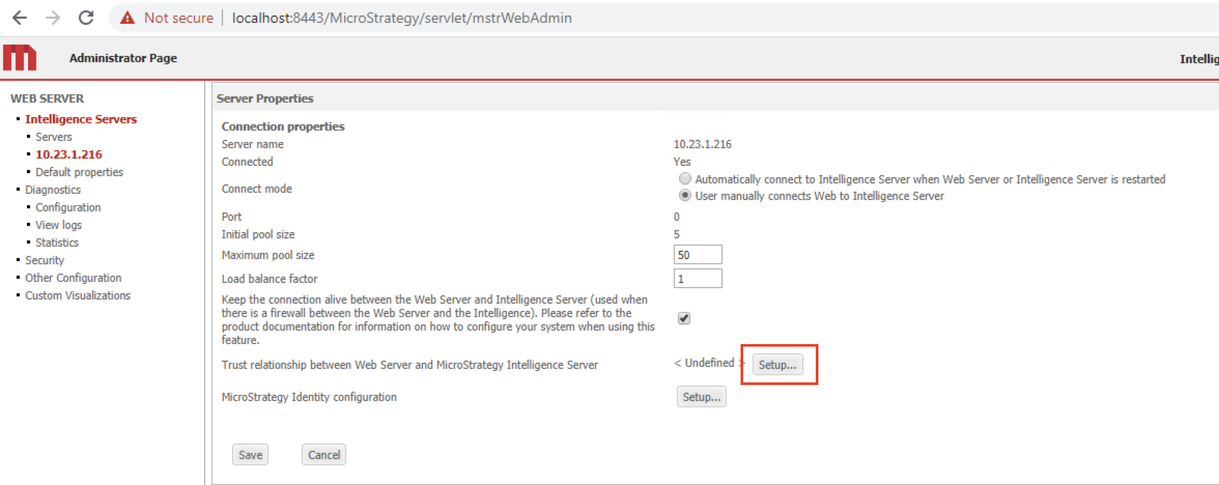
- Enter the administrator account and password to establish trust.
Integrate a Strategy Library SAML Environment with Entra ID
The configuration for integrating a Strategy Library SAML environment is similar to the steps in Create an Entra ID Enterprise Application and enable single sign-on with SAML authentication for JSP Web and Mobile.
-
Generate and modify configuration files.
- Open https://<FQDN>:<port>/MicroStrategyLibrary/saml/config/open to generate configuration files.
-
Modify MstrSamlConfig.xml according to the information from IdP.
The file path is [Tomcat path]\MicroStrategyLibrary\WEB-INF\classes\auth\SAML.
-
Create an Entra ID Enterprise Application for Library and Manage the SAML signing certificate.
- Create a trusted relationship to establish trusted communication between the Library Web Server and Intelligence Server.
Create Snowflake OAuth Applications and Integrate with Strategy
-
Configure Snowflake OAuth integration with Microsoft Entra ID to create OAuth Applications.
Refer to Configure Microsoft Entra ID for External OAuth.
- Select the following OAuth flow described in the Pre-Requisites section: The authorization can grant the Oauth client an access token on behalf of the user.
-
Complete the steps accordingly.
Based on the Snowflake documentation, you will create two applications, Snowflake OAuth Resource Application and Snowflake OAuth Client Application. When configuring the Client Application, add the following redirect URL: https://[MicroStrategy Web Server Hostname]/MicroStrategy/servlet/mstrWeb?evt=3172.
-
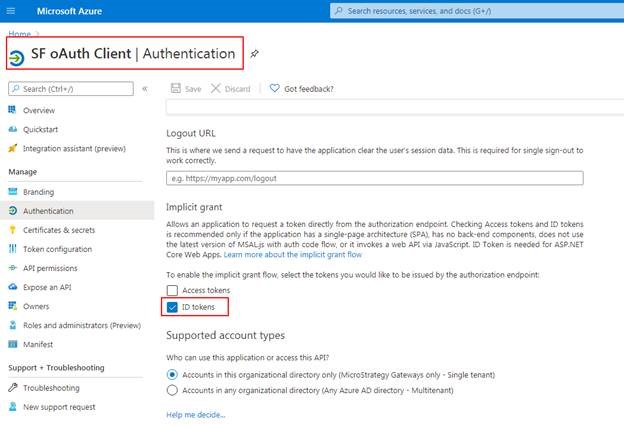
Go to the Snowflake OAuth Client Application > Authentication. Locate the Implicit grant section and select the ID tokens checkbox.
-
Configure
SAML2OAuth.xml to fetch the ID tokens.-
Open and edit the following files:
-
[MicroStrategy Web Root]\WEB-INF\classes\resources\SAML\custom\SAML2OAuth.xml
-
[MicroStrategyLibrary Root]\WEB-INF\classes\auth\SAML\custom\SAML2OAuth.xml
-
-
Comment out the following section:
Copy<!-- Beans to add an additional step to fetch idToken after SAML login -->
<bean id="oAuthTokenProvider" class="com.microstrategy.auth.saml.implicitoauth.MicrosoftAzureAD">
<property name="authorizationEndpoint" value=""/>
<property name="clientID" value=""/>
<property name="redirectUri" value=""/>
<property name="responseType" value="id_token"/>
<property name="scope">
<list>
<value>openid</value>
<value>email</value>
<value>profile</value>
<value>offline_access</value>
</list>
</property>
</bean> -
Complete the fields for authorizationEndpoint, clientID, and redirectUri.
You can find the required information on Entra ID where the Snowflake OAuth Resource Application and Snowflake OAuth Client Application were created.
-
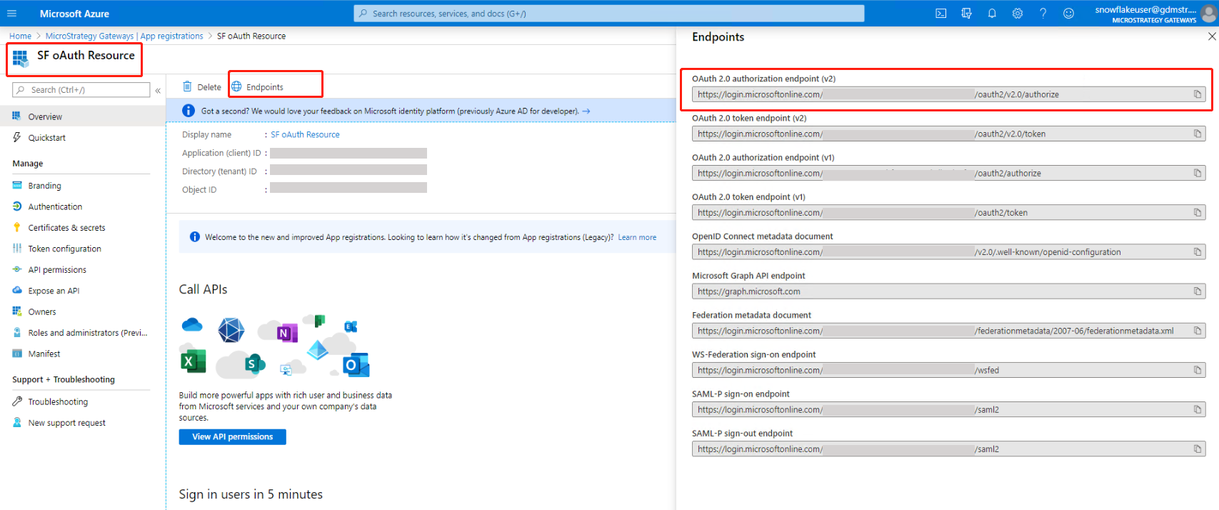
For authorizationEndpoint,go to App > Overview > Endpoints, copy the Oauth 2.0 authorization endpoints (v2) and paste it in the file.
-
For clientID, go to App > Overview > Application (client) ID, copy the ID and paste it in the file.

-
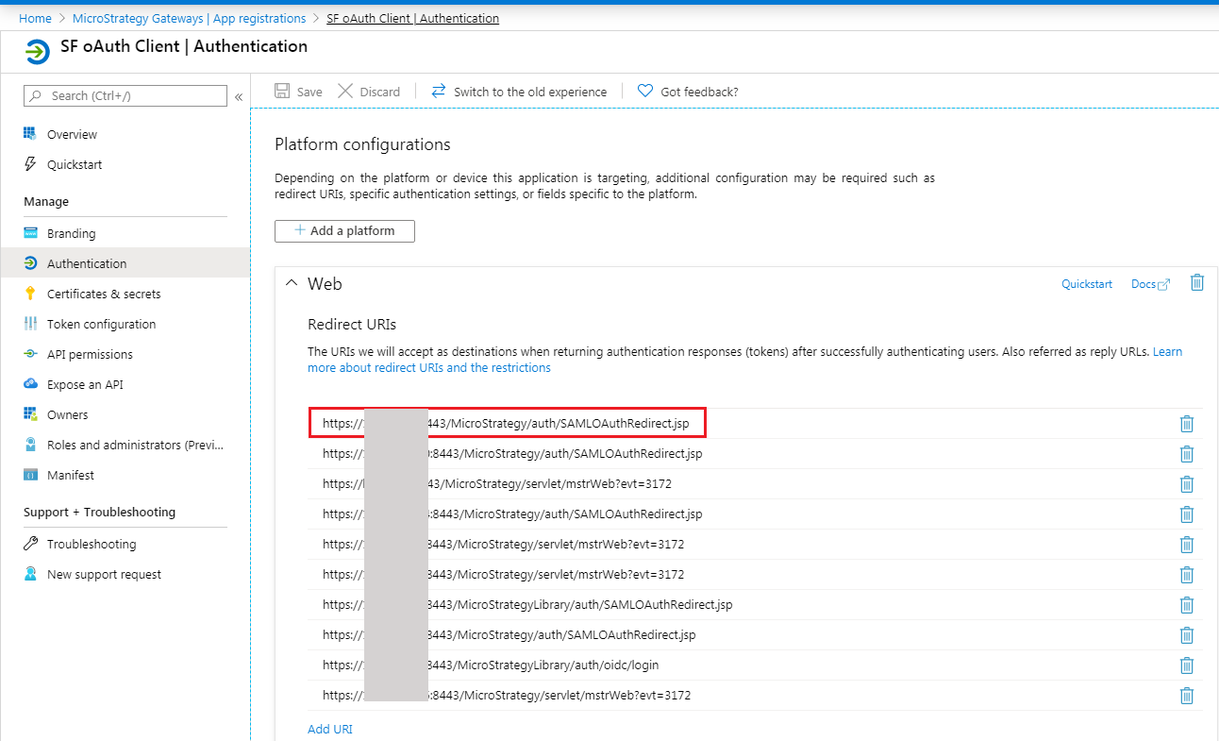
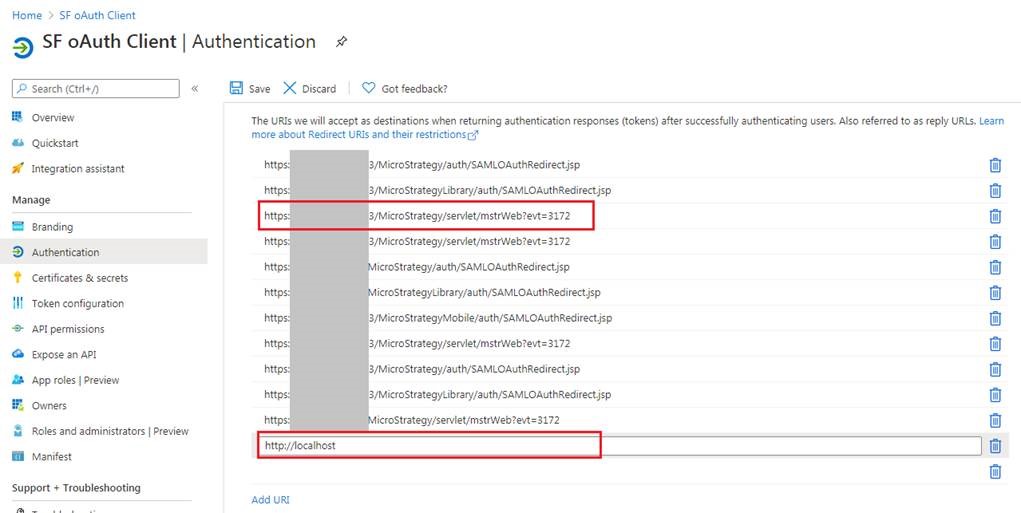
For redirectUri, go to App > Authentication, copy the URL and paste it in the file. If nothing is available in the Redirect URIs list, manually add:
- For Strategy Web:
https://[MicroStrategy Web Hostname]/MicroStrategy/auth/SAMLOAuthRedirect.jsp -
For Strategy Library:
https://[MicroStrategy Library Hostname]/MicroStrategyLibrary/auth/SAMLOAuthRedirect.jsp
- For Strategy Web:
-
-
- Restart Tomcat for the Strategy Web and Library configurations to take effect.
-
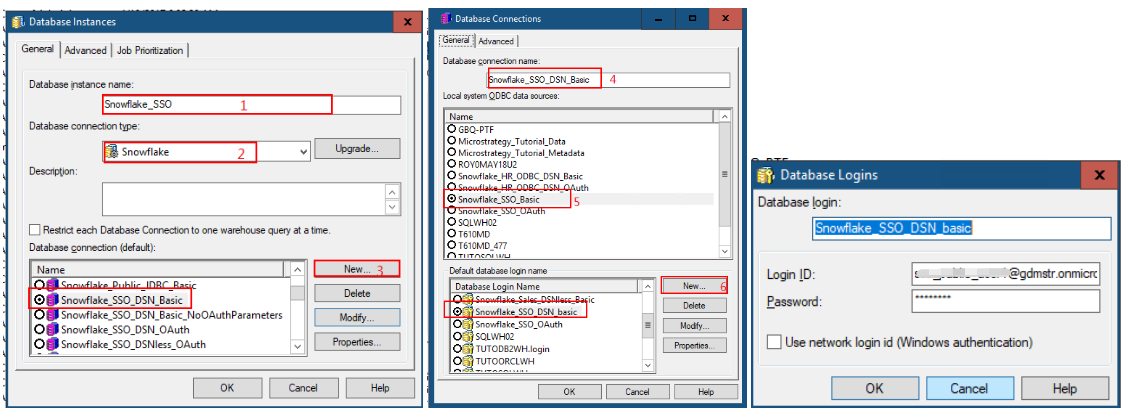
In MicroStrategy Developer:
- In the Database instance name field, type in a name.
- From the Database connection type drop-down, select Snowflake.
- Click New to create a new database connection.
- In the Database connection name field, type in a name.
- Select the DSN.
-
Create a database login and saved your settings.
-
In Strategy Web:
Database instances created via Strategy can be used for the project schema, but cannot be used for connection mapping.
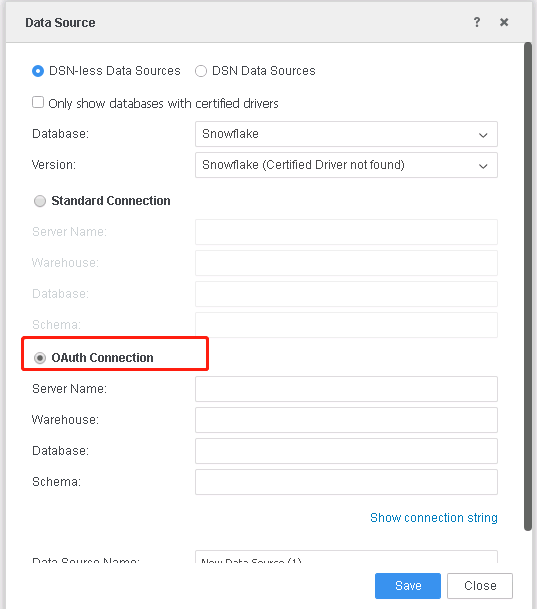
-
In the Data Source dialog, select the Standard Connection option.

-
-
Create an OAuth authentication database connection:
-
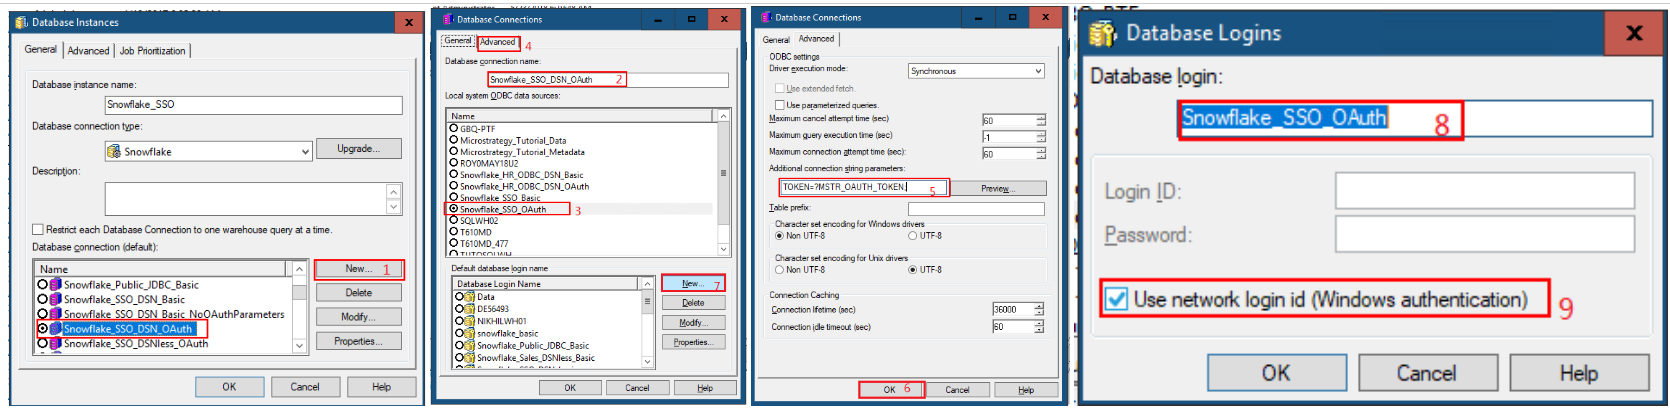
In MicroStrategy Developer:
- Click New to create a new database connection.
- In the Database connection name field, type in a name.
- Select the DSN.
- Go to the Advanced tab.
-
In the Additional connection string parameters field, enter TOKEN=?MSTR_OAUTH_TOKEN;.
This will act as a placeholder that will be replaced by a real token when the user uses the Snowflake database instance.
- Click OK.
- In the Database login, enter a name.
-
Select the Use network login id (Windows authentication) checkbox.
-
In Strategy Web:
In the Data Source dialog, select the OAuth Connection option.
-
-
Set OAuth Parameters.
Users must have the Set OAuth parameters for Cloud App sources privilege under Client-Web.
If you want to use the DB role in Strategy Workstation, OAuth parameters must be set from Workstation. Oauth parameters in Web and Workstation are different set values.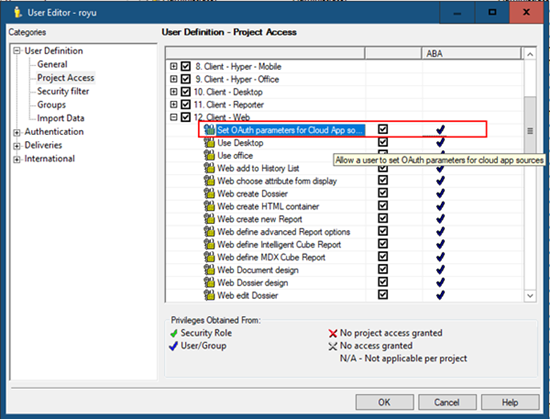
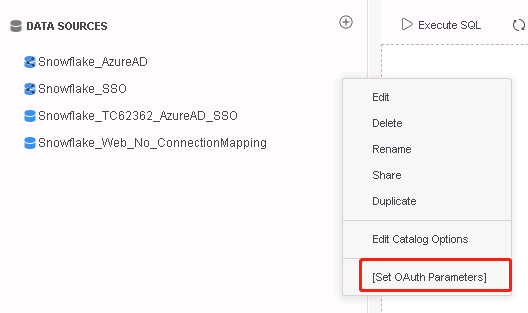
After the database instance is created, you can set the OAuth parameters in Strategy Web.
-
In the Database Instance menu, select Set OAuth Parameters.
-
In the Authentication Type drop-down, select Microsoft Azure AD SSO.
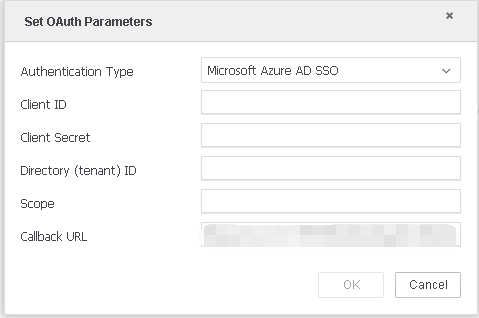
-
Fill out the required fields.
You can find the required information on Entra ID where the Snowflake OAuth Application was created in Integrate a MicroStrategy Library SAML environment with Microsoft Entra ID.
-
For Client ID, click on the app > Overview > Application (client) ID, and locate the ID.
- For Client Secret, click on the app > Certificates & secrets, and locate the secret. If necessary, create a new secret.
- For Directory (tenant) ID, click on the app > Overview, and locate the ID.
- For Scope, click on the app > API permissions, click on the API/Permission name, and locate the URL. The URL is in the format like
https://[AzureDomain]/[id]/session:scope-any. -
The Callback URL is generated by default.
For Web: https://[MicroStrategy Web Hostname]/MicroStrategy/servlet/mstrWeb?evt=3172
For Workstation: http://localhost
The callback URL should be added to the Snowflake OAtuh Client Application.
-
-
Create Snowflake Database Instances
You can create Snowflake database instances with or without the project schema.
With the Project Schema
To use the project schema, you must have a basic authentication connection:
Without the Project Schema
To use the database instance without the project schema, you must either have basic or OAuth authentication.
Create Connection Mappings (Optional)
If you have multiple Strategy Users or User Groups and want to give access to the same database instance but with different database logins, see Controlling Access to the Database: Connection Mappings
In a primary database connection, users that are not mapped into the secondary database connection use the default database connection. In a secondary database connection, users in a specific group use the mapped database connection.
For example, the administrator uses basic authentication, while other users use OAuth authentication. All users can use the project schema. You must set the default connection to use standard authentication for the Warehouse Catalog to work in Developer:
-
Create a basic authentication database connection (default).
-
In MicroStrategy Developer
- In the Database instance name field, type in a name.
- From the Database connection type drop-down, select Snowflake.
- Click New to create a new database connection.
- In the Database connection name field, type in a name.
- Select the DSN.
-
Create a database login and save your settings.
-
-
Create an OAuth authentication database connection.
-
In MicroStrategy Developer
- Click New to create a new database connection.
- In the Database connection name field, type in a name.
- Select the DSN.
- Go to the Advanced tab.
-
In the Additional connection string parameters field, enter TOKEN=?MSTR_OAUTH_TOKEN;.
This will act as a placeholder that will be replaced by a real token when the user uses the Snowflake database instance.
- Click OK.
- Click New.
- In the Database login, enter a name.
-
Select the Use network login id (Windows authentication) checkbox.
-
-
Create connection mappings.
-
Assign the new traditional DBRole in Project Configuration > Database Instance > SQL Data warehouse.
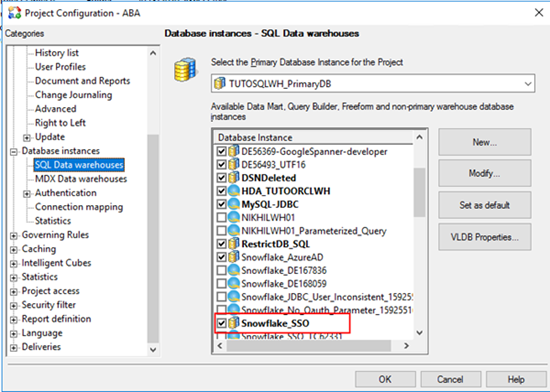
A default database connection mapping is created for all users when you select the database instance.
-
Assign different user groups with basic and OAuth database connection in Project Configuration > Database instances > Connection mapping.

- Users in group SSO_End_User_DSNless_OAuth will use the Snowflake_SSO_DSNless_OAuth database connection.
- Users in group SSO_End_User_DSN_OAuth will use the Snowflake_SSO_DSN_OAuth database connection.
- Users in group SSO_End_User_JDBC_OAuth will use the SSO_End_User_JDBC_OAuth database connection.
- Other users will use the default database connection. In this case, the Snowflake_SSO_DSNLess_Basic database connection is used.
-
-
Set OAuth parameters via Strategy Web.
After the database instance is created, you can set the OAuth parameters in Strategy Web.
-
In the Database Instance menu, select Set OAuth Parameters.
-
From the Authentication Type drop-down, select Microsoft Azure AD SSO.
-
Fill out the required fields:
You can find the required information on Entra ID where the Snowflake OAuth Application was created in Integrate a MicroStrategy Library SAML environment with Microsoft Entra ID.
- For Client ID, click on the app > Overview > Application (client) ID, and locate the ID.
- For Client Secret, click on the app > Certificates & secrets, and locate the secret. If necessary, create a new secret.
- For Directory (tenant) ID, click on the app > Overview, and locate the ID.
- For Scope, click on the app > API permissions, click on the API/Permission name, and locate the URL. The URL is in the format like
https://[AzureDomain]/[id]/session:scope-any. -
The Callback URL is generated by default.
The callback URL should be added to the Snowflake OAtuh Client Application.
-
Related Content
KB484275: Best practices for using the Snowflake Single Sign-on (SSO) feature