Strategy One
Integrating SAML Support with Badge
This procedure provides specific details about integrating MicroStrategy Web or Library with Badge.
- Download the IdP metadata:
- Open Identity Manager.
- Click the Logical Gateways tab.
- Click Download your network's Badge IdP metadata.
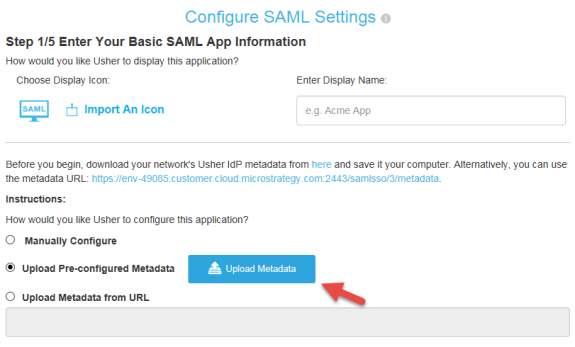
- Upload the SP metadata to the MicroStrategy Identity Server:
- Click the large SAML button.
- Enable the Upload Pre-configured Metadata option.
- Click Upload Metadata.
- Configure assertion attributes by selecting the LDAP attributes and mapping them to SAML Assetion attributes.
Select LDAP attributes:
- Open the Users and Badges tab and click Configure in the User Management section.
- On the Active Directory Synchronization page, set the Badge user attributes by mapping the values in the Badge field column to the Active Directory Attribute to be used. You may add custom Badge fields with any given name.
Map LDAP attributes to SAML Assetion attributes:
- On the Logical Gateways tab and click the Edit link in the Web Application login section.
- In the Configure SAML Settings dialog, click Configure on SAML Attribute Consuming Service.
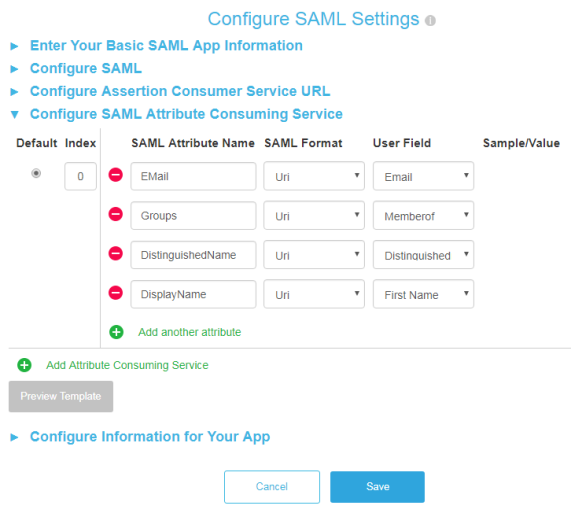
- Map the SAML Attribute Name to the User Field that contains the appropriate Active Directory Attribute configured in the previous step.
- Click Save.
- Check group format setting by finding the
<groupFormat>tag in theMstrSamlConfig.xmlfile.If your Identity network is configured with Active Directory or LDAP, the group information should be sent as DistinguishedNames.