Strategy One
Integrating SAML Support with AD FS
This procedure provides specific details about integrating Strategy Web, Library, and Mobile with AD FS. All steps below are performed in AD FS Management Console. Additionally, the following steps assume that SAML is already enabled in the AD FS server.
-
Download the IDP metadata.
-
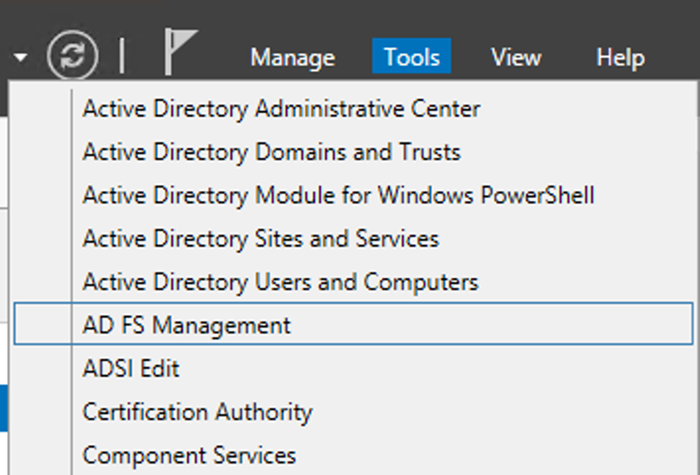
In Server Manager, go to Tools > AD FS Management.
-
Go to the Endpoints menu and locate the Federation Metadata entry point. The entry contains a field similar to
/FederationMetadata/2007-06/FederationMetadata.xml.
-
In any browser, enter the URL using the format <ADFS Server base URL>/<Metadata entry point> to download the metadata file to the browser's
Downloadsfolder.In this example, we navigate to
https://cl-desp-adfs.techsecurity.com/FederationMetadata/2007-06/FederationMetadata.xmlfrom the ADFS server machine because ADFS access is restricted to that machine. -
Copy the metadata file into your Web application's
WEB-INF/classes/resources/SAMLfolder. -
Copy the metadata file into your Library application's
MicroStrategyLibrary/WEB-INF/classes/auth/SAMLfolder. -
Copy the metadata file into your Mobile application's
WEB-INF/classes/resources/SAMLfolder. -
Rename the copied metadata file to
IDPMetadata.xml.
-
In Server Manager, go to Tools > AD FS Management.
-
Establish trust between the Web server and Intelligence server. See Single Sign-On with SAML Authentication for JSP Web and Mobile for more information.
-
Generate SAML configuration files. See Single Sign-On with SAML Authentication for JSP Web and Mobile for more information.
-
Add the admin user or user groups in
WEB-INF/classes/resources/SAML/MstrSamlConfig.xml.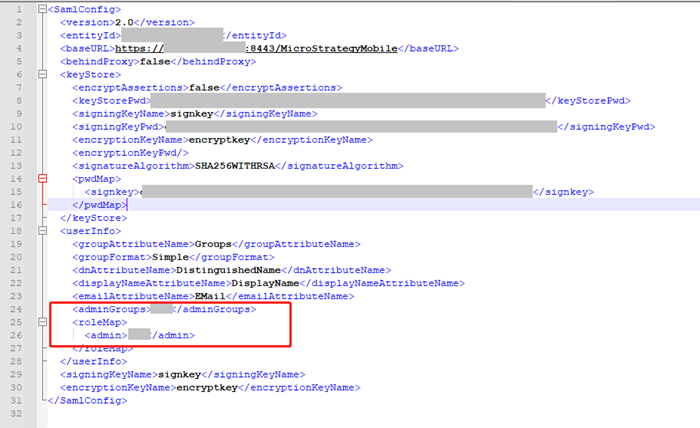
-
Register Strategy Web, Library, and Mobile with the ADFS server.
-
Copy the
SPMetadata.xmlfile from your Web application'sWEB-INF/classes/resources/SAMLfolder to the ADFS server machine. -
Copy the
SPMetadata.xmlfile from your Library application'sWEB-INF/classes/auth/SAMLfolder to the ADFS server machine. -
Copy the
SPMetadata.xmlfile from your Mobile application'sWEB-INF/classes/resources/SAMLfolder to the ADFS server machine. -
In the Console tree, right-click Relying Party Trusts > Add Relying Party Trust.
-
In the Select Data Source pane, select Import data from the relying party from a file.
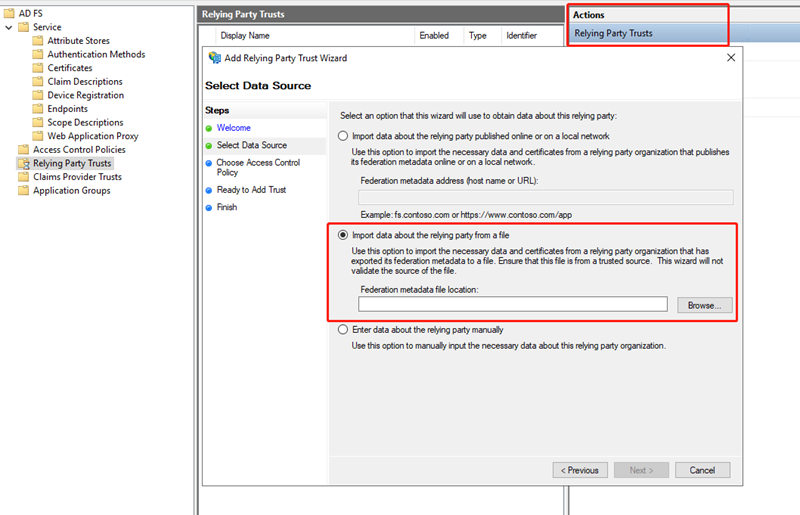
-
Click Browse and locate the metadata file.
-
Leave the remaining options as default.
-
-
Add claim rules for the registered relying party trust. See Integrating SAML Support for ADFS for more information.
-
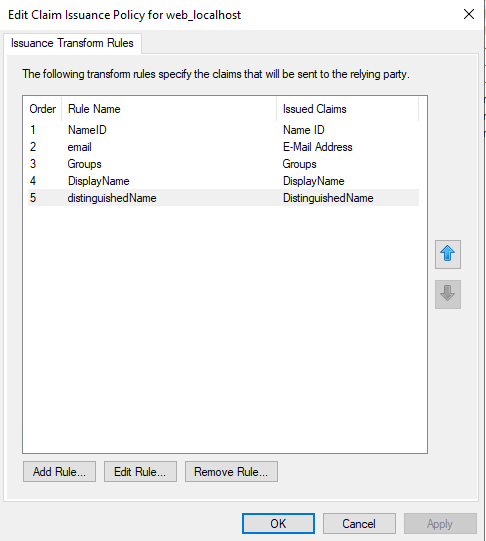
Right-click your registered application in ADFS > Edit Claim Rules.
-
One by one, add the claim rules and complete the setup on ADFS. The following are examples of rule creation and a list of created rules. In this example, the same claim rule is created as specified in the following screenshot.
-
Select Send LDAP Attributes as Claims as the claim rule template.
-
Select the name shown in the screenshot for the claim rule name.
-
From the Attribute store drop-down, choose Active Directory.
-
From the LDAP Atrtibute drop-down, choose an option. This option is the information taken from your Active Directory user.
- From the Outgoing Claim Type drop-down, choose an option.
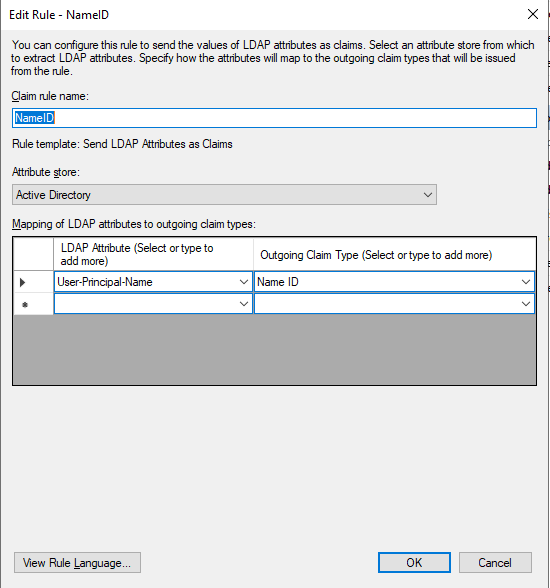
-
The following is the list of the mappings for the rules used in this example:
- User-Principal-Name -> Name
- E-Mail-Addresses -> Name ID
- Token-Groups - Unqualified Names -> Groups
- Display-Name -> DisplayName
- User-Principal-Name -> DistinguishedName
-
-
-
Map the OAuth user to the Strategy user for login control.
- Restart your application server and test to see if login is successful. Upon successful login, the following screen displays and your user appears.