Strategy ONE
Enable Single Sign-on to Web, Mobile, and Office with Third-Party Authentication
You can enable single sign-on (SSO) authentication for the following MicroStrategy applications using a third-party tool such as IBM Tivoli Access Manager, CA SiteMinder, Oracle Access Manager, or PingFederate®:
- MicroStrategy Web
- MicroStrategy Mobile
-
MicroStrategy Web Services, to support MicroStrategy Office (IBM Tivoli Access Manager and CA SiteMinder only)
This information applies to the legacy MicroStrategy Office add-in, the add‑in for Microsoft Office applications which is no longer actively developed.
It was substituted with a new add‑in, Strategy for Office, which supports Office 365 applications. The initial version does not yet have all the functionalities of the previous add‑in.
If you are using MicroStrategy 2021 Update 2 or a later version, the legacy MicroStrategy Office add-in cannot be installed from Web.
For more information, see the Strategy for Office page in the Readme and the Strategy for Office Help.
Once a user is authenticated in the third-party system, the user's permissions are retrieved from a user directory, such as LDAP, and access is granted to the MicroStrategy application.
In this security model, there are several layers. For example, when a user logs in to Tivoli, Tivoli determines whether the user's credentials are valid. If the user logs in with valid credentials to Tivoli, the user directory (such as LDAP) determines whether that valid user can connect to MicroStrategy. The user's MicroStrategy privileges are stored within the MicroStrategy Access Control List (ACL). What a user can and cannot do within the MicroStrategy application is stored on Intelligence Server in the metadata within these ACLs. For more information about privileges and ACLs in MicroStrategy, see Setting Up User Security.
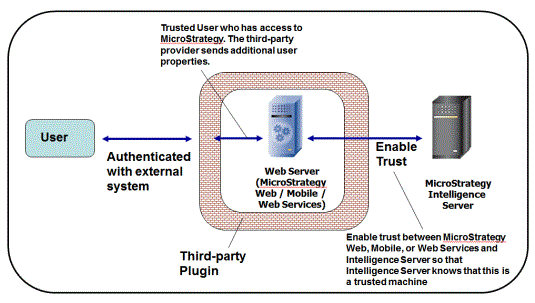
For MicroStrategy to be able to get a user's privileges from the metadata, Intelligence Server must be configured to be a trusted machine in MicroStrategy Web, Mobile, and Office. This allows the information to be passed between the two machines.
The following diagram illustrates the architecture of a security system that uses third-party authentication.

MicroStrategy enables this type of access by passing tokens between MicroStrategy, the user directory, and the third-party authentication provider. Properly configuring these levels of communication is critical to implementing SSO authentication.
The distinguished name of the user passed from the third-party provider is URL-decoded by default within MicroStrategy Web, Mobile, or Web Services before it is passed to the Intelligence Server.
Single sign-on authentication performs the step of allowing a user access to MicroStrategy products. You also must configure MicroStrategy users to define privileges and permissions that control what a user can perform and access within the products.
Setting Up Third-Party SSO Authentication in MicroStrategy Products
The following high-level steps are required to set up third-party SSO authentication in MicroStrategy Web, Mobile, or Web Services, and each is detailed below:
- Creating Users and Links in Third-Party Authentication Systems
- Enabling Single Sign-On Authentication to MicroStrategy Web, Mobile, or Office
- Importing and Linking Third-Party Authentication Users in MicroStrategy
- To Log in to MicroStrategy Web Using Tivoli Single Sign-On
Creating Users and Links in Third-Party Authentication Systems
Before MicroStrategy can be configured to accept Tivoli, SiteMinder, PingFederate or Oracle Access Manager authentication, certain preliminary settings must be established. This ensures that a link exists between the authentication provider and MicroStrategy products, and that the link is functioning as required.
You must complete all of the following steps to ensure proper configuration of your authentication provider and MicroStrategy products.
Creating a User in Your Third-Party Authentication System
You can enable SSO authentication in MicroStrategy by associating a MicroStrategy user to a user in Tivoli, SiteMinder, PingFederate or Oracle Access Manager. To test this association, you must create a user in your authentication system to confirm that access has been properly configured in MicroStrategy products.
For steps to create a new user, refer to your authentication provider's documentation.
Creating a Link to MicroStrategy Applications in Your Third-Party Authentication System
You link Tivoli to MicroStrategy applications using junctions, SiteMinder using Web Agents, and Oracle Access Manager using Webgates. These links redirect users from the respective provider to MicroStrategy, and are required to enable SSO authentication. You must create one link each, as applicable, for MicroStrategy Web, MicroStrategy Mobile, and MicroStrategy Web Services to support MicroStrategy Office.
Oracle Access Manager authentication is only available for MicroStrategy Web.
For steps to create a junction (in Tivoli), a Web Agent (in SiteMinder), or a Webgate (Oracle Access Manager), refer to the product's documentation.
Enabling Single Sign-On Authentication to MicroStrategy Web, Mobile, or Office
Once the initial third-party authentication setup is complete, you must enable trusted authentication in MicroStrategy Web, Mobile or Office, and establish trust between the MicroStrategy product and Intelligence Server. This allows the authentication token to be passed from one system to the other.
Note that for MicroStrategy Web Services to support MicroStrategy Office, you must establish trust between Office and the Intelligence server, and enable trusted authentication in the configuration files for Web Services.
This section explains the following required steps to enable SSO authentication in MicroStrategy Web, Mobile, or Web Services:
- Enabling Trusted Authentication in MicroStrategy Web
- Enabling Trusted Authentication in MicroStrategy Mobile
- Establishing Trust Between MicroStrategy Web or Mobile and Intelligence Server
- Establishing Trust Between MicroStrategy Web Services and Intelligence Server, to Support MicroStrategy Office
- Enabling Trusted Authentication in MicroStrategy Web Services to Support MicroStrategy Office
If you use Internet Information Services (IIS) as your web server for MicroStrategy Web or Web Services, you must enable anonymous authentication to the MicroStrategy virtual directories to support SSO authentication to MicroStrategy Web, Mobile, or Office. This is discussed in Enabling Anonymous Authentication for Internet Information Services.
Enabling Trusted Authentication in MicroStrategy Web
To enable users to log in to MicroStrategy Web using SSO authentication, you must enable trusted authentication as an available authentication mode in MicroStrategy Web.
To Enable Trusted Authentication in MicroStrategy Web
- From the Windows Start menu, point to All Programs, then MicroStrategy Tools, and then select Web Administrator.
- On the left side of the page, click Default Properties.
-
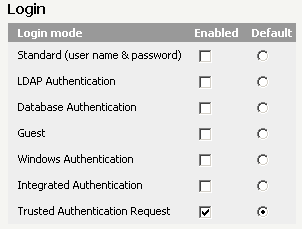
Scroll down to the Login area and, under Login mode, select the Enabled check box next to Trusted Authentication Request. Also select the Default option next to Trusted Authentication Request, as shown below:

- From the Trusted Authentication Providers drop-down list, select IBM Tivoli Access Manager, CA SiteMinder, PingFederate, or Oracle Access Manager.
To use a custom authentication provider, select Custom SSO. For information about adding custom authentication providers, refer to your MicroStrategy SDK documentation.
- Click Save.
Using Certificate Authentication with SiteMinder
CA SiteMinder can be configured to use either certificate authentication or basic authentication. MicroStrategy Web's siteminder_security.properties file indicates that the first SiteMinder header variable to be used is SM_UNIVERSALID. This variable provides information for certificate authentication. If this variable is empty, then the information in the variable SM_USER is used for basic authentication. For information about configuring your SiteMinder system to use certificate authentication, see the SiteMinder documentation.
Enabling Trusted Authentication in MicroStrategy Mobile
To enable users to log in to MicroStrategy Mobile using SSO authentication, you must enable trusted authentication as an available authentication mode in MicroStrategy Mobile. For instructions on configuring mobile devices to use trusted authentication, refer to the Administering MicroStrategy Mobile section in the Strategy Mobile Administration Help.
To Enable Trusted Authentication in MicroStrategy Mobile
- From the Windows Start menu, point to All Programs, then MicroStrategy Tools, and then select Mobile Administrator.
- On the left side of the page, click Default Properties.
- From the Trusted Authentication Providers drop-down list, select IBM Tivoli Access Manager, CA SiteMinder, PingFederate, or Oracle Access Manager.
To use a custom authentication provider, select Custom SSO. For information about adding custom authentication providers, refer to your MicroStrategy SDK documentation.
- Click Save.
To create a mobile configuration to send to users' mobile devices, refer to the Administering MicroStrategy Mobile section in the Strategy Mobile Administration Help.
Establishing Trust Between MicroStrategy Web or Mobile and Intelligence Server
To enable the authentication token to pass from your third-party authentication provider to MicroStrategy Web or Mobile, and then to Intelligence Server, a trust relationship must be established between MicroStrategy Web or Mobile and Intelligence Server. The steps to establish trust are described below.
If you need to delete an established trust relationship, see To Delete a Trust Relationship.
If you are using multiple Intelligence Server machines in a cluster, you must first set up the cluster, as described in Cluster Multiple Strategy Servers, and then establish trust between Web or Mobile Server and the cluster.
To establish trust between MicroStrategy Web or Mobile and Intelligence Server, you must have the following privileges:
- Bypass all object security access checks
- Configure security settings
- Enable Intelligence Server administration from Web
- Web administration
For information on assigning privileges to users, see Controlling Access to Functionality: Privileges.
To Establish Trust Between MicroStrategy Web or Mobile and Intelligence Server
- Open MicroStrategy Web Administrator or MicroStrategy Mobile Administrator, as applicable:
- From the Windows Start menu, point to All Programs, then MicroStrategy Tools, and then select Web Administrator.
- From the Windows Start menu, point to All Programs, then MicroStrategy Tools, and then select Mobile Administrator.
- On the left, click Servers.
- Confirm that MicroStrategy Web or Mobile Server is currently connected to an Intelligence Server. If an Intelligence Server is not connected, in the Unconnected Servers table, under Action, click Connect for the appropriate Intelligence Server.
- In the Connected Servers table, under Properties, click the Modify icon
 .
. 
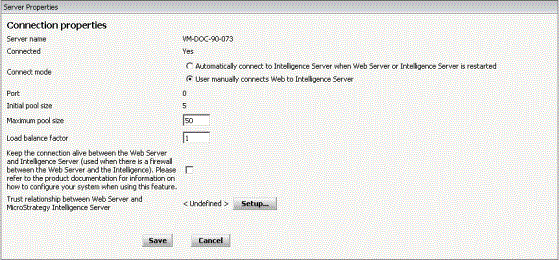
- Next to Trust relationship between Web/Mobile Server and MicroStrategy Intelligence Server, as applicable, click Setup.
- Type a User name and Password in the appropriate fields. The user must have administrative privileges for MicroStrategy Web or Mobile, as applicable.
- From the options provided, select the authentication mode used to authenticate the administrative user.
-
In the Web Server Application or Mobile Server Application field, type a unique name for the trust relationship.
For example, you can use the URLs for the applications using Tivoli, as follows:
MicroStrategy Web:
https://MachineName/JunctionName/MicroStrategy/aspMicroStrategy Mobile:
https://MachineName/JunctionName/MicroStrategyMobile/asp - Click Create Trust Relationship.
- Click Save.
To Verify the Trust Relationship
- From the Windows Start menu, point to All Programs, then MicroStrategy Products, and then select Developer.
- Log in to a project source as a user with administrative privileges.
- From the Administration menu, point to Server, and then select Configure MicroStrategy Intelligence Server.
- On the left, expand the Web Single Sign-on category, and verify that the trusted relationship is listed in the Trusted Web Application Registration list.
- Click OK.
To Delete a Trust Relationship
- Open MicroStrategy Web Administrator or MicroStrategy Mobile Administrator, as applicable:
- From the Windows Start menu, point to All Programs, then MicroStrategy Tools, and then select Web Administrator.
- From the Windows Start menu, point to All Programs, then MicroStrategy Tools, and then select Mobile Administrator.
- On the left, click Servers.
- Confirm that MicroStrategy Mobile is currently connected to an Intelligence Server. If an Intelligence Server is not connected, in the Unconnected Servers table, under Action, click Connect for the appropriate Intelligence Server.
- In the Connected Servers table, under Properties, click the Modify icon
 .
. -
Next to Trust relationship between MicroStrategy Web/Mobile Server and MicroStrategy Intelligence Server, as applicable, click Delete.

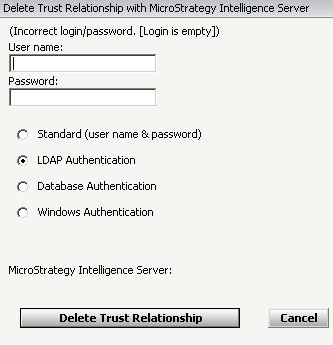
- Provide your login information in the appropriate fields.
- Click Delete trust relationship.

- Click Save.
Establishing Trust Between MicroStrategy Web Services and Intelligence Server, to Support MicroStrategy Office
To establish trust between MicroStrategy Office and Intelligence Server, you must use MicroStrategy Office to connect to the project source you want to use trusted authentication for, and then establish the trust relationship between Office and the Intelligence Server. Once you have completed this step, you must edit the projectsources.xml file for Web Services to enable trusted authentication for the project source. Both procedures are described below.
To Establish Trust Between MicroStrategy Web Services and Intelligence Server
- On a machine where MicroStrategy Office is installed, open a Microsoft Office product, such as Excel.
- In the Microsoft Office ribbon, under the MicroStrategy Office tab, click MicroStrategy Office. MicroStrategy Office starts, with a list of project sources you can connect to.
- From the list of project sources on the left, select the project source you want to enable trusted authentication for.
- In the right pane, enter the login ID and password for a user with administrative privileges, and click Get Projects. A list of projects is displayed.
- Select any project, and click OK.
- In the MicroStrategy Office toolbar, click Options.
- Under the General category, select Server.
- Next to Trust relationship between Web Services and Intelligence Server, click Create.
To Use the Third-Party Authentication URL for Web Services
- In the Web Services URL field, enter the URL for the Tivoli Junction or SiteMinder Web Agent, as applicable, that you created for MicroStrategy Web Services.
- Click OK.
Enabling Trusted Authentication in MicroStrategy Web Services to Support MicroStrategy Office
To allow users to log in to MicroStrategy Office using single sign-on (SSO), you must do the following:
- Edit the
web.configfile for Web Services orMWSConfig.propertiesfile for J2EE application servers, to choose a trusted authentication provider. - Edit the
projectsources.xmlfile for MicroStrategy Web Services and configure the project source to use a third-party security plug-in. For additional information on the settings in theprojectsources.xmlfile, see Determining How Users Log Into MicroStrategy Office in the legacy MicroStrategy Office User Guide.
You need administrative access to the machine where MicroStrategy Web Services is installed.
To Enable Trusted Authentication in MicroStrategy Office
To Choose a Trusted Authentication Provider
- Depending on your Web Services environment, on the machine where MicroStrategy Web Services is installed, do one of the following:
- If you are using IIS as your application server, open the
web.configfile in a text editor, such as Notepad. By default, the file is located inC:\Program Files (x86)\MicroStrategy\Web Services. - If you are using Web Services in a J2EE-compliant application server, open the
MWSConfig.propertiesfile in a text editor, such as Notepad. By default, the file is located in the folder where your application server deploys Web Services. - Depending on your Web Services environment, do the following:
-
In the
web.configfile, locate the following line:<add key="TRUSTEDAUTHPROVIDER" value="1" /> -
In the
MWSConfig.propertiesfile, locate the following line:TRUSTEDAUTHPROVIDER=1 - Change
valueorTRUSTEDAUTHPROVIDER, as applicable, to one of the following, as applicable: - To use Tivoli as the authentication provider, type
1. - To use SiteMinder as the authentication provider, type
2. - To use a custom authentication provider, type
3.
If you are using a custom authentication provider, you must make additional modifications to the custom_security.properties file, which is located by default in C:\Program Files (x86)\MicroStrategy\Web Services\resources. For information on these modifications, refer to the MicroStrategy Developer Library (MSDL).
To Configure Web Services to Use Trusted Authentication
- On the machine where MicroStrategy Web Services is installed, open the
projectsources.xmlfile in a text editor, such as Notepad. By default, the file is located inC:\Program Files (x86)\MicroStrategy\Web Services. - In the
projectsources.xmlfile, locate the<ProjectSource>tag describing the project source you want to enable SSO for. -
In the
<ProjectSource>tag, replace the content of the<AuthMode>tag withMWSSimpleSecurityPlugin. The contents of the new<ProjectSource>tag should appear similar to the following:Copy<ProjectSource>
<ProjectSourceName>Name</ProjectSourceName>
<ServerName>Name</ServerName>
<AuthMode>MWSSimpleSecurityPlugIn</AuthMode>
<PortNumber>0</PortNumber>
</ProjectSource> - Save
projectsources.xml.
Enabling Anonymous Authentication for Internet Information Services
If you use Internet Information Services (IIS) as your web server, you must enable anonymous authentication to the MicroStrategy virtual directory to support SSO authentication to MicroStrategy Web, Web Services or Mobile.
The steps to perform this configuration are provided below, which may vary depending on your version of IIS. Click here to find more information about using anonymous authentication with IIS.
- IIS 7
- IIS 8
- IIS 10
You cannot use Windows authentication to authenticate users in MicroStrategy Web or Mobile if you enable anonymous authentication to the MicroStrategy virtual directory in IIS. The steps below should only be used as part of an SSO authentication solution with Tivoli.
To Configure IIS to Enable Anonymous Authentication to the MicroStrategy Web, Web Services, and Mobile Virtual Directories
- On the MicroStrategy Web server machine, access the IIS Internet Service Manager.
- Browse to and right-click the MicroStrategy virtual folder and select Properties.
- On the Directory Security tab, under Anonymous access and authentication control, click Edit.
- Select the Allow anonymous access check box.
- Click OK.
- Click OK.
- To enable anonymous authentication to MicroStrategy Web Services, repeat the above procedure for the MicroStrategyWS virtual directory.
- To enable anonymous authentication to MicroStrategy Mobile, repeat the above procedure for the MicroStrategyMobile virtual directory on the Mobile Server machine.
- Restart IIS for the changes to take effect.
Importing and Linking Third-Party Authentication Users in MicroStrategy
For third-party authentication users to access MicroStrategy applications, the users must be granted MicroStrategy privileges. Whether the LDAP DN is sent in the request to Intelligence Server is configured when the Tivoli junction or SiteMinder Web Agent is created. For details about creating a junction or Web Agent, refer to your Tivoli or SiteMinder documentation.
A Tivoli or SiteMinder user can be:
- Imported as a new MicroStrategy user upon logging in to MicroStrategy Web, which assigns the user privileges that are defined for the MicroStrategy user. For steps to perform this configuration, see Importing Tivoli Users as MicroStrategy Users.
- Allowed guest access to MicroStrategy Web. The Tivoli user inherits the privileges of the Public/Guest group in MicroStrategy. Guest access to MicroStrategy Web is not necessary for imported or linked Tivoli users. For steps to perform this configuration, see Enabling Guest Access to MicroStrategy Web or Mobile for Tivoli Users.
A Tivoli or SiteMinder user can also be associated with an existing MicroStrategy user, using the MicroStrategy User Editor. Associating Tivoli users rather than enabling Tivoli users to be imported when they log in to MicroStrategy Web enables you to assign MicroStrategy privileges and other security settings for the user prior to their initial login. For steps to perform this configuration, see Linking Tivoli Users to Existing MicroStrategy Users.
If a Tivoli or SiteMinder user has already been imported into MicroStrategy, and a MicroStrategy user has been associated with the Tivoli or SiteMinder user, the MicroStrategy metadata is synchronized with the information from the user directory, such as the LDAP server. The way this synchronization takes place depends upon several factors.
Importing Tivoli Users as MicroStrategy Users
When MicroStrategy is configured to import a Tivoli user, the Tivoli user is imported as a MicroStrategy user the first time that the user logs in to MicroStrategy Web after the configuration is completed. A Tivoli user is imported into MicroStrategy only if the Tivoli user has not already been imported as or associated with a MicroStrategy user.
When a Tivoli user is imported into MicroStrategy:
- The Tivoli user name is imported as the trusted authentication request user ID for the new MicroStrategy user.
- The MicroStrategy user is added to the Everyone group by default. If no privileges are defined through a user directory such as LDAP, then the imported user inherits the privileges associated with the MicroStrategy Everyone group.
- Security privileges are not imported from Tivoli; these must be defined in MicroStrategy by an administrator.
To iImport Tivoli Users as MicroStrategy Users
- From the Windows Start menu, point to All Programs, then MicroStrategy Products, and then select Developer.
- Log in to a project source as a user with administrative privileges.
- From the Administration menu, point to Server, and then Configure MicroStrategy Intelligence Server.
- On the left, expand the Web Single Sign-on category.
- On the right, select the Import user at login check box.
- Click OK.
Linking Tivoli Users to Existing MicroStrategy Users
As an alternative to importing users, you can link (or associate) Tivoli users to existing MicroStrategy users to retain the existing privileges and configurations defined for the MicroStrategy users. Linking Tivoli users rather than enabling Tivoli users to be imported when they log in to MicroStrategy Web enables you to assign privileges and other security settings for the user prior to their initial login.
To Link Tivoli Users to Existing MicroStrategy Users
- From the Windows Start menu, point to All Programs, then MicroStrategy Products, and then select Developer.
- Log in to a project source as a user with administrative privileges.
- In the folder list on the left, expand Administration, and then expand User Manager.
- Browse to the MicroStrategy user to link to a Tivoli user.
- Right click the user and select Edit.
- Expand Authentication, then select Metadata.
- Under Trusted Authentication Request, in the User ID field, type the Tivoli user name to link to the MicroStrategy user.
The name you type in the User ID field should be the same as the one that the user employs when providing their Tivoli login credentials.
- Click OK.
Enabling Guest Access to MicroStrategy Web or Mobile for Tivoli Users
If you choose to not import or link Tivoli users to a MicroStrategy user, you can enable guest access to MicroStrategy Web for the Tivoli users. Guest users inherit their privileges from the MicroStrategy Public/Guest group.
Logging in to MicroStrategy Web Using Tivoli Single Sign-On
Once all of the preliminary steps have been completed and tested, users may begin to sign in to MicroStrategy using their Tivoli credentials. Sign-on steps are provided in the procedure below.
To Log in to MicroStrategy Web Using Tivoli Single Sign-On
- Open a web browser.
- Type the following URL in the address field:
https://MachineName/JunctionName/MicroStrategyWebURLWhere the variables in italics are as follows:
MachineNameis the name of the machine running Tivoli.JunctionNameis the name of the junction created in Tivoli.MicroStrategyWebURLis the URL to access MicroStrategy Web. For example,MicroStrategy/asp.
- Type your Tivoli user name and password.
- Connect to a MicroStrategy project.
- Click Trusted Authentication.
You are logged in to the MicroStrategy project with your Tivoli user credentials.
If you are prompted to display both secure and non-secure items on the web page, you can configure your web browser to hide this warning message. Refer to your web browser documentation regarding this configuration.
