Strategy One
Single Sign-On with SAML Authentication for JSP Web and Mobile
You can configure Strategy Web and Strategy Mobile to work with SAML‑compliant single sign‑on (SSO). To complete the set up in this document, a basic understanding of SAML workflows is required.
Though the following prerequisites and procedures refer to Strategy Web, the same information applies to Strategy Mobile, except where noted.
Before you begin configuring Strategy Web to support single sign-on, make sure you have done the following:
- Deployed a SAML‑enabled identity provider (IdP) infrastructure
- Verified that Strategy Web is run on a JSP server.
-
Deployed Strategy Web on this Web application server. Deploy the Strategy Web WAR file on the Web application server in accordance with your Web application server documentation.
The following procedures describe how to configure and integrate SAML support for Strategy Web to implement single sign‑on.
- Generate and Manage SAML Configuration Files
- Register Strategy Web with Your Identity Provider
- Configure the Intelligence Server and Enable SAML Authentication
- Configure Logging
- Change the Authentication Mode for the Admin Web Pages
Generate and Manage SAML Configuration Files
Strategy SAML support relies on several configuration files. Strategy provides a web page that automatically generates the necessary files based on the provided information. SAML metadata is used to share configuration information between the Identity Provider (IdP) and the Service Provider (SP). Metadata for the IdP and the SP is defined in the XML files.
To launch the page that generates the configuration files, open a browser and enter the following URL:
<web application_path>/saml/config/openTo access, you are prompted for the application server's admin credentials.
If you deployed Strategy Web under the name MicroStrategyWeb and you are launching the configuration page from the machine where you deployed Strategy Web, the URL is:
http://<FQDN>:<port>/MicroStrategyWeb/saml/config/openIf you deployed Strategy Mobile under the name MicroStrategyMobile and you are launching the configuration page from the machine where you deployed Strategy Mobile, the URL is:
http://<FQDN>:<port>/MicroStrategyMobile/saml/config/openExisting SAML Configuration Files
In MicroStrategy 2021 Update 3, you can download the existing SAML configuration file without manually connecting to the Web server machine.
If you have already configured SAML, you can download the following SAML configuration files and verify the content.
-
IDPMetadata.xml
-
SPMetadata.xml
-
SamlKeystore.jks
Upload IDPMetadata
In MicroStrategy 2021 Update 3, you can upload the IDPMetadata.xml configuration file without manually connecting to the Web server machine.
You can upload or change the existing IDPMetadata.xml file with the metadata file generated by the Identity Provider.
SAML Configuration Generation
The SAML configuration files are generated by submitting the following details:
-
General
-
Entity ID: This the unique identifier of the web application to be recognized by the IdP.
Some IdPs may require Entity ID to be the web application URL. SAML standards state it can be any string as long as a unique match can be found among the IdP's registered entity IDs. Follow the requirements for your specific IdP.
-
Entity base URL: This is the URL the IdP will send and receive SAML requests and responses. The field will be automatically generated when you load the configuration page, but it should always be double checked.
If you deployed Strategy Web under the name MicroStrategyWeb, the URL is:
http://<FQDN>:<port>/MicroStrategyWebIf you deployed Strategy Mobile under the name MicroStrategyMobile, the URL is:
http://<FQDN>:<port>/MicroStrategyMobileIf the web application is set up behind reverse proxy or load balancer, use FQDN of the proxy or loadbalancer in this URL.
- Do not use "localhost" for the Entity base URL.
- Do not use a trailing / at the end of the URL.
- Once configured, remember to always use this URL to access Strategy Web – using any alternative host name to visit would end up failing the SAML authentication.
-
Behind the proxy: Using a reverse proxy or load balancer can alter the HTTP headers of the messages sent to the application server. These HTTP headers are checked against the destination specified in the SAML response to make sure it is sent to the correct destination. A mismatch between the two values can cause the message delivery to fail. To prevent this, select Yes if Strategy Library runs behind a reverse proxy or load balancer. The base URL field is set to the front-end URL. Select No if you are not using a reverse proxy or load balancer.
-
-
Encryption
- Signature algorithm: The default is to use the industry standard "SHA256 with RSA" encryption algorithm. Set this value in accordance with the requirements of your specific IdP.
-
Generate Encryption Key: Set to No by default. Setting to Yes will generate an encryption key and store it in the Strategy Library metadata XML file.
If setting Generate Encryption Key to Yes: SAML authentication will not work unless you have the proper Java encryption strength policy and correct setup on IdP side.
-
Assertion Attribute mapping
These options control how user attributes received from the SAML responses are processed. If the SAML attribute names are configurable on IdP side, you may leave all options as default. If your IdP sends over SAML attributes in fixed names the values must be changed on the web application side to match.
- Display Name Attribute: User display name attribute
- Email Attribute: User email address attribute
- Distinguished Name Attribute: User distinguished name attribute
- Group Attribute: User group attribute
- Group format
- Simple: The default option takes a user's group information as plain group names. When using this option, make sure values sent over by IdP in the "Groups" attribute are group names and nothing else.
- DistinguishedName: DistinguishedName means that values sent over in the "Groups" attribute are the LDAP DistinguishedName of the user's groups. The option is only used to utilize LDAP integration or when the IdP only sends group information as DistinguishedNames.
-
Admin Groups: Defines groups that can access Administrator page.
- Group Attribute:Groups
- Admin Groups:IdPGroupA,IdPGroupB
You can also change attribute names in MstrSamlConfig.xml even after the configuration is done.
To define multiple groups, use comma to separate them. Do not add space in front of or behind comma.
For example, group information is passed in the SAML response as:
<saml2:Attribute Name="Groups" NameFormat="urn:oasis:names:tc:SAML:2.0:attrname-format:unspecified">
   <saml2:AttributeValue xmlns:xs="http://www.w3.org/2001/XMLSchema" xmlns:xsi="http://www.w3.org/2001/XMLSchema- instance" xsi:type="xs:string">IdPGroupA </saml2:AttributeValue>
   <saml2:AttributeValue xmlns:xs="http://www.w3.org/2001/XMLSchema" xmlns:xsi="http://www.w3.org/2001/XMLSchema-instance" xsi:type="xs:string">IdPGroupB </saml2:AttributeValue>
</saml2:Attribute>
To allow IdPGroupA and IdPGroupB users to access Administrator page, the configuration is:
Click Generate config to generate three configuration files in the WEB-INF/classes/resources/SAML folder of the Strategy Web installation directory:
MstrSamlConfig.xmlContains run-time SAML support configuration parametersSPMetadata.xmlContains metadata describing your web application to SSOSamlKeystore.jksContains necessary cryptographic material
Do not rename any of the generated files.
Register Strategy Web with Your Identity Provider
To register Strategy Web with your IdP, you need to do the following:
- Register Strategy Web with your IdP using the
SPMetadata.xmlfile you generated in the previous step. - Configure the SAML Assertion attributes
Each SAML-compliant IdP has a different way to perform these steps. The sections below provide a general overview of the process.
- Register the web application with SSO:
Use the
SPMetadata.xmlfile you generated in the previous step to register the Strategy Web application with the IdP.If uploading a metadata file is not supported by your IdP, manual configuration is necessary.
The
SPMetadata.xmlfile contains all of the information needed for manual configuration.- The
entityID=parameter is the same EntityID you provided in the SAML config page AssertionConsumerService Location=this URL is located near the end of the file.Be aware that there are multiple URLs in this file. The
AssertionConsumerService Locationwill contain the binding statementHTTP-POSTat the end.- If the signing certificate is required:
- Copy the text between
<ds:X509Certificate>and</ds:X509Certificate>tags. - Paste the contents into a text editor.
- Save the file as
file_name.cerand upload to IdP.
- Copy the text between
- The
- Configure SAML Assertion attributes:
Strategy Web uses information about users from the SAML Response to create Intelligence Server sessions. The settings are how SAML users are mapped or imported to Strategy.
The user properties that Strategy uses for mapping are:
Required attributes
- Name ID: Maps to Trusted Authenticated Request User ID of the Strategy user as defined in MicroStrategy Developer.
Optional attributes
- DisplayName: Used to populate or link to a Strategy user's Full name
- EMail: User email
- DistinguishedName: Used to extract additional user information from the LDAP server
- Groups: List of groups user belongs to
Attribute names are case sensitive. Make sure any SAML attribute name configured here is an exact match to the web application configuration.
In the case where IdP does not allow customization of SAML attribute names and provides fixed names instead, you may modify the corresponding attribute names in
MstrSamlConfig.xmlgenerated previously.For more information on mapping users between a SAML IdP and Strategy, see Mapping SAML Users to Strategy
When configuring assertion attributes, make sure you set up users who belong to a group (for example admin) with the same group name as defined when generating configuration files in Strategy Web (step 2 in Generate and Manage SAML Configuration Files). Otherwise, no user will be able to access the web administrator page after the web.xml file has been modified and the Web server restarted. Use Groups as SAML Attribute Name.
- Download the IdP metadata:
Consult the SSO documentation for instructions on how to export or download the IdP metadata. The IdP metadata file must be named
IDPMetadata.xml. This file can either be uploaded using the Upload IDPMetadata functionality mentioned inGenerate and Manage SAML Configuration Files or directly placed in theWEB-INF/classes/resources/SAMLfolder. Ensure that the EntityID value in theIDPMetadata.xmlfile is different from the EntityID value in theSPMetadata.xmlfile to avoid web application errors.Strategy does not automatically update the
IDPMetadata.xmlfile. If for any reason the metadata changes on the IdP side, you will need to download and replaceIDPMetadata.xmlmanually.
Configure the Intelligence Server and Enable SAML Authentication
To use SAML authentication, you need to configure the trusted relationship between the Web server and the Intelligence Server and enable SAML authentication. This is done through the Administrator Page. Open the admin page for your web application. Then, connect to the Intelligence Server you want to use.
- Establish trust between the server and Intelligence Server:
- Open the Server properties editor.
- Next to Trust relationship between Strategy Web Server and Strategy Intelligence Server, click Setup.

- Enter the Intelligence Server administrator credentials.
- Click Create Trust relationship.
- Enable SAML authentication for 2021 Update 2 or later:
In the Default Properties section of the Web Administrator page, enable SAML authentication and click Save.
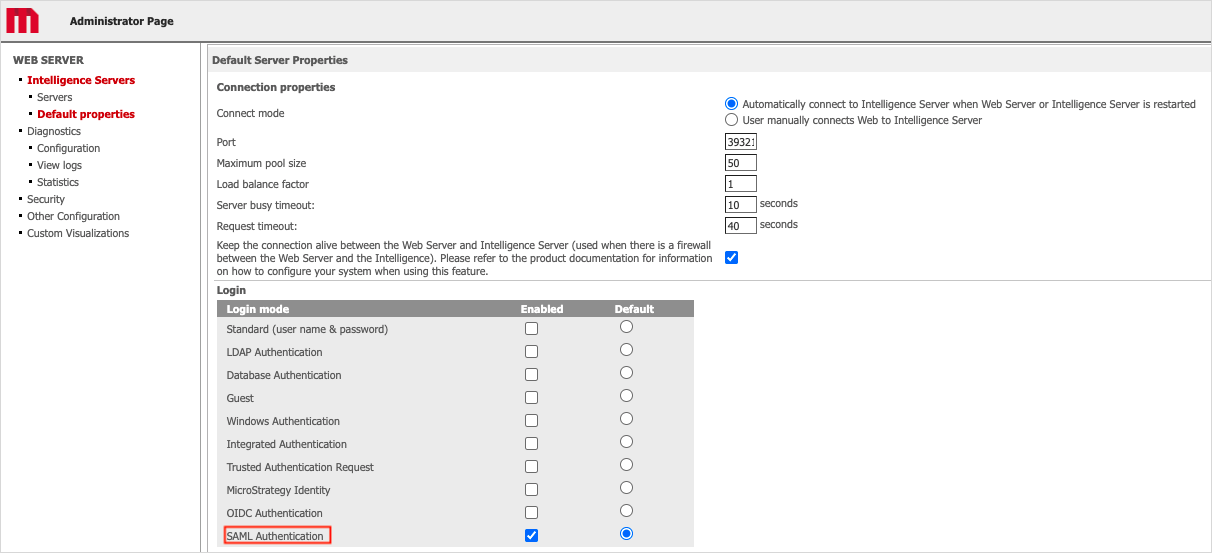
- Restart the Web server.
-
Enable SAML authentication for 2021 Update 1:
-
In the Default Properties section of the Web Administrator page, enable SAML authentication and click Save.

- Locate the
web.xmlfile located in theWEB-INFfolder of the Strategy Web installation directory and open it in a text editor. -
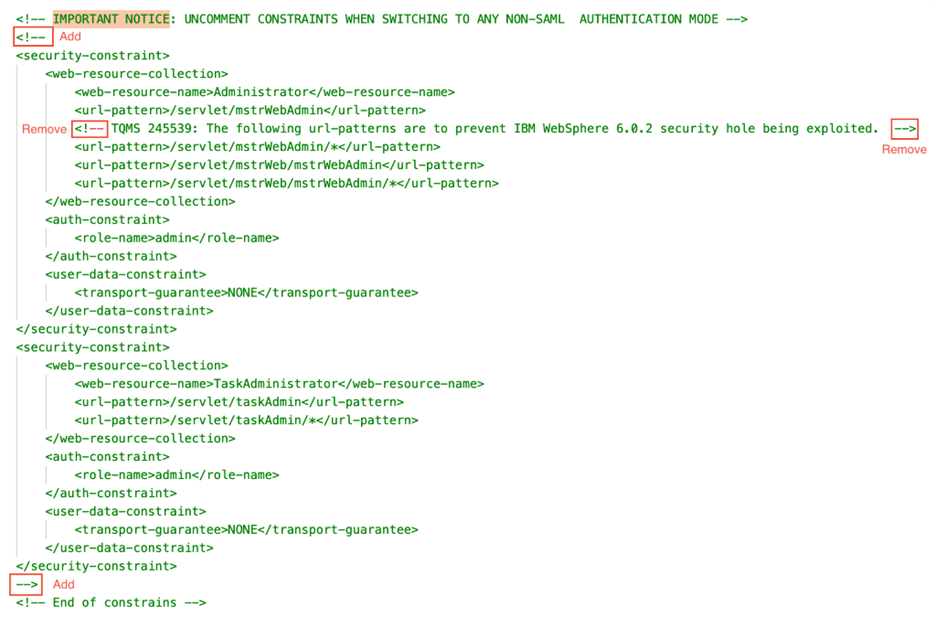
Comment out the two security constraints as shown below to disable basic authentication for the Administrator page. Surround the constraints with
<!--and-->tags. Make sure that there are no sub comments in the text, as this may cause an error. If you decide to change to another authentication mode besides SAML in the future, you must reverse the changes done in this step.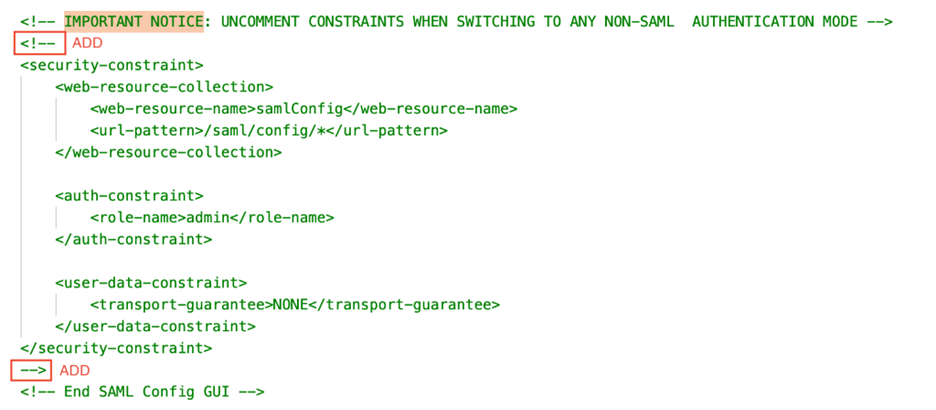
-
-
Enable SAML authentication for the 2021 platform release or older versions:
In Strategy Web, the Default properties screen is used for configuring default login mode, but the default properties do not apply to SAML for 2021 or older versions. When SAML authentication is configured in
web.xml, this screen displays SAML settings regardless of the default property values and all the login fields on the page are disabled. SAML is chosen unconditionally for trusted mode.If you decide to configure SAML authentication in
web.xml, you must first enable Trusted Authentication Request.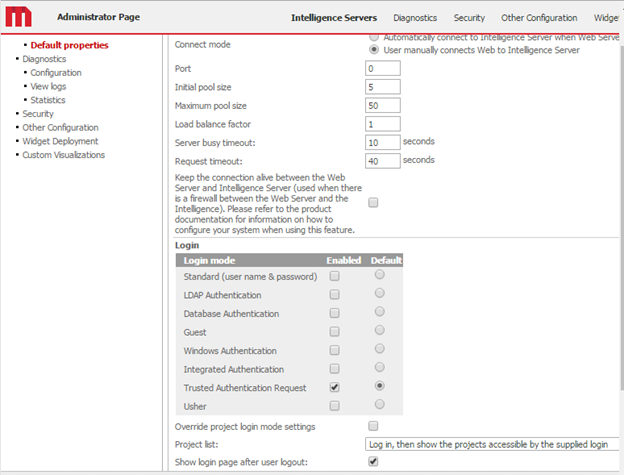
To enable SAML in the Web application for 2021 or older versions, modify the
web.xmlfile located in theWEB-INFfolder of the Strategy Web installation directory.-
Stop the Strategy Web application server.
-
Delete the first and last line of the
web.xmlfragment shown below to enable SAML authentication.Copy<!-- Delete fragment below to enable SAML Authentication mode
<context-param>
<param-name>contextConfigLocation</param-name>
<param-value>classpath:resources/SAML/SpringSAMLConfig.xml</param-value>
</context-param>
<context-param>
<param-name>contextInitializerClasses</param-name>
<param-value>com.microstrategy.auth.saml.config.ConfigApplicationContextInitializer</param-value>
</context-param>
<filter>
<filter-name>springSecurityFilterChain</filter-name>
<filter-class>org.springframework.web.filter.DelegatingFilterProxy</filter-class>
</filter>
<filter-mapping>
<filter-name>springSecurityFilterChain</filter-name>
<url-pattern>/servlet/*</url-pattern>
</filter-mapping>
<filter-mapping>
<filter-name>springSecurityFilterChain</filter-name>
<url-pattern>/saml/*</url-pattern>
</filter-mapping>
<listener>
<listener-class>org.springframework.web.context.ContextLoaderListener</listener-class>
</listener>
--> -
Save the
web.xmlfile. - Restart the Web server.
To disable SAML in a Web application for the 2021 platform release and older versions, modify the
web.xmlfile located in theWEB-INFfolder of the Strategy Web installation directory.-
Replace the
web.xmlfile of the Web application with the original file that you saved. - Open the Web Administrator page.
- Change the Login mode to the desired mode.
- Remove the trust relationship between the Web server and Intelligence Server.
- Restart the Web server.
-
Configure Logging
- Locate the
log4j2.propertiesfile in theWEB-INF/classesfolder. - Modify the
property.filenameproperty to point to the folder where you want the SAML logs stored.It is not recommended to leave the file as is, since the relative file path is very unreliable and can end up anywhere. The file can almost always cannot be found in the Web application folder. Use full file paths to fully control the log location.
In a Windows environment, the file path must be in Java format. This means you either need to change each backslash ("\") to a slash ("/"), or you need to escape the backslash with another one ("\\"). There is also a way to shorten the path by referring to the Tomcat base folder as a variable, for example:
Copy${catalina.home}/webapps/MicroStrategy/WEB-INF/log/SAML/SAML.logFor troubleshooting purposes it is recommended to first change the level of
org.opensaml, that is thelogger.d.levelproperty, to debug and leave everything else as the default. This generates a clean log with all SAML messages, along with any errors or exceptions. -
Restart the Web application server to apply all changes.
If you have a problem accessing the Strategy Web Administrator page, close and reopen your web browser to clear the old browser cache.
Change the Authentication Mode for the Admin Web Pages
In 2021 Update 2 or later, the Web admin pages support SAML and basic authentication when SAML authentication is enabled. The admin pages authentication is governed by the springAdminAuthMethod parameter located in the WEB-INF/xml/sys_defaults.properties file.
There are two possible values for the springAdminAuthMethod parameter:
-
springAdminAuthMethod = 2The default value of the
springAdminAuthMethodparameter is2. This means the Web admin pages are protected by the SAML admin groups mentioned in the saml/config/open form. These admin groups are linked to the groups on the Identity Provider (IDP) side. The members who belong to the IDP admin groups can only access the admin pages. Users that do not belong to the admin group receive a 403 Forbidden error. -
springAdminAuthMethod = 1Admin pages are protected with basic authentication.
The administrator can change the parameter value as per the requirements. A Web server restart is required for the changes to take effect.