Strategy One
Mosaic Studio Object List Panel
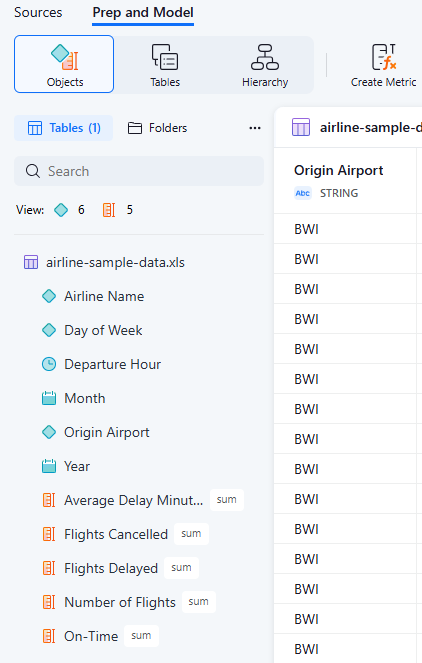
You can view the Object List panel in either Table View or Folder View. Click an option to switch views.
You can use the Objects panel to view objects and perform a variety of actions, see the following:
Table View
The contents are organized into tables. You can see unmapped columns in this view.
In most cases, Table View is the default. When you switch to the hierarchy canvas, Folder View becomes the default.

Folder View
The contents are listed or organized into folders. Additionally, you can drag and drop folders and objects to organize them.
Create a Folder
-
In the Objects panel Folder View, click Create a New Folder
 .
.A New Folder is added.
-
To rename the folder:
-
Right-click the folder and choose Rename.
-
Type a new name and press
Enter.
-
-
To add objects to the folder, drag and drop an object on the folder.
To add multiple objects to the folder, press
ShiftorCtrlto select your objects and drag and drop them on the folder. -
To delete a folder, right-click the folder and choose Delete.
-
Click Save.
Objects List Panel Options
You can further control what and how objects display in the Object List panel.
-
Next to Objects, click Panel Options
 .
. -
To hide or display attribute forms in the Object List panel, select or deselect Show Attribute Forms.
-
To hide or display unmapped columns, select or deselect Show unmapped columns.
You can map attributes in the same table to link them or you can map attributes from different tables to create a multi-form attribute.
Table Options
-
In the Table View, right-click a table.
-
Choose one of the following options:
-
Rename: Type a name for the table and press
Enter. -
Duplicate: Create a copy of the table.
-
Create attribute: Create an attribute to add to the table. For more information, see Create and Edit Attributes in Mosaic Studio.
-
Create metric: Create a metric to add to the table. For more information, see Create and Edit Base and Advanced Metrics in Mosaic Studio.
-
Delete: Remove the table from the Mosaic model.
-
-
Click Save.
Attribute Options
-
In the Table View or Folder View, right-click an attribute.
-
Choose one of the following options:
-
Edit: Edit the attribute. For more information, see Create and Edit Attributes in Mosaic Studio.
-
Rename: Type a new name for the attribute and press
Enter. -
Duplicate: Create a copy of the attribute.
-
Unmap from: Remove the link to an attribute in the same table.
This option is only available if you are in the Table View.
-
Merge to: Select a checkbox next to an object to merge the attribute into and click Ok.
If a source attribute and target attribute are in the same table, create a multi-form attribute. If a source attribute and target attribute are in different tables, link the attributes.
-
Define Geography: Assign a geo role to the data column. Expand the drop-down list, choose a geography type, and click OK.
-
Convert to Column Metric: Define the object as a metric.
-
Delete: Delete the attribute.
-
Metric Options
-
In the Table View or Folder View, right-click an metric.
-
Choose one of the following options:
-
Edit: Edit the metric. For more information, see Create and Edit Base and Advanced Metrics in Mosaic Studio.
-
Rename: Type a new name for the metric and press Enter.
-
Duplicate: Create a copy of the metric.
-
Aggregate Function: Create a metric by selecting the aggregation function used to calculate values.
-
Unmap: Remove the link to a metric in the same table.
This option is only available for imported metrics if you are in the Table View.
-
Convert to Attribute: Define the object as an attribute.
This option is only available for imported metrics.
-
Delete: Delete the attribute.
-
-
Click Save.
