Strategy One
Use Adobe Analysis Workspace to Import Data
Adobe has discontinued Adobe Analytics, replacing it with Adobe Analysis Workspace. Starting in Strategy One (March 2025), you can create a data source that uses Adobe Analysis Workspace and then use it to import data.
- Create an Adobe Analysis Workspace Database Role Using Data Sources
- Import Data Using the Adobe Analysis Workspace Database Role
Create an Adobe Analysis Workspace Database Role Using Data Sources
-
In the Add Data Source window, type the Name of the database role you are creating.
-
Type an optional Description to help identify the data source to users.
-
In Database Version, Cloud Gateway SharePoint is selected by default.
-
From the Default Database Connection drop-down list, choose an existing connection or click Add New Database Connection.
-
If you choose to create a new database connection, use the following steps:
-
In the Create New Database Connection dialog, type a Name and an optional Description.
-
Select the Driver from the drop-down list.
-
Select the Authentication Mode from the drop-down list.
-
From the Authentication Service drop-down list, choose an existing service or click Add New Authentication Service.
-
If you choose to create a new authentication service:
-
Type a Display Name.
-
Keep the Identity Provider set to Adobe. The Library Web, Authoring Web, and Workstation URIs are automatically populated. Be sure to whitelist these URIs to use the OAuth database role in Library, Web, and Workstation. See Manage OAuth Enterprise Security with Identity and Access Management (IAM) Objects for more information on creating an IAM object.
-
Copy the values from your Adobe app for the Client ID, Client Secret, and Scope (this is the Director(tenant) ID).
-
Click Save.
-
-
Click Save.
-
-
In the Add Data Source dialog, select the Projects to associate this database source with.
-
Click Save.
Test is not available for OAuth workflows.
Import Data Using the Adobe Analysis Workspace Database Role
Once you create the database role, you can start importing data.
-
You can import data using Workstation or Library:
-
Workstation: In the Navigation pane, click
 , next to Datasets. Choose an Environment, Project, and Data Import Cube.
 -
Library: Create a new dashboard.
-
-
Select the Adobe Analysis Workspace database role. The database roles created using the data sources and enterprise security workflows display.
-
Select the database role. If this is your first time using the database role, enter the user name/email and password to sign in.
-
Import Adobe Analysis Workspace data with by selecting dimensions and metrics or a custom query.
-
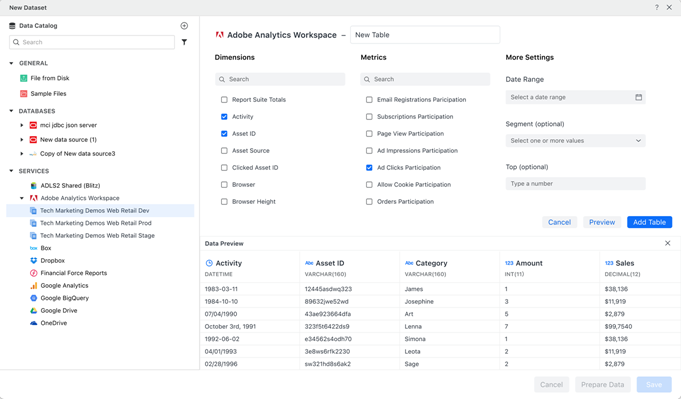
Click here for steps to import data by selecting dimensions and metrics.
-
In the drop-down list, select report suites of Adobe Analysis Workspace.
-
Select the table.
-
Select the dimensions and metrics to import.
-
You can optionally select a Date Range, Segments, and /or the Top values.

-
Click Preview to preview the data, if needed.
-
When your data is ready, click Add Table to add the table to the panel on the right.
-
Click Save.
-
-
Click here for steps to import data with a custom query.
-
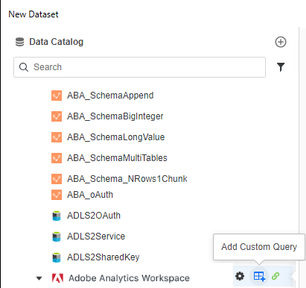
Hover your cursor over the Adobe Analysis Workspace data source and click Add Custom Query.
-
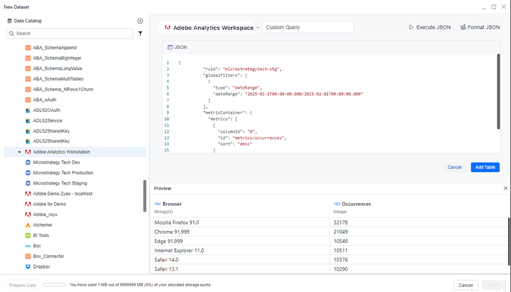
Add the JSON body to the Query Editor pane.
-
If necessary, click Format JSON in the toolbar.
-
Click Execute JSON to get the data.
-
Click Add Table to add the table to the panel on the right.
-
-
-
Use the Preview pane to view sample data and change the column type.
-
Publish the cube.
Limitations
-
If you select too many dimensions, you might encounter an error due to the Adobe API limitation.
-
Workaround: Select fewer dimensions or add a filter to reduce the amount of data and make the request valid.
-
-
Adobe Analysis Workspace has a timeout and request rate limitation which blocks some high-concurrency operations. See details at Analytics 2.0 API FAQ.
-
The API request timeout is 60 seconds.
-
If you send a request to get data too frequently (12 requests every 6 seconds per user or approximately 120 requests per minute), an error occurs for too many requests.
-