Strategy One
Configure Drilling for a Project
Explore data at additional levels of detail beyond what is immediately visible in a report by drilling on the data.
Drill to navigate through different levels of information within a report. Drill down to see more detailed data or drill up to view higher-level summaries. For example, if you have sales data organized by regions, markets, and stores, you can start with a report showing total sales by region and then drill down to see sales figures for individual markets within that region.
Configure Drilling
- Open the Workstation window.
- In the Navigation pane, click Projects.
-
Right-click a project and choose Properties.
-
In the left pane, click Drilling.
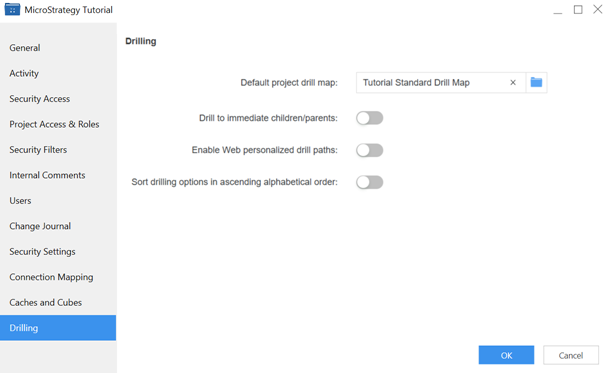
- Select the Default Project Drill Map from the drop-down list. Drill maps are fully customized drill paths that are available to your users while drilling on a report. By default, the paths available are based on the system hierarchy of the project. For steps to create a drill map, see Create Drill Maps.
-
Drill to immediate children/parents: Controls drill-down behavior from objects on a report. If you enable it, only the immediate children or parents of an object, rather than all children or parents, are displayed to be drilled to. This option is disabled by default.
-
Enable Web personalized drill paths: When disabled, Web users see all drill paths (the default). Enable it to allow Web users to see only personalized drill paths.
-
Personalized drill paths are based on each object's access control list (ACL), specified in the Security category of the Properties dialog box. If you set up ACLs, all drill paths still display on Web until you enable Web personalized drill paths.
-
-
Sort drilling options in ascending alphabetical order: Enable this to automatically sort all drilling options alphabetically in the display when a user right-clicks a drillable object. Sorting occurs within a hierarchy and between hierarchies, in ascending alphabetical order. This option is disabled by default.
- Click OK to save your changes and close the Properties dialog box.
- Click Save to save your changes and close the Properties dialog box.