Strategy One

Create an Object Prompt to Select Objects to Display on a Report

Beginning in Strategy One (December 2025), you can format how the prompt displays. Options include the style (such as pull-down list or check box) and allowing a search box, among others.

Object prompts provide users the ability to add additional objects to a report. You can let users select from almost any object available in Strategy. The objects the user selects in the prompt are placed on the report. This essentially allows users to create their reports, although you use the object prompt to control what objects they can choose to include on their reports.

For example, you can create a prompt that allows users to choose from a list of existing stand-alone filters to apply to the report. Or, you can create a prompt that displays the Day, Month, Quarter, and Year attributes to users so that the user can specify the granularity of the report. Object prompts enable you to provide versatile reports to users.

Object prompts can be used in many places, including the following:

  • Object prompts containing attributes: Any place that can accept a list of attributes.
  • Object prompts containing metrics: Embedded in a set qualification filter and any place that accepts metrics.

When you create an object prompt, you can decide whether users can select from a specified list of objects, or you can define a specific search that presents an up-to-date set of objects for users to choose from. Including a search object in the object prompt, rather than specifying the exact object names, allows users to select from new objects that might not have been part of the project when you first created the prompt.

Check out the video below to learn more!

You can create a stand-alone prompt to be used in other objects. Beginning in Strategy One (December 2025), you can create a prompt that is embedded in a filter. An embedded prompt is saved within the filter and cannot be used in other objects.

Create an Object Prompt

If you want users to answer the prompt by selecting from the results of a search object, create the search object before creating the prompt.

  1. Open the Workstation window.
  2. Do one of the following:
    • To create a stand-alone prompt, from the File menu, select New Prompt.
    • To create an embedded prompt within a filter, from the File menu, select New Filter.
  3. If you are connected to multiple environments or projects, select the environment and project to create the prompt in.
  4. To create an embedded prompt within a filter, complete the following steps: 
    1. Click New Qualification.
    2. From the Based On drop-down list, select Create Prompt.
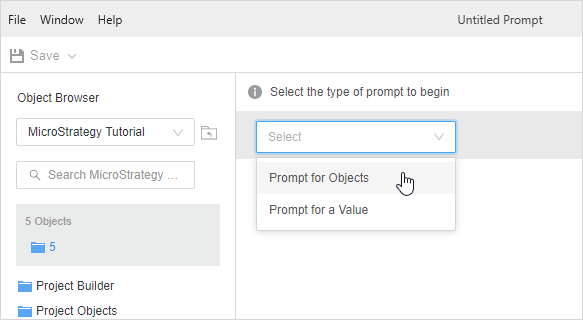
    3. From the Select the Type of Prompt to Begin drop-down list, select the type of object to use in the prompt: Filter, Report, or Metric.
  5. To create a stand-alone prompt, from the Select the Type of Prompt to Begin drop-down list, select Prompt for Objects.

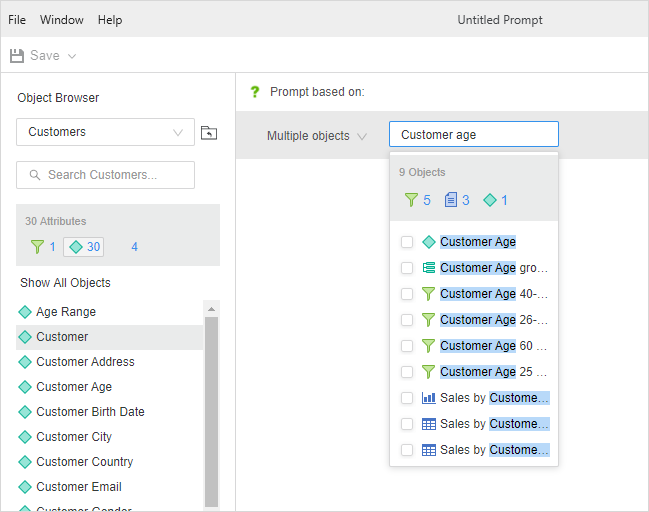
  6. In the Multiple objects box, search for and add objects.

    • To let users select which objects to include on the report, select attributes and metrics.

    • To let users determine the data that is included in the report, select filters and reports.

    • To let users determine which objects to use to split a long report into a set of individual pages, select attributes and metrics.

    • To create a prompted filter, select attributes, filters, and reports.

    • To create a prompted metric, select attributes, filters, or metrics.

    • You can instead select search objects that contain these types of objects.

    You can also drag and drop objects from the Object Browser.

  7. Edit the predefined text for the Prompt title and instructions by clicking the text. Type a new Prompt Title and Instructions in the boxes.

  8. To set a minimum and/or maximum, require a prompt answer, and enable personal answers, click None next to Answer restrictions.

    • To set the minimum number of objects that can be selected by the user, select the Minimum Objects check box and type the value in the box. You can specify a minimum even if you do not specify a maximum.

    • To set the maximum number of objects that can be selected by the user, select the Maximum Objects check box and type the value in the box. You can specify a maximum even if you do not specify a minimum.

    • To require users to answer the prompt before running the report, select the Prompt Answer Required check box.

    • To determine whether users can save and reuse their prompt answers, select the Allow Personal Answers check box. Choose how many prompt answers they can save for the prompt:

      • Single Save and reuse only one prompt answer.

      • Multiple Save and reuse multiple prompt answers.

  9. When the prompt is executed, the user is prompted to select which of the objects to include on the report. If users tend to select the same answers, define those answers as the default. Default answers are automatically selected and save users time. If a default answer is not defined, users must select an answer if the prompt is required.
    1. Click None next to Default Answer.
    2. Select the check boxes for the objects to use as the defaults.
  10. Beginning in Strategy One (December 2025), you can format how the prompt displays.
    1. Click Options.
    2. Select the Display Style. The styles include:
      • Radio Button: Users select an attribute element by clicking a radio button. Not available for hierarchy qualification prompts.

      • Check Box: Users specify attribute elements by selecting check boxes. Available only for attribute element list and object prompts.

      • Pull-Down: Users select an answer from a drop-down list. Not available for hierarchy qualification prompts.

      • List: Users select prompt answers from a list. Not available for hierarchy qualification prompts.

      • Text: Users type text in a box. Available only for attribute qualification and metric qualification prompts.

      • Tree: Users expand levels of the hierarchy to navigate to the object to select. Available only for hierarchy qualification prompts and for object prompts that use a search object.

      • Shopping Cart: Users add values to a list of selected values.

      The available formatting options vary depending on the prompt's type and display style.

    3. If you select Radio Button or Check Box for an attribute element list prompt, you can determine how the prompt items are arranged.
      • From the Orientation drop-down list, select Vertical or Horizontal.
      • You can specify how many items display in each column or row by selecting the Items Per Column or Row check box and typing the value.
    4. If an attribute element list prompt lists all elements, you can determine whether to allow users to use a search box to locate prompt answers. Searching for objects allows analysts to quickly locate specific objects to use to answer the prompt. To do this, from the Show Search Box drop-down list, select Yes, No, or Inherit from Web Settings (default).

    5. For an attribute qualification prompt, specify how the qualification displays in the prompt:
      • Determine whether users can browse the elements in the attribute qualification by selecting or clearing the Allow the User to Browse Elements in a Qualification check box.

      • For the shopping cart display style, you can allow users to modify expressions by selecting the Allow Modification of the Logical Operator check box. If it is allowed, select one of the following:

        • To allow users to select only one condition operator (AND/OR) between all of the conditions in an expression, choose Use a Single Logical Operator Between All Conditions.

        • To allow users to choose a separate default operator between each condition, choose Allow the User to Set Independent Logical Operators Between Conditions.

      • Determine the types of qualification expressions allowed in the prompt by selecting an option from the Expression Type Allowed drop-down list.

      • If you choose Select and Qualify above, determine the default condition that displays in the prompt by selecting an option from the Default Qualification Type drop-down list.

      • Determine the default condition operator (for example, Greater than, Less than, or Contains) that displays in the prompt by selecting an option from the Default Operator drop-down list.

      • To allow users to import a list of attribute elements from which they can choose, select the Allow Import Elements check box.

      • Determine the default logical operator (AND/OR) that is used between conditions by selecting an option from the Default Operator Between Conditions drop-down list.

    6. For a metric qualification prompt, specify how the qualification displays in the prompt:

      • For the shopping cart display style, you can allow users to modify expressions by selecting the Allow Modification of the Logical Operator check box. If it is allowed, select one of the following:

        • To allow users to select only one condition operator (AND/OR) between all of the conditions in an expression, choose Use a Single Logical Operator Between All Conditions.

        • To allow users to choose a separate default operator between each condition, choose Allow the User to Set Independent Logical Operators Between Conditions.

      • Determine the default condition operator (for example, Greater than, Less than, or Contains) that displays in the prompt by selecting an option from the Default Operator drop-down list.

      • To allow users to specify the output level of the metric, select the Display Output Level Selection check box. This is the level that the metric is calculated at.

      • To allow users to import a list of values from which they can choose, select the Allow Import Elements check box.

      • Determine the default logical operator(AND/OR) that is used between conditions by selecting an option from the Default Operator Between Conditions drop-down list.

    7. For a hierarchy qualification prompt, specify how the qualification displays in the prompt:

      • Determine whether to allow users to use a search box to locate prompt answers. Searching for objects allows analysts to quickly locate specific objects to use to answer the prompt. To do this, from the Show Search Box drop-down list, select Yes, No, or Inherit from Web Settings (default).

      • If the search box is enabled, you can ensure that users use the search box to locate answers, by selecting the Require Search check box.

      • Allow users to modify expressions by selecting the Allow Modification of the Logical Operator check box. If it is allowed, select one of the following:

        • To allow users to select only one condition operator (AND/OR) between all of the conditions in an expression, choose Use a Single Logical Operator Between All Conditions.

        • To allow users to choose a separate default operator between each condition, choose Allow the User to Set Independent Logical Operators Between Conditions.

      • To allow users to navigate above the root folder when searching, select the Allow Navigation Above Search Root check box.

      • Determine the types of qualification expressions allowed in the prompt by selecting an option from the Expression Type Allowed drop-down list.

      • If you choose Select and Qualify above, determine the default condition that displays in the prompt by selecting an option from the Default Qualification Type drop-down list.

      • Determine the default condition operator (for example, Greater than, Less than, or Contains) that displays in the prompt by selecting an option from the Default Operator drop-down list.

      • To allow users to import a list of attribute elements from which they can choose, select the Allow Import Elements check box.

      • Determine the default logical operator (And, Or) that is used between conditions by selecting an option from the Default Operator Between Conditions drop-down list.

    8. For an object prompt, specify how the objects display in the prompt:

      • For the Radio Button and Check Box display style, you can determine how the prompt items are arranged. From the Orientation drop-down list, select Vertical or Horizontal. You can specify how many items display in each column or row by selecting the Items Per Column or Row check box and typing the value.
      • For the Tree display style (available if you use a search object), you can:

        • Determine whether to allow users to use a search box to locate prompt answers. Searching for objects allows analysts to quickly locate specific objects to use to answer the prompt. To do this, from the Show Search Box drop-down list, select Yes, No, or Inherit from Web Settings (default).

        • Allow users to navigate above the root folder when searching. Select the Allow Navigation Above Search Root check box.

  11. Do one of the following:
    • If you are creating a stand-alone prompt, click Save in the upper left.
    • If you are creating an embedded prompt in a filter, click Done. You are returned to the Filter Editor. To finish creating the filter, begin at this step.

    Use the Stand-alone Object Prompt

  12. Add your object prompt to a report, filter, or metric:
    • To let users select which objects to include on the report, add an object prompt of attributes and metrics to the report's layout (the rows and columns).
    • To let users determine the data that is included in the report, add an object prompt of filters and reports to the report's filter.
    • To let users select which objects to use to page a report, add an object prompt of attributes and metrics to the report's page-by pane.
    • To let users select the object to use in a filter, add an object prompt of attributes, filters, and reports to a filter.
    • To let users select the object to use in a metric, add an object prompt of attributes, filters, and metrics to a filter.