Strategy ONE
Adding Context Menu Items that Display Information about the Object
This customization scenario illustrates how to add context menu items that display information about an object. Information about the object is called context information. Some context information, such as the object ID, is available through FolderViewtransform, the transform that is used by default to render the Folder Browsing page. Other context information requires the creation of a custom transform to provide the information.
There are two customizations performed in this scenario. For both examples, you add a new context menu item that displays certain information about the selected object, a folder object in this example, when the context menu item is clicked.
Displaying object information using the default transform
In the first example in this scenario, you add a new context menu item, called View Object ID, to context menus on the Folder Browsing page. When this context menu item is clicked, it displays the ID of the selected object (in this case, the folder ID). This information is available from FolderViewtransform.
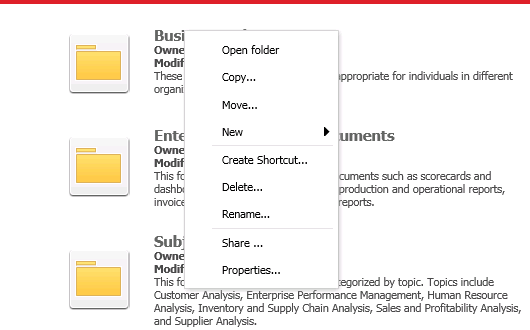
Before customization:
After customization:
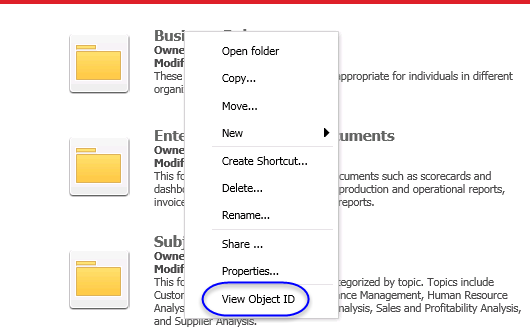
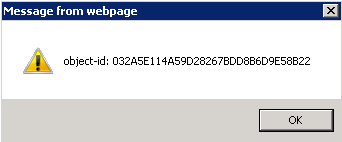
After you have performed the customization and saved your changes, the View Object ID menu item appears on the context menu for the Folder Browsing page when you right-click a folder. If you click View Object ID, a message box displays the Folder ID.
This customization can be accomplished using either of the following methods:
Deploying the plug-in provided with MicroStrategy SDK
MicroStrategy SDK provides a plug-in (ZIP file) that can simply be extracted to thepluginsfolder to view the customization in MicroStrategy Web. The following steps guide you in locating the plug-in and deploying it.
-
Access the plug-in: JSP version or ASP .NET version.
-
Extract the plug-in to the plugins subfolder inside the MicroStrategy Web installation folder.
-
Launch MicroStrategy Web to view the customization.
Using the Web Customization Editor to create a plug-in
MicroStrategy SDK provides a Web Customization Editor that can be used to create a customization plug-in. The following steps guide you in creating the plug-in and deploying it.
-
Create a new plug-in and give it a meaningful name. For example: AddingContextMenuDefaultTransform.
-
Exit the Web Customization Editor.
-
Use the Eclipse IDE to create a specialized ContextMenuItem builder class. The sample, CustomAlert.java, contains the entire code for this custom builder class.
-
Compile CustomAlert.java and place the class file inside the classes folder of this customization plug-in adhering to the package structure. For example: plugins\pluginName\WEB-INF\classes\com\microstrategy\sdk\samples\transforms\contextmenu
-
If the Web Customization Editor is closed, launch it again and access your plug-in.
-
Click on MicroStrategy Web Configuration inside the Application Settings view to expand the hierarchical tree. The expanded list comprises the different settings that can be modified to perform customizations.
-
Click on Context Menus to expand the list of context menus used in MicroStrategy Web.
-
Navigate to folderContextMenus->default.
-
Right-click the default context menu and select New Shortcut.
-
Enter group3 in the text field and click OK. This launches the Shortcut Attributes editor for group3.
-
Enter - in the Descriptor text field.
-
Save your changes. group3 will be a horizontal line that will separate the View Object ID context menu item from the rest of the menu items.
-
Navigate back to folderContextMenus->default.
-
Right-click the default context menu and select New Shortcut.
-
Enter viewObjectID in the text field and click OK. This will be the View Object ID context menu item.
-
In the Shortcut Attributes editor for viewObjectID, enter View Object ID in the Descriptor text field.
-
Click the Advanced Properties tab at the bottom.
-
Enter com.microstrategy.sdk.samples.transforms.contextmenus.CustomAlert in the text field for Builder ClassName.
-
Save your changes.
-
Launch MicroStrategy Web to view the customization.
In this customization, View Object ID is the last item on the context menu, and it is set apart from the other menu items by a separator. You can vary the location of the new menu item by changing the placement of the shortcut in the list of shortcuts. To change the position of View Object ID, navigate to folderContextMenus->default and double-click default to launch the Shortcut Attributes editor for default. The position of context menu items can be ordered in the List of Shortcuts section.
Displaying object information using a custom transform
In the second example in this scenario, you add a new context menu item, called View Object Index, that displays the index (relative position of the selected object within the list of objects displayed on the page— in this case, the relative position of the folder). This information must be provided by a custom transform.
Before customization:

After customization:
![]()
After you have performed the customization and saved your changes, the View Object Index menu item appears on the context menu for the Folder Browsing page when you right-click a folder. When you click View Object Index, a message box displays the index of the folder (that is, the relative position of the folder within the list of folders displayed on the page). The index of the first folder always starts with '0'.
![]()
This customization can be accomplished using either of the following methods:
Deploying the plug-in provided with MicroStrategy SDK
MicroStrategy SDK provides a plug-in (ZIP file) that can simply be extracted to thepluginsfolder to view the customization in MicroStrategy Web. The following steps guide you in locating the plug-in and deploying it.
-
Access the plug-in: JSP version or ASP .NET version.
-
Extract the plug-in to the plugins subfolder inside the MicroStrategy Web installation folder.
-
Launch MicroStrategy Web to view the customization.
Using the Web Customization Editor to create a plug-in
MicroStrategy SDK provides a Web Customization Editor that can be used to create a customization plug-in. The following steps guide you in creating the plug-in and deploying it.
-
Click on MicroStrategy Web Configuration inside the Application Settings view to expand the hierarchical tree. The expanded list comprises the different settings that can be modified to perform customizations.
-
Right-click Styles and select Create Transform to launch the Transform Creation Wizard.
-
Click Browse... next to the Source folder text field to select the src folder and click OK.
-
Enter the following information for the rest of the text fields.
Package: com.microstrategy.sdk.samples.transforms
Name: CustomFolderTransform
Transform description: This transform displays the folder contents.
Superclass: com.microstrategy.web.app.transforms.ProjectsTransform -
Click Next.
-
Click the radio button for Uncheck all methods.
-
Click Next.
-
Click Finish. CustomFolderTransform.java opens in the editor. The sample, CustomFolderTransform.java, contains the entire code for this custom transform. You can use this code in CustomFolderTransform.java that is open for editing.
-
Save your changes.
-
Navigate to Styles->FolderStyleIcon.
-
Double-click FolderStyleIcon to launch the Style Properties editor in the right frame.
-
Click Change to select a new transform.
-
Enter CustomFolderTransform in the text field.
-
Select CustomFolderTransform from your project and click OK.
-
Save your changes.
-
Double-click FolderStyleList to launch the Style Properties editor in the right frame.
-
Click Change to select a new transform.
-
Enter CustomFolderTransform in the text field.
-
Select CustomFolderTransform from your project and click OK.
-
Save your changes.
-
Use the Eclipse IDE to create a specialized ContextMenuItem builder class. The sample, CustomFolderMenuItem.java, contains the entire code for this custom builder class. CustomFolderMenuItem extends DefaultContextMenuItemBuilder, which contains the logic to enable and populate each item on context menus on the Folder Browsing page. CustomFolderMenuItem adds logic to enable and populate a new context menu item that displays the index of the folder that is right-clicked.
-
Compile CustomFolderMenuItem.java and place the class file inside the classes folder of this customization plug-in adhering to the package structure. For example: plugins\pluginName\WEB-INF\classes\com\microstrategy\sdk\samples\transforms\contextmenus
-
If the Web Customization Editor is closed, launch it again and access your plug-in.
-
Click on MicroStrategy Web Configuration inside the Application Settings view to expand the hierarchical tree. The expanded list comprises the different settings that can be modified to perform customizations.
-
Click Context Menus to expand the list of context menus used in MicroStrategy Web.
-
Navigate to folderContextMenus->default.
-
Right-click the default context menu and select New Shortcut.
-
Enter group3 in the text field and click OK. This launches the Shortcut Attributes editor for group3.
-
Enter - in the Descriptor text field.
-
Save your changes. group3 will be a horizontal line that will separate the View Object Index context menu item from the rest of the menu items.
-
Navigate back to folderContextMenus->default.
-
Right-click the default context menu and select New Shortcut.
-
Enter ObjectIndex in the text field and click OK. This will be the View Object Index context menu item.
-
In the Shortcut Attributes editor for ObjectIndex, enter View Object Index in the Descriptor text field.
-
Click the Advanced Properties tab at the bottom.
-
Enter com.microstrategy.sdk.samples.transforms.contextmenus.CustomFolderMenuItem in the text field for Builder ClassName.
-
Save your changes.
-
Launch MicroStrategy Web to view the customization.
In this customization, View Object Index is the last item on the context menu, and it is set apart from the other menu items by a separator. You can vary the location of the new menu item by changing the placement of the shortcut in the list of shortcuts. To change the position of View Object ID, navigate to folderContextMenus->default and double-click default to launch the Shortcut Attributes editor for default. The position of context menu items can be ordered in the List of Shortcuts section.
See Also
-
Scenarios: Customizing Existing Functionality: Adding Custom Context Menus
-
Scenarios: Customizing Existing Functionality: Removing Context Menus
-
Scenarios: Customizing Existing Functionality: Adding or Removing Context Menu Items
-
Scenarios: Customizing Existing Functionality: Displaying Objects Selected in a Report
-
Scenarios: Extending Existing or Adding New Functionality: Adding Context Menu Items Not Implemented by Default