Strategy ONE
Adding GUI Elements to an Existing Prompt
Typically, a user is presented with options for answering a prompt. These options or prompt answers are values that are mapped to attributes or metrics in your project. There can be situations where you want the user to provide additional information while answering a prompt. If the user does not have the exact additional information, you can ask the user to provide information (relevant to him/her) that can be mapped to the exact additional information required for answering the prompt. For example, if you need information about a product SKU to answer a report, you can ask the user to type in relevant information such as the name of the product, and write custom logic that maps the product to its SKU and answers the report using the SKU.
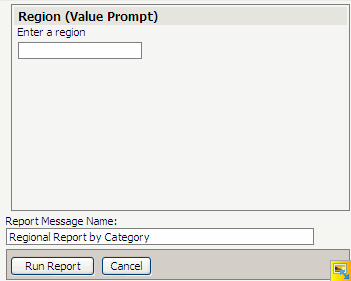
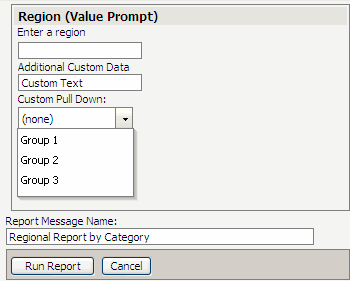
In this customization scenario, two GUI elements, a text box and a drop-down menu, are added to an existing value prompt. The data for the GUI elements is provided in the transform. Since the objective of this scenario is to explain how to add the GUI elements, the custom event handler does not contain the logic to process any data provided by the GUI elements.
Before customization:
After customization:
This customization can be accomplished using either of the following methods:
Deploying the plug-in provided with MicroStrategy SDK
MicroStrategy SDK provides a plug-in (ZIP file) that can simply be extracted to thepluginsfolder to view the customization in MicroStrategy Web. The following steps guide you in locating the plug-in and deploying it.
-
Access the plug-in: JSP version or ASP .NET version.
-
Extract the plug-in to the plugins subfolder inside the MicroStrategy Web installation folder.
-
Launch MicroStrategy Web to view the customization.
- Access Preferences->Prompts under Project Defaults preference level to add the new prompt style.
-
Click the link Add custom style manually.
-
Enter the following information::
Style Name: CustomPromptConstantWidgetStyle
Description: Prompt with custom GUI elements
Prompt type: Value Prompt
Base style: Textbox -
Click Add.
-
Click Apply to save your changes.
-
Navigate to the value prompt that is to use this new prompt style and edit the prompt using the Prompt Editor.
-
Click the Style tab.
-
Select CustomPromptConstantWidgetStyle from the Custom style drop-down menu.
-
Click Save to save your changes.
-
Execute any report that uses this value prompt to view your customization.
You can also use MicroStrategy Developer to add this new style. Refer to the Help files provided with MicroStrategy Developer for instructions on adding a new prompt style. However, unlike MicroStrategy Web, MicroStrategy Developer does not validate any information about your new prompt style; so it is important that you correctly spell and specify all the information.
Using the Web Customization Editor to create a plug-in
MicroStrategy SDK provides a Web Customization Editor that can be used to create a customization plug-in. The following steps guide you in creating the plug-in and deploying it.
-
Click on MicroStrategy Web Configuration inside the Application Settings view to expand the hierarchical tree. The expanded list comprises the different settings that can be modified to perform customizations.
-
Right-click Styles and select Create Transform to launch the Transform Creation Wizard.
-
Click Browse... next to the Source folder text field to select the src folder and click OK.
-
Enter the following information for the rest of the text fields.:
Package: com.microstrategy.sdk.transforms
Name: CustomPromptConstantWidgetTransform
Transform description: This transform adds GUI elements to an existing prompt.
Superclass: com.microstrategy.web.app.transforms.PromptConstantWidgetTransform -
Click Next.
-
Click the radio button for Uncheck all methods.
-
Click Next.
-
Click Finish.
CustomPromptConstantWidgetTransform.java opens in the editor. The sample, CustomPromptConstantWidgetTransform.java, contains the entire code for this custom transform. You can use this code in CustomPromptConstantWidgetTransform.java that is open for editing.
-
Save your changes.
-
Click on Styles to expand the list of styles used in MicroStrategy Web.
-
Right-click PromptConstantWidgetStyle and select Duplicate.
-
Enter name as CustomPromptConstantWidgetStyle and click OK. CustomPromptConstantWidgetStyle opens in the Basic Style Properties editor.
-
Click Change to select CustomPromptConstantWidgetTransform as the transform for the custom style.
-
Click the Style Layouts tab at the bottom in the right frame.
-
Click the Edit Layout button.
-
Click the Yes button in the prompt to edit PromptConstantLayout_widget.xml. A copy of PromptConstantLayout_widget.xml inside the plug-in opens for editing.
-
Edit this copy of PromptConstantLayout_widget.xml to make the following changes. The sample, PromptConstantLayout_widget.xml, contains the entire code for this custom layout definition file.
-
Create a custom property that is to contain the value for the text box view
-
Create a custom list model and populate it with values using the transform
-
Create custom text view for the text box, and assign block properties and model:
Parent/model points to the answer model valueField property points to customValueString path.
-
Create custom drop-down view for the text box, and assign block properties and model path:
Parent/modelpoints to the answer model; the list is held in the child customList.
-
-
Save your changes.
-
Navigate up to MicroStrategy Web Configuration->Client-side Layouts->mstr->layouts->CalendarAndTimePicker.xml.
-
Right-click CalendarAndTimePicker.xml and select Open in Editor.
-
Click the Yes button in the prompt to edit CalendarAndTimePicker.xml. A copy of CalendarAndTimePicker.xml inside the plug-in opens for editing.
-
Edit this copy of CalendarAndTimePicker.xml to make the following changes. The sample, CalendarAndTimePicker.xml, contains the entire code for this custom layout definition file.
-
Add rendering instructions to render the custom text box
-
Add rendering instructions to render the custom drop-down
-
-
Save your changes.
-
Navigate up to MicroStrategy Web Configuration->Pages->report (Report Execution)->Beans->frame->rb (Type=ReportBean).
-
Right-click rb (Type=ReportBean) and select New Event Handler. This launches the Custom Event Handler Creation wizard.
-
Click Browse to select the source folder for the project.
-
Enter com.microstrategy.sdk.events in the Package text field.
-
Enter CustomPromptEventHandler in the Name text field.
-
Select the radio button for Use Existing Event.
-
Click ... to select PromptsBean.
-
Select 8001 as the event ID from the Select Event ID drop-down menu.
-
Click Next.
-
Click Finish. CustomPromptEventHandler.java opens in the editor. The sample, CustomPromptEventHandler.java, contains the entire code for this custom event handler.
-
-
Save your changes.
-
Exit the Web Customization Editor.
-
Create a PromptEditor.xml file that contains only the code to add a command that captures the custom information using the code below. The code instructs that before all the prompt answers are applied, the ReportInstanceModel (parent/model from the PromptEditor location) must have the AppendCustomAnswers command. This code is virtually merged into the out-of-the-box PromptEditor.xml file (located in /WEB-INF/xml/blocks of the MicroStrategy Web installation folder) when the application server hosting MicroStrategy Web is restarted.:
-
Create a custom JavaScript file, customCommands.js, for AppendCustomAnswers.
-
Save this custom JavaScript file, customCommands.js, in the plugins\pluginName\javascript subfolder inside the MicroStrategy Web installation folder. For example: plugins\AddingGUIElementsExistingPrompt\javascript.
-
If the Web Customization Editor is closed, launch it again and access your plug-in.
-
Click on MicroStrategy Web Configuration inside the Application Settings view to expand the hierarchical tree. The expanded list comprises the different settings that can be modified to perform customizations.
-
Navigate to Pages->report (Report Execution).
-
Double-click report (Report Execution) to launch the Basic Properties editor in the right frame.
-
Select Template Properties tab at the bottom in the editor.
-
Select the Waiting for User page template tab.
-
Right-click the links page section and select Edit current file.
-
Click the Yes button in the prompt to edit Report_links.jsp/ascx.
-
In Report_links.jsp/ascx, add the following line of code shown in bold at the end of the file.:
J2EE environment
Copy...
</web:else>
</web:ifBeanValue>
<web:resource type="custom-javascript" name="customCommands.js" />.NET environment
Copy...
</web:melse>
</web:ifBeanValue>
<web:resource type="custom-javascript" runat="sever" name="customCommands.js" />
-
Save your changes.
-
Exit the Web Customization Editor.
-
Log into MicroStrategy Web and access Preferences->Prompts under Project Defaults preference level to add the new prompt style.
-
Click the link Add custom style manually.
-
Enter the following information:
Style Name: CustomPromptConstantWidgetStyle
Description: Prompt with custom GUI elements
Prompt type: Value Prompt
Base style: Textbox -
Click Add.
-
Click Apply to save your changes.
-
Navigate to the value prompt that is to use this new prompt style and edit the prompt using the Prompt Editor.
-
Click the Style tab.
-
Select CustomPromptConstantWidgetStyle from the Custom style drop-down menu.
-
Click Save to save your changes.
-
Execute any report that uses this value prompt to view your customization.
You can also use MicroStrategy Developer to add this new style. Refer to the Help files provided with MicroStrategy Developer for instructions on adding a new prompt style. However, unlike MicroStrategy Web, MicroStrategy Developer does not validate any information about your new prompt style; so it is important that you correctly spell and specify all the information.
See Also