Strategy ONE
Enabling Custom Drill Paths for Different Attribute Elements
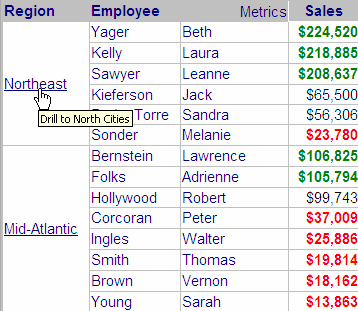
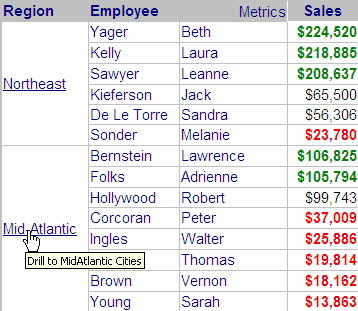
In this customization scenario, you enable drilling to a template (custom drill path) based on the attribute element. As shown in the before-after images below, the default drill down path for all Region attribute elements (Northeast, Mid-Atlantic, Southeast, etc.) is drilling down to Call Center. However, after the customization is implemented, the drill path for each attribute element is different. That is, the drill path for Northeast is Drill to North Cities; drill path for Mid-Atlantic is Drill to MidAtlantic Cities, and so on.
You can create custom drill paths using MicroStrategy Developer. This scenario assumes you have created custom drill paths as drill to templates and named them as North Cities, MidAtlantic Cities, South Cities and Central Cities. All the drill paths have High priority. Refer to MicroStrategy Developer Help for instructions on creating custom drill paths.
This customization scenario is applied to the Individual Sales Analysis report in Shared Reports->Subject Areas->Sales and Profitability Analysisunder MicroStrategy Tutorial. The inline comments in the RowHeaderCustomDrillPath transform provide information on applying this scenario to all reports so long as they have the Region attribute on the report. The RowHeaderCustomDrillPath transform can be modified to enable custom drill paths for other attributes as well.
The custom drill path is available only when you click the attribute elements. To see the default drill path for the attribute element, right-click the attribute element.
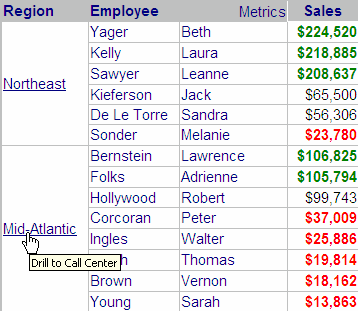
Before customization:
These before images are before creating custom drill paths in MicroStrategy Developer. By default, the drill path is for the Region attribute is defined to drill to the Call Center attribute.

After customization:
This customization can be accomplished using either of the following methods:
Deploying the plug-in provided with MicroStrategy SDK
MicroStrategy SDK provides a plug-in (ZIP file) that can simply be extracted to thepluginsfolder to view the customization in MicroStrategy Web. The following steps guide you in locating the plug-in and deploying it.
-
Access the plug-in: JSP version or ASP .NET version.
-
Extract the plug-in to the plugins subfolder inside the MicroStrategy Web installation folder.
-
Launch MicroStrategy Web to view the customization.
Using the Web Customization Editor to create a plug-in
MicroStrategy SDK provides a Web Customization Editor that can be used to create a customization plug-in. The following steps guide you in creating the plug-in and deploying it.
-
Click on MicroStrategy Web Configuration inside the Application Settings view to expand the hierarchical tree. The expanded list comprises the different settings that can be modified to perform customizations.
-
Click on Styles to expand the list of styles used in MicroStrategy Web.
-
Double-click ReportGridStyle to open it in the Style Properties editor.
-
Click the Style Parameters tab at the bottom in the editor.
-
Click Add.
-
Select headerMetricValueOptimized and click >>.
-
Click OK to close the dialog.
-
Select headerMetricValueOptimized in the Transform Parameters section and select FALSE from the drop-down for Value in the Parameter Properties section.
-
Save your changes.
-
Navigate back to Application Settings and right-click Styles to select Create Transform. This launches the Transform Creation Wizard.
-
Click Browse... next to the Source folder text field to select the src folder and click OK.
-
Enter the following information for the rest of the text fields.:
Package: com.microstrategy.sdk.samples.transforms
Name: RowHeaderCustomDrillPath
Transform description: This transform displays a custom drill path.
Superclass: com.microstrategy.web.app.transforms.ReportGridCellRowHeaderImpl -
Click Next.
-
Click the radio button for Uncheck all methods.
-
Click Next.
-
Click Finish. RowHeaderCustomDrillPath.java opens in the editor. The sample, RowHeaderCustomDrillPath.java, contains the entire code for this custom transform. You can use this code in RowHeaderCustomDrillPath.java that is open for editing. The inline comments in the transform explain how to apply this customization to a specific report or to all reports in MicroStrategy Web.
-
Save your changes.
-
Enable the Property Files setting from the Show Advanced Options in MicroStrategy Preferences.
-
Click on MicroStrategy Web Configuration inside the Application Settings view to expand the hierarchical tree. The expanded list comprises the different settings that can be modified to perform customizations.
-
Click on Property Files to expand the list of property files used in MicroStrategy Web.
-
Navigate to WEB-INF->classes->resources and double-click gridClasses.properties to launch the Web Properties Editor.
-
Click the Value field for property rowHeader and replace the entry with com.microstrategy.sdk.samples.transforms.RowHeaderCustomDrillPath.
-
Save your changes.
-
Launch MicroStrategy Web to view the customization.