Strategy ONE
Displaying the list of projects in a tabbed display
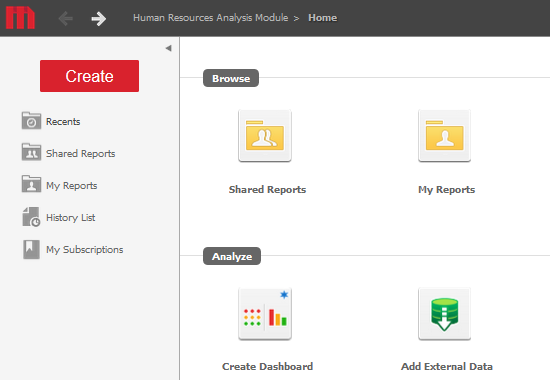
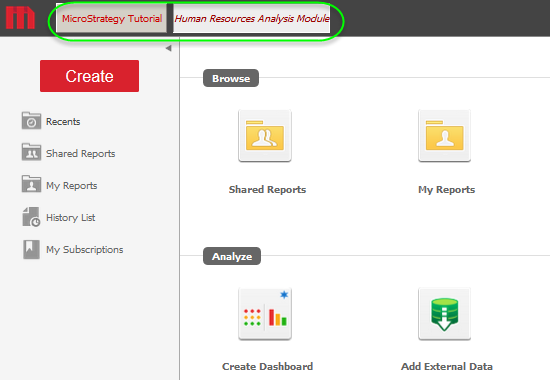
This scenario shows how to customize the default Home page to display available projects as tabs at the top of the Home page.
Before customization:
After customization:
This customization can be accomplished using either of the following methods:
-
Using the plug-in provided for you:
This method lets you view the customization right away, without having to do anything except deploying the plug-in provided with the MicroStrategy SDK.
-
Creating the plug-in yourself using the Web Customization Editor
This method gives you hands-on experience in performing this customization, as it steps you through the process of creating and deploying the plug-in.
Using the plug-in provided for you
The MicroStrategy SDK provides an out-of-the-box plug-in (ZIP file) that changes the images used for rendering the pivot buttons on a report. Follow the simple steps below to deploy the plug-in and view the results in MicroStrategy Web.
-
Access the plug-in: JSP version or ASP .NET version.
-
Extract the plug-in to the plugins subfolder inside the MicroStrategy Web installation folder.
-
Restart your web server.
-
Launch MicroStrategy Web to view the customization.
Creating the plug-in yourself using the Web Customization Editor
If you want to understand how to display available projects as tabs at the top of the Home page, follow the steps below to create the plug-in and deploy it.
-
Launch the Web Customization Editor.
Because you create a custom transform in this scenario, make sure that Build Automatically is selected from the Projects menu in Eclipse.
-
Create a new plug-in and give it a meaningful name.
-
On the Application Settings tab, click the Select Plug-in icon.:

-
On the Select Plug-in dialog box, click New and enter a meaningful name for the plug-in, such as DisplayingProjectsTabbedDisplay.
-
Click OK.
-
-
Create a custom layout class, ProjectsToolbarSampleLayout.xml. :
-
ProjectsToolbarSampleLayout.xml, which contains the code for this layout, is included in the plug-in provided by MicroStrategy SDK.
-
Download this file and save it in the plugins\pluginName\WEB-INF\xml\layouts subfolder inside the MicroStrategy Web installation folder.
-
-
On the Application Settings tab in the Web Customization Editor, expand MicroStrategy Web Configuration to view the list of settings that can be modified to perform customizations.:
-
Right-click Styles and select Create Transform to launch the Transform Creation Wizard:
-
On the first panel::
-
For Source folder, click Browse. Navigate to thesrc folder in your MicroStrategy project, select it, and click OK.
-
For Package, enter com.microstrategy.sdk.samples.transforms.
-
For Name, enter ProjectsToolbarSampleTransform.
-
For Transform description, enter This transform displays the list of projects as a tabbed display.
-
For Superclass, enter com.microstrategy.web.app.transforms.ProjectsTransform.
-
Click Next.
-
-
On the second panel:
-
Confirm that Uncheck all methods is selected.
-
Click Next.
-
-
On the final panel::
-
Click Finish. ProjectsToolbarSampleTransform.java opens in the editor.
-
A sample file, ProjectsToolbarSampleTransform.java, with the entire code for this custom transform has been provided for you. Download this file, copy its entire contents and paste them in ProjectsToolbarSampleTransform.java that is open for editing.
-
-
Save your changes.
-
-
Right-click Styles and select New Style to launch the Style Creation Wizard.
-
On the first panel:
-
For Style Name, enter ProjectsToolbarStyle.
-
For Description, enter Style: Display list of projects as a tabbed display.
-
For Transform Defn, select ProjectsToolbarSampleTransform
-
Click Next.
-
-
On the second panel::
-
Select transform parameter displayFlag and click >> to move it to the shopping cart.
-
Click Next.
-
-
On the third panel:
-
With displayFlag selected, enter 15 for Value.
-
Click Next.
-
-
On the fourth panel::
-
For Layout Definition, click ... to navigate to ProjectsToolbarSampleLayout.xml in the plugins\pluginName\WEB-INF\xml\layouts subfolder. Select ProjectsToolbarSampleLayout.xml and click Open.
-
Click Next
-
-
On the final panel, click Finish.
-
-
Expand Pages to view the list of pages used in MicroStrategy Web.:
-
Double-click the desktop (Desktop) page to display the Properties Editor.:
-
Click the Template Properties tab at the bottom of the editor to make changes to the default page template.
-
Right-click the path page section and select Edit current file.
-
Click Yes to make a copy of Basic_Path.jsp/ascx in your plug-in and open it for editing.
-
In the copy of Basic_Path.jsp/ascx, replace the code shown in bold italics below.
J2EE environment:
Before customization
Copy...
<%-- Display the path section --%>
<div class="mstrPathContainer">
<web:displayBean bean="pathBean" styleName="DesktopPathStyle"/>
<%@include file='/jsp/Logo.jsp' %>
</div>
...After customization
Copy...
<%-- Display the path section --%>
<div class="mstrPathContainer">
<web:displayBean bean="projects" styleName="ProjectsToolbarStyle"/>
<%@include file='/jsp/Logo.jsp' %>
</div>
...
.NET environment:
Before customization
Copy...
<%-- Display the path section --%>
<div class="mstrPathContainer">
<web:displayBean runat="server" bean="pathBean" styleName="DesktopPathStyle"/>
<%@include file='/jsp/Logo.jsp' %>
</div>
...After customization
Copy...
<%-- Display the path section --%>
<div class="mstrPathContainer">
<web:displayBean runat="server" bean="projects" styleName="ProjectsToolbarStyle"/>
<%@include file='/jsp/Logo.jsp' %>
</div>
... -
Save your changes.
-
-
-
Expand desktop (Desktop), right-click Beans and select New Bean to launch the New Web Bean Wizard.:
-
On the first panel::
-
For Name, enter projects.
-
For System Bean, click .. to browse to and select ProjectsBean.
-
For Persist Mode, confirm that None is selected.
-
Click Next.
-
-
On the second panel, click Next. Do not select any features.
-
On the third panel::
-
Confirm that No is selected, to specify that a custom event handler is not used for this bean.
-
Click Next.
-
-
On the fourth panel, click Next. Do not select any initialization parameters.
-
On the fifth panel, click Next. Do not select any request parameters.
-
On the final panel, click Finish.
-
-
With desktop (Desktop) expanded, expand CSS, then MicroStrategy Web, then mstr.:
-
Right-click pageDesktop.css and choose New Selector.
- Enter .mstrPathContainer .mstrTransform as the name of the selector.
- For Apply Selector to, confirm that This Page is selected.
- Click OK. A new CSS file, called desktopPage.css, is created under CSS -> Customizations, with the new .mstrPathContainer .mstrTransform selector you just added.
-
Right-click the new .mstrPathContainer .mstrTransform selector and choose New Property.
-
For Property, enter line-height.
-
For Value, enter 32px.
-
For Apply to, confirm that This Page is selected.
-
Click OK. The new property is added.
-
-
-
- A new plug-in folder, with the name you gave it, now exists in the plugins folder of your MicroStrategy Web installation directory. Restart your web server to apply the plug-in.
- Launch MicroStrategy Web, select a project, and view the customizations.
See Also
-
Fundamentals of customization: Page Configuration file
-
Fundamentals of customization: Style Catalog Configuration file