Strategy ONE
Including the Prompt Question on the Document Execution Page
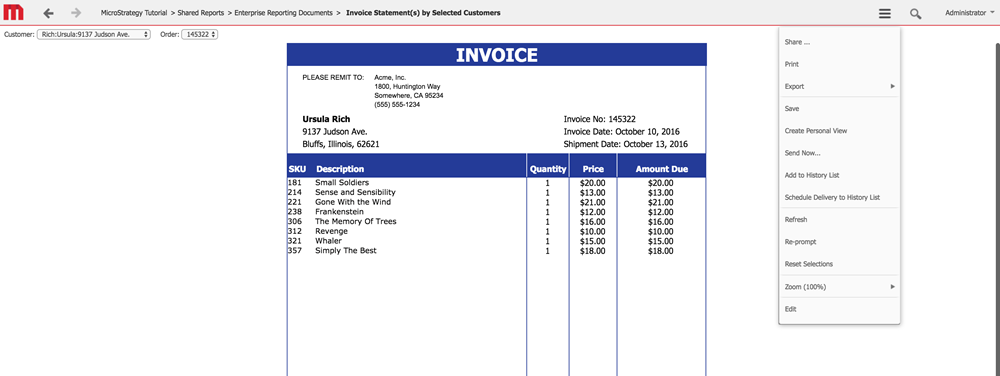
When a user attempts to execute a document with prompts, the user is asked to answer prompt questions before the document execution is completed. Once the document is executed, if the user wants to go back to re-answer the prompt questions differently, the user must click the Re-prompt button, which returns the user to a page with only the prompt questions and no data.
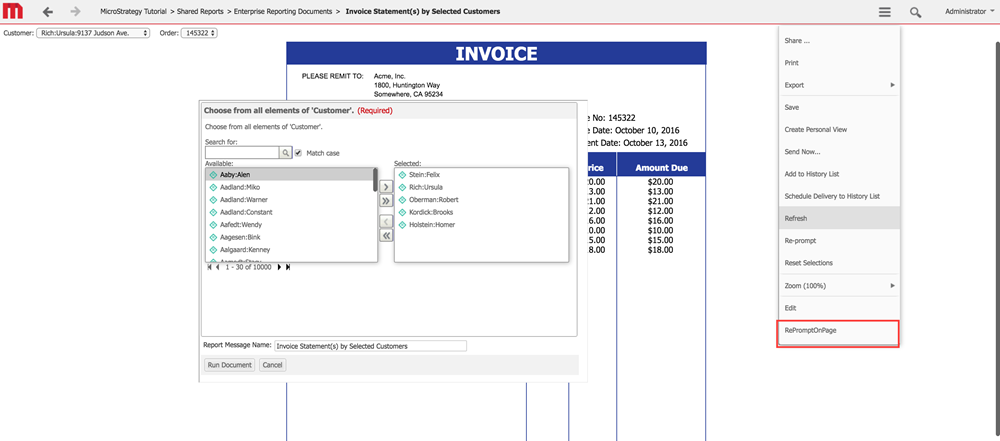
In this scenario, the prompt question is displayed in a modal dialog on top of the Document Execution page, provided that the user has answered the initial prompt question at document execution time.
Before customization:
After customization:
This customization can be accomplished using either of the following methods:
Deploying the plug-in provided with MicroStrategy SDK
MicroStrategy SDK provides a plug-in (ZIP file) that can simply be extracted to the plugins folder to view the customization in MicroStrategy Web. The following steps guide you in locating the plug-in and deploying it.
-
Access the plug-in: JSP version.
-
Extract the plug-in to the plugins subfolder inside the MicroStrategy Web installation folder.
-
Launch MicroStrategy Web to view the customization.
Using the Web Customization Editor to create a plug-in
MicroStrategy SDK provides a Web Customization Editor that can be used to create a customization plug-in. The following steps guide you in creating the plug-in for this scenario and deploying it.
-
Create a new plug-in and give it a meaningful name. For example: IncludingPromptOnPresentation.
-
Expand MicroStrategy Web Configuration inside the Application Settings view.
-
Expand Pages to see the list of pages used in MicroStrategy Web.
-
Make copies of two pages, the oivm page and the prompts page, as described below:
- Navigate to the oivm(Optimized Interactive View Mode) page, right-click, and choose Duplicate -> by making a copy of this page. Name the new page oivmCustomPrompt and click OK.
- Navigate to the prompts(This page is used for answering prompts in the Mojo OIVM page) page, right-click, and choose Duplicate -> by making a copy of this page. Name the new page prompts2 and click OK.
- Navigate to the oivm(Optimized Interactive View Mode) page, right-click, and choose Duplicate -> by making a copy of this page. Name the new page oivmCustomPrompt and click OK.
- Create new javascript files for the two new pages:
- Right-click oivmCustomPrompt and choose Create new JavaScript. On the New JavaScript Wizard, click Next and Finish. A new javascript file, called oivmCustomPromptPage.js, is added under oivmCustomPrompt -> JavaScript.
- Right-click prompts2 and choose Create new JavaScript. On the New JavaScript Wizard, click Next and Finish. A new javascript file, called prompts2Page.js, is added under prompts2 -> JavaScript.
- Right-click oivmCustomPrompt and choose Create new JavaScript. On the New JavaScript Wizard, click Next and Finish. A new javascript file, called oivmCustomPromptPage.js, is added under oivmCustomPrompt -> JavaScript.
-
Create a new toolbar for the oivmCustomPrompt page:
- Right-click oivmCustomPrompt and choose Toolbars-> Add Custom Toolbar Element.
-
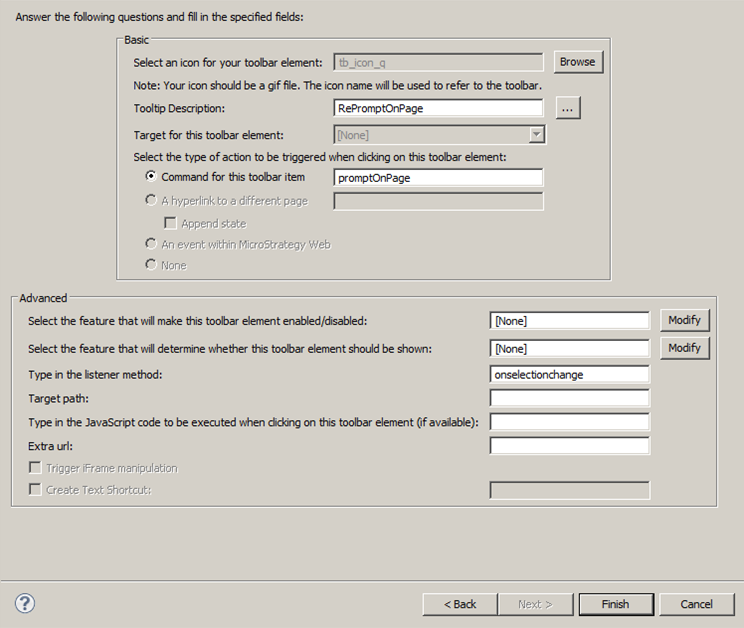
On the New Toolbar Element Wizard, click Next and choose an icon for the toolbar element. Select Command for this toolbar item and enter as the command name promptOnPage, which corresponds to the javascript function that you will define in the oivmCustomPrompt.js file in a later step. Click Next and Finish.
- Right-click oivmCustomPrompt and choose Toolbars-> Add Custom Toolbar Element.
-
Double-click the oivmCustomPrompt page to open it in the editor.
- Click the Template Properties tab at the bottom of the screen.
- With the main template file selected (/jsp/Mojo_Template.jsp), click the Modify button. This creates a copy of the file and adds it to the jsp folder in the plug-in. If you get a message, say Yes.
- Click the Template Properties tab at the bottom of the screen.
-
Leave the Web Customization Editor open. In the file explorer, open the plugins folder in the MicroStrategy Web installation directory and do the following:
-
Locate the pageConfig.xml file in your plugin—for example, MicroStrategy/plugins/IncludePromptOnPresentation/WEB-INF/xml/pageConfig.xml—and open it.
-
Locate the <page> node whose name attribute is set to "oivmCustomPrompt".
Copy<page class="com.microstrategy.web.app.beans.RWOIVMPageComponent" desc="Optimized Interactive View Mode" desc-id="" feature-id="" name="oivmCustomPrompt" title-bean="rwb" track="true">.-
Locate the <template> node whose XMLmerge_ID attribute is set to "2". In the <page-section> node whose name attribute is set to "content_core", change the value of the file-name attribute from "/jsp/OIVM_Content_Core.jsp" to "@IncludePromptsOnPresentation:/jsp/OIVM_Content_Core.jsp".
Before:
Copy<templates>
<template XMLmerge_id="2" allow-cancel="false" error-title-id="mstrWeb.921" file-name="@IncludePromptsOnPresentation:/jsp/Mojo_Template.jsp" iframe="false">
<page-sections use-default="false">
<page-section file-name="/jsp/OIVM_Header.jsp" name="header_mojo"/>
<page-section file-name="/jsp/OIVM_Content_Mojo.jsp" name="content_mojo"/>
<page-section file-name="/jsp/OIVM_Content_Core.jsp" name="content_core"/>
</template>After:
Copy<templates>
<template XMLmerge_id="2" allow-cancel="false" error-title-id="mstrWeb.921" file-name="@IncludePromptsOnPresentation:/jsp/Mojo_Template.jsp" iframe="false">
<page-sections use-default="false">
<page-section file-name="/jsp/OIVM_Header.jsp" name="header_mojo"/>
<page-section file-name="/jsp/OIVM_Content_Mojo.jsp" name="content_mojo"/>
<page-section file-name="@IncludePromptsOnPresentation:/jsp/OIVM_Content_Core.jsp" name="content_core"/>
</template> -
Locate the <template> node whose XMLmerge_ID attribute is set to "3". In this node, change the value of page-name from "prompts" to "prompts2":
Before:
Copy<templates>
...
<template
XMLmerge_id="3" error-title-id="mstrWeb.921" iframe="true" page-name="prompts" show-wait="false" status="com.microstrategy.web.beans.EnumRequestStatus.WebBeanRequestWaitingForUserInput"/>After:
Copy<templates>
...
<template
XMLmerge_id="3" error-title-id="mstrWeb.921" iframe="true" page-name="prompts2" show-wait="false" status="com.microstrategy.web.beans.EnumRequestStatus.WebBeanRequestWaitingForUserInput"/>
-
-
Locate the <page> node whose name attribute is set to "prompts2" .
Copy<page class="com.microstrategy.web.app.beans.RWPromptsPageComponent" desc="This page is used for answering prompts in the Mojo OIVM page" desc-id="" feature-id="" isPrompt="true" name="prompts2" title-bean="rwb" track="true" useResourceMgr="on"> -
Locate the <template> node whose XMLmerge_ID attribute is set to "2". In this node, change the value of the page-name attribute from "oivm" to "oivmCustomPrompt", as shown below:
Before:
Copy<templates>
<template XMLmerge_id="2" allow-cancel="false" error-title-id="mstrWeb.921" iframe="false" page-name="oivm">
<page-sections>
<page-section file-name="/jsp/Empty.jsp" name="path"/>
</page-sections>
</template>After:
- Save your changes.
Copy<templates>
<template XMLmerge_id="2" allow-cancel="false" error-title-id="mstrWeb.921" iframe="false" page-name="oivmCustomPrompt">
<page-sections>
<page-section file-name="/jsp/Empty.jsp" name="path"/>
</page-sections>
</template> -
-
- Copy the out-of-the-box OIVM_Content_Core.jsp file, located under /MicroStrategy/jsp, and save the copy in your plugins folder under /MicroStrategy/plugins/IncludePromptOnPresentation/jsp.
-
Open the OIVM_Content_Core.jsp file you copied to the plugins folder.
-
Delete the existing contents and replace it with the following code:
Copy<%@ taglib uri="/webUtilTL.tld" prefix="web" %>
<%@ page import="com.microstrategy.web.app.beans.PageComponent" %>
<span id="pagePlaceholder"></span>
<jsp:include page='/jsp/Mojo_Config.jsp' flush="true"/>
<script type="text/javascript">
<web:ifBeanValue name="rwb" property="getXMLStatus" value="4"> <!-- WebBeanRequestEndsInError -->
<web:then>
//throws an error, we need to close the prompts and notify the users
</web:then>
<web:else>
var docModelData = JSON.parse('<web:displayBean beanName="rwb" />');
//call method to refresh target page
parent.processPromptReload(docModelData.bs);
</web:else>
</web:ifBeanValue> - Save your changes.
-
-
Close the file explorer and go back to the Web Customization Editor. If it is not already expanded, expand MicroStrategy Web Configuration inside the Application Settings view.
- Expand Pages.
- Expand the prompts2 page.
- Expand Javascript.
-
Double-click the prompts2Page.js file to open it. Replace the placeholder code with the following javascript code. It contains logic which will override or add on to the existing execute/cancel buttons on the prompts page.
Copy/**
Javascript for prompts2 page
*/
window.onload = function () {
var promptButtons = document.getElementsByClassName('mstrPromptEditorCellNavToolbar')[0];
if(promptButtons != null){
//Add event listener to show mstrWait when submit button is clicked
promptButtons.getElementsByClassName("mstrButton")[0].addEventListener("click", function(){
//show wait
parent.mstrApp.showWait();
//hide iframe containing the prompts
parent.document.getElementById("customPromptIframe").style.display = "none";
});
//Add event listener to delete iframe from the page if cancel button is clicked
promptButtons.getElementsByClassName("mstrButton")[1].addEventListener("click", function(){
//delete iframe
parent.removeById("customPromptIframe");
//stop other events from triggering
event.stopPropagation();
});
} - Save your changes.
- Expand the oivmCustomPrompt page.
- Expand Javascript.
-
Double-click the oivmCustomPrompt.js file to open it. Replace the placeholder code with the following javascript code. It contains logic to reload the bean with the new state after prompts are applied.
Copy/**
* Javascript file which will be loaded on the oivmPage.js*/
/**
* Function to remove from the DOM an element by the ID
*/
function removeById(id) {
return (elem=document.getElementById(id)).parentNode.removeChild(elem);
}
if(typeof mstrApp !== "undefined" ) {
mstrApp.docModel.controller.promptOnPage = function(){
//append an iframe to the page which loads the prompts page passing the beanstate
var beanState = mstrApp.docModelData.bs;
var url = './'+ mstrApp.name+ '?evt=2048030&src='+mstrApp.name+'.oivmCustomPrompt.rwb.2048030&rePrompt=true&fresh=false&customReprompt=true®enerate=false&rwb='+beanState;
//customReprompt
var iframe = document.createElement('iframe');
iframe.style.display = "block";;
iframe.setAttribute("id", "customPromptIframe");
iframe.src = url; iframe.style.width = 800+"px";
iframe.style.height = 800+"px";
iframe.style.position = "absolute";
iframe.style.left = 0+'px';
iframe.style.top = 0+'px';
iframe.style.zIndex = "9999";
document.body.appendChild(iframe);
};
}
/**
* Function to process the reloading of the oivm page after the prompts have been applied
*/
var processPromptReload = function(beanState){
//close iframe
removeById('customPromptIframe');
//call method to var url = './'+ mstrApp.name + '?evt=2048030&src='+mstrApp.name+'.oivm.rwb.2048030&fresh=true®enerate=false&rwb='+beanState;
window.location = url;
}; - Save your changes.
- Expand Pages.
- Launch MicroStrategy Web to view the customization.
See Also
-
Fundamentals of customization: Style Catalog Configuration file
-
Fundamentals of customization: Page Configuration file
-
Page content and layout: Web beans and Web components