Strategy ONE
Add Files for the React Format Panel
This feature is available starting in MicroStrategy 2021 Update 3.
Since the React Format panel is not part of the Custom Visualization Tool by default, the entire structure needs to be added separately.
Add and Install All Necessary Packages
To install all necessary packages open package.json and update the devDependencies section to include all the dependencies listed below.
"devDependencies": {
        "babel-eslint": "^10.0.2",
        "eslint": "^5.16.0",
        "eslint-config-airbnb-base": "^13.2.0",
        "eslint-plugin-import": "^2.18.2",
        "@babel/core": "^7.13.1",
        "@babel/preset-env": "^7.13.5",
        "babel-loader": "^8.2.2",
        "core-js": "^3.12.1",
        "webpack": "^5.24.2",
        "webpack-cli": "^4.5.0",
        "dotenv": "8.2.0"
    }
After running the npm install command all packages should be installed successfully.
For Windows users:
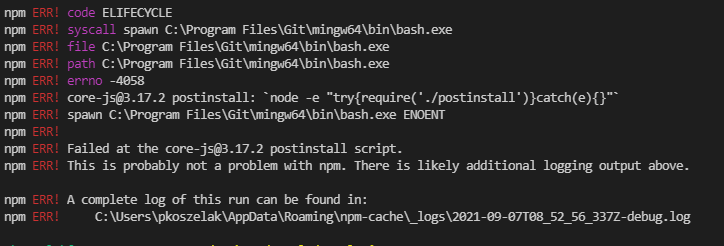
If you see an error similar to the one shown below:

Follow these steps to resolve the issue:
-
Install git bash.
-
In the main
SampleVizdirectory, create a file named.npmrc. -
In the file, paste
script-shell = "C:/Program Files/Git/bin/bash.exe", which represents the local absolute path to previously installed git bash executable file. -
Run the
npm-installcommand again.
Add the Basic Format Panel Structure
To work with the React Format panel you must assemble the basic file structure. This means the formatPanelConfig folder must be created in the main directory. This folder contains files with all the necessary components, as well as the middle layer logic (query and apply). See Add Files for the React Format Panel for descriptions of these files. You can download the basic structure for the Format panel in formatPanelConfig.zip. Remember this structure corresponds to the sample plugin, so it can be used as a base for further development.
After adding the structure into the plugin, navigate to formatPanelConfig/config.js and replace <viz-name> in the template shown below with the name of the visualization.
Before:
const mstr<viz-name> = { config, properties, apply, query };
export { mstr<viz-name> }
After:
const mstrSampleViz = { config, properties, apply, query };
export { mstrSampleViz };
If you are using the Custom Visualization Tool version 2.2.3 and newer and you have initialized a custom visualization using the React Format panel, all template files in formatPanelConfig.zip are automatically added to your visualization folder .
Add Webpack Config
If you are using the Custom Visualization Tool version 2.2.3 and newer and you have initialized a custom visualization using the React Format panel, you should skip this section. You also no longer need webpack.config.js.
The config file was originally defined as an ES6 module, so it automatically supports dynamic import of all associated dependencies. However, ES6 modules are supposed to work with http protocol, which means the code must be deployed within an http server. However, this is not possible with Workstation, since everything is hosted from a local file system. This means http protocol and ES6 modules cannot be used. To resolve this, there is one extra step before deploying in Workstation. You must transpile your visualization to an ES5 compatible version, so it can be loaded using the mojo loader.
-
Install the webpack package described in Add Files for the React Format Panel
-
Add
webpack.config.jsto the main directory. This file allows the creation of a transpiled and minified version of the Format panel. -
Add commands to run the script.
Add Scripts and Commands
You must add scripts and variables to indicate where and how the Format panel is deployed.
Add Commands
Inside package.json, under the scripts section, create and modify commands to simplify the development of the plugin. These commands are used in official custom plugins for Sankey or TimeSeries visualizations.
"scripts": {
        "start": "npm run env && mstr-viz-build development",                 // builds the visualization in developer mode, which means the build files are updated after each change
        "build": "npm run env && mstr-viz-build && npm run webpack",          // builds the minified version of the viz and additionally builds format panel config locally (in main directory /dist)
        "build-dev": "npm run env && mstr-viz-build",                         // builds the minified version of the viz
        "build:local": "npm run env && mstr-viz-build local",                 // builds the minified version of the viz locally (in main directory /dist)
        "build:format": "npm run webpack && npm run copy-format-panel",       // builds the format panel and copies it to deployment folder
        "webpack": "WEBPACK_ENV=build webpack",                               // builds the format panel locally (in main directory /dist)
        "webpack-dev": "WEBPACK_ENV=dev webpack",                             // builds the format panel locally (in main directory /dist) - this version is easier to debug later on
        "copy-format-panel": "source ./dev_scripts/copy_format_panel.sh",     // copies created format panel from local (in main directory /dist) to deployment folder
        "deploy": "source ./dev_scripts/deploy_to_env.sh",                    // deploys the whole viz from deployment folder to AWS environment
        "env": "source ./dev_scripts/env_check.sh"                           // checks whether env file with variables exists, if no then creates it (look at 3.4.3.Add variables section)
  },
If you are using the Custom Visualization Tool version 2.2.3 and newer and you have initialized a custom visualization using the React Format panel, you should remove "npm run webpack" from the "build" command.
"scripts": {
        …
        "build": "npm run env && mstr-viz-build”,
…
Add Dev Scripts
Unpack and add the additional dev scripts in dev_scripts.zip to the main visualization directory. These scripts are not included in the tool by default.
Add Variables to the .ENV File
The correct variables must be defined so the commands and scripts work. All necessary variables are located in a newly created .env file inside the main plugin directory. The content of the file is shown below.
-
PATH_OF_PLUGINSThe absolute path to the destination (deployment) folder. -
PLUGIN_NAMEThe name of the plugin. -
ENV_IPThe IP address for the AWS environment. This line is optional. -
ENV_USRThe user login for AWS environment. This line is optional.
# WARNING, if running on Windows you need git-bash installed.
# Then run `npm run add_bash:windows`

PATH_OF_PLUGINS="C:/Program Files/Apache Software Foundation/Tomcat 9.0/webapps/MicroStrategy/plugins"
PLUGIN_NAME=SampleViz

PATH_OF_VIZ=$PATH_OF_PLUGINS/$PLUGIN_NAME
ENV_IP=remote_env_ip
ENV_USR=mstr
Update the Config File
You must also update the following variables inside the existing config.js file:
-
plugin_name: process.env.PLUGIN_NAME, -
path_of_plugins: process.env.PATH_OF_PLUGINS, -
visualization_name: process.env.PLUGIN_NAME,
To work with these variables add a require("dotenv").config(); line at the top of the file.
