Strategy One
Integrate OIDC Support with Okta
This procedure provides instructions for integrating Strategy Web with Okta. For more information, see the Okta documentation.
Create an Application
-
Log in as an Okta administrator and go to the Admin page.
-
Go to Applications and click Create App Integration.
-
Select OIDC - OpenID Connect and Native Application.
-
Click Next
-
Under General Settings, enter the App integration name.
-
Confirm that Authorization Code and Refresh Token are checked in the Grant type.
-
Add the following Web, Mobile, Library and Desktop application URIs under Sign-in redirect URIs. Replace the environment-specific URIs with your environment name.
-
https://env-xxxxxx.customer.cloud.microstrategy.com/MicroStrategyLibrary/auth/oidc/login -
com.microstrategy.hypermobile://auth -
com.microstrategy.dossier.mobile://auth -
https://env-xxxxxx.customer.cloud.microstrategy.com/MicroStrategyLibrary/static/oidc/success.html -
local://plugins -
com.microstrategy.mobile://auth -
https://env-xxxxxx.customer.cloud.microstrategy.com:443/MicroStrategy/auth/oidc/login -
https://env-xxxxxx.customer.cloud.microstrategy.com:443/MicroStrategyMobile/auth/oidc/login -
The following URIs are only required if you are logging into Workstation via OIDC:
-
http://127.0.0.1 -
http://127.0.0.1:51892 -
http://127.0.0.1:51893 -
http://127.0.0.1:51894 -
http://127.0.0.1:51895 -
http://127.0.0.1:51896 -
http://127.0.0.1:51897
-
-
-
Click Save.
-
Go to the Assignments tab and assign users.
-
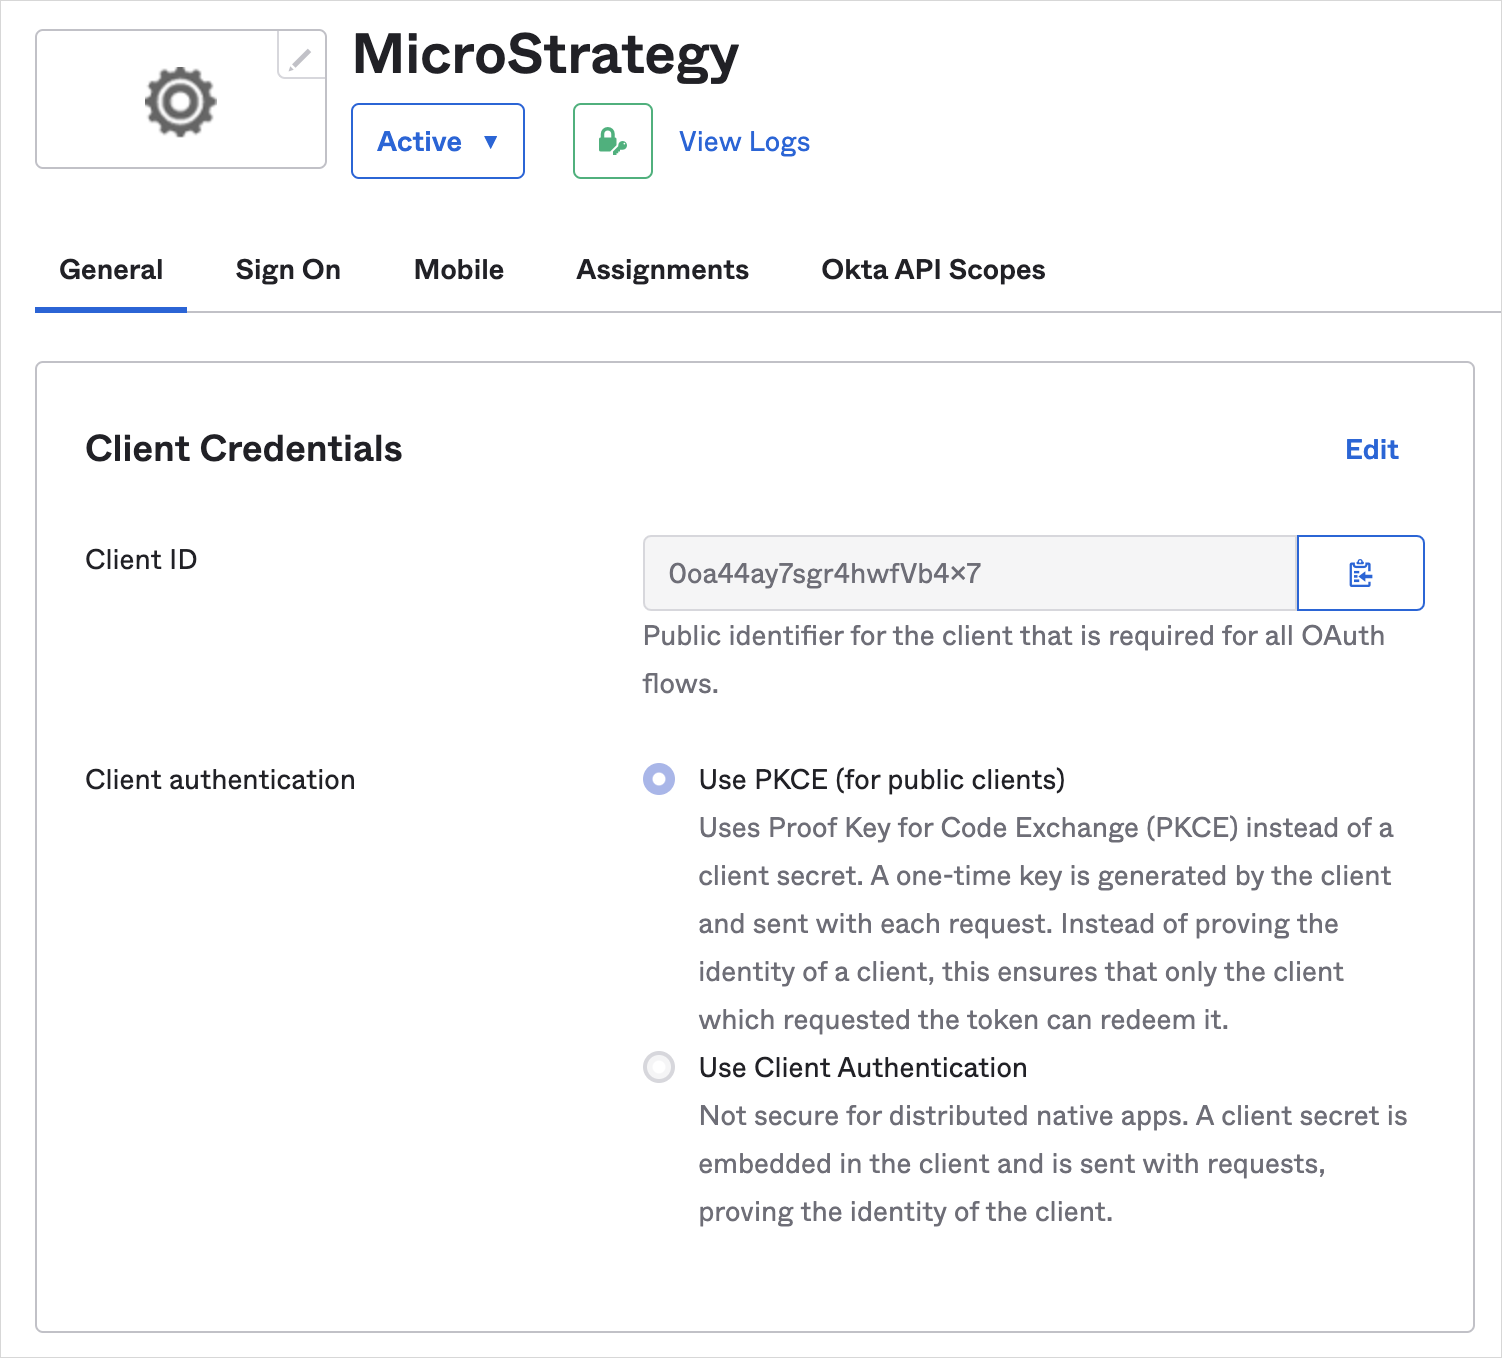
On the General tab, under Client Credentials, take note of the client ID for future reference.
-
Select the Sign On tab. Under the OpenID Connect ID Token, take note of the issuer for future reference.
-
Next to OpenID Connect ID Token, click Edit. In the Groups claim filter, choose
Matches regex, enter a value of.*, and click Save.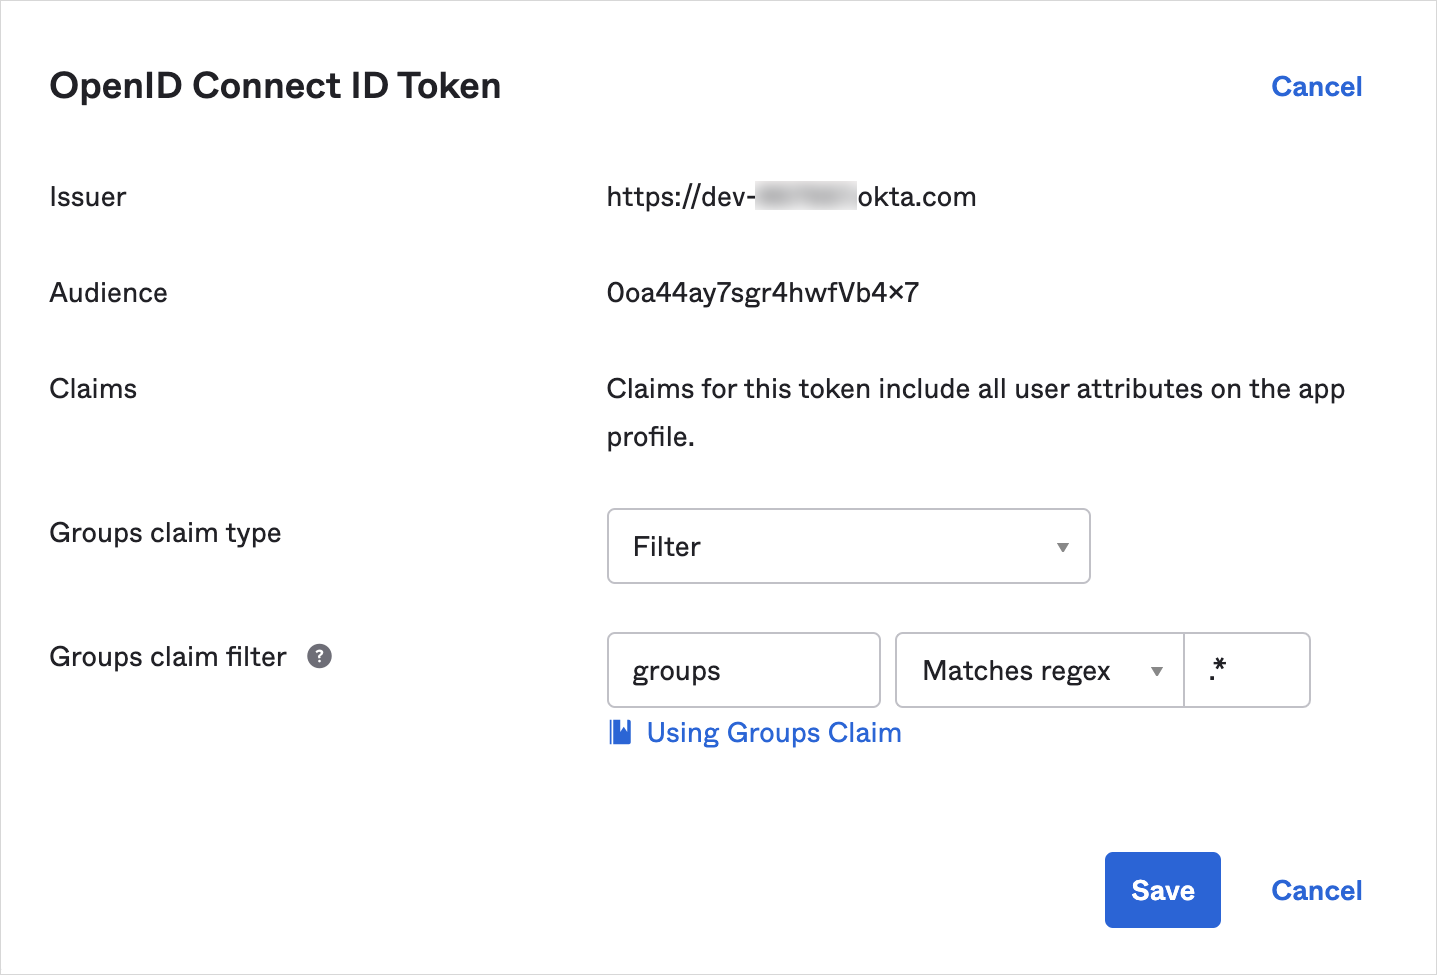
-
Select the Assignments tab and verify that the users that need to access the application are assigned.
-
Optionally click Okta API Scopes and grant
okta.apps.read,okta.groups.read, andokta.users.readscopes to the application.
Configure Strategy Library in Workstation
-
Open Workstation and connect to the Library environment using standard authentication with an admin privilege user.
-
Right-click on the connected environment. Under Configure Enterprise Security, select Configure OIDC.
-
Select Okta as the identity provider from the dropdown in the first step.
-
Verify that all URIs mentioned in the second step are already added to the Okta application.
-
Provide the Client ID and Issuer for the Okta application in the third step.
-
Verify the default User claim mappings and Import user at Login setting.
-
Click Save. This automatically creates a trust relationship between Library Web server and Intelligence server, and enables OIDC authentication mode.
Configure and Enable OIDC Auth Mode for Strategy Web/Strategy Mobile
The procedure below refers to Strategy Web. However, the same information applies to Strategy Mobile unless otherwise noted.
-
Go to the Strategy Web admin page.
https://env-xxxxxx.customer.cloud.microstrategy.com/MicroStrategy/servlet/mstrWebAdmin -
Locate the connected Intelligence server and click Modify.
-
Click Setup next to the trust relationship between the Web server and Strategy Intelligence server.
-
Enter the user credentials with admin privileges and click Create Trust Relationship.
-
In the navigation pane, click Default properties and enable OIDC Authentication.
-
Under OIDC Configuration, complete the remaining fields.
Client ID Enter the client ID of your Okta application.
Client Secret This field is only required when the Okta application is a Web app. If you deployed a Public client/native app in Create an Application, you can leave this field blank.
Issuer Enter the Issuer of your Okta application.
Native Client ID This is the same as the client ID, unless configured otherwise.
Redirect URI The default web redirect URI. This should not be changed unless configured otherwise.
Scope The scopes used by Strategy to authorize access to a user. To log into the Mobile admin page with OIDC, add "groups" to the scope.
Claim Map
-
Full Name The user display name attribute. The default value for this field is name.
-
User ID The user distinguished login attribute. The default value for this field is email.
-
Email The user email address attribute. The default value for this field is email.
-
Groups The user group attribute. The default value for this field is groups.
Admin Groups Select admin groups whose members can access to the admin pages. You can have multiple admin groups.
["WebAdmin","SystemAdmin"]
Members belonging to WebAdmin and SystemAdmin can access the admin pages. -
-
Click Save. For more information, see Enabling OIDC Authentication for JSP Web and Mobile.
Restart the Web server after completing all the above steps for the changes to take effect.