Strategy ONE
Integrate MicroStrategy With Snowflake for Single Sign-On With OIDC using Microsoft Entra ID (Formerly Azure AD)
To integrate Strategy and Snowflake with Microsoft Entra ID OIDC SSO using Workstation, see Integrate Strategy with Microsoft Entra ID OIDC Single Sign-On.
Learn how to integrate MicroStrategy with Snowflake for Single-Sign On (SSO) with OpenID Connect (OIDC) authentication.
- Prerequisite: Configure Snowflake OAuth integration with Microsoft Entra ID to create OAuth applications
- Enable MicroStrategy Web OIDC with Microsoft Entra ID
- Enable MicroStrategy Library OIDC with Microsoft Entra ID
- Configure seamless login
- Enable MicroStrategy Mobile OIDC with Microsoft Entra ID
- Create Snowflake database instances
- Validate OIDC login mode
Prerequisite: Configure Snowflake OAuth Integration with Microsoft Entra ID to Create OAuth applications
- Select the following OAuth flow described in the Pre-Requisite section of Configure Microsoft Entra ID for External OAuth: The authorization can grant the Oauth client an access token on behalf of the user.
- Complete the following steps:
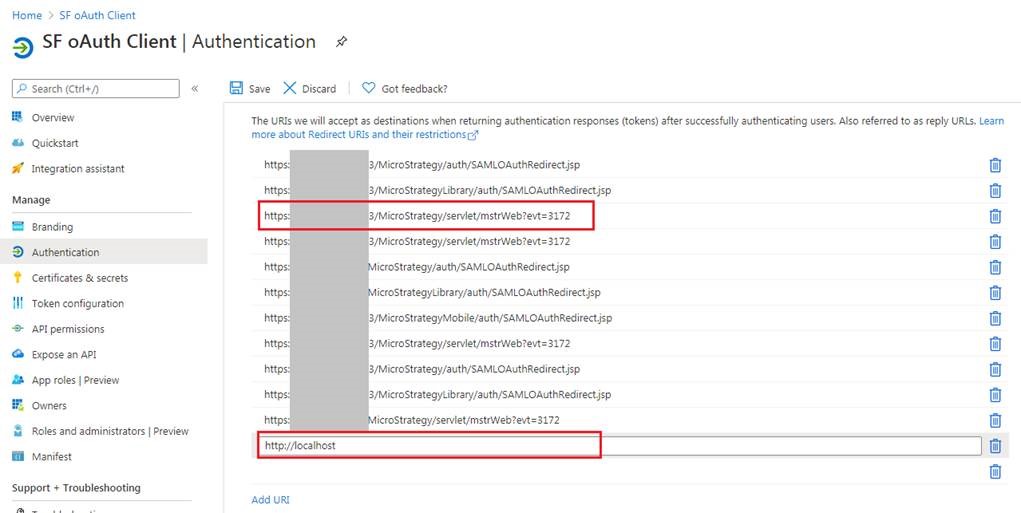
- Based on the Snowflake documentation, create two applications: Snowflake OAuth Resource Application and Snowflake OAuth Client Application. When configuring the Client Application, add the following redirect URLs:
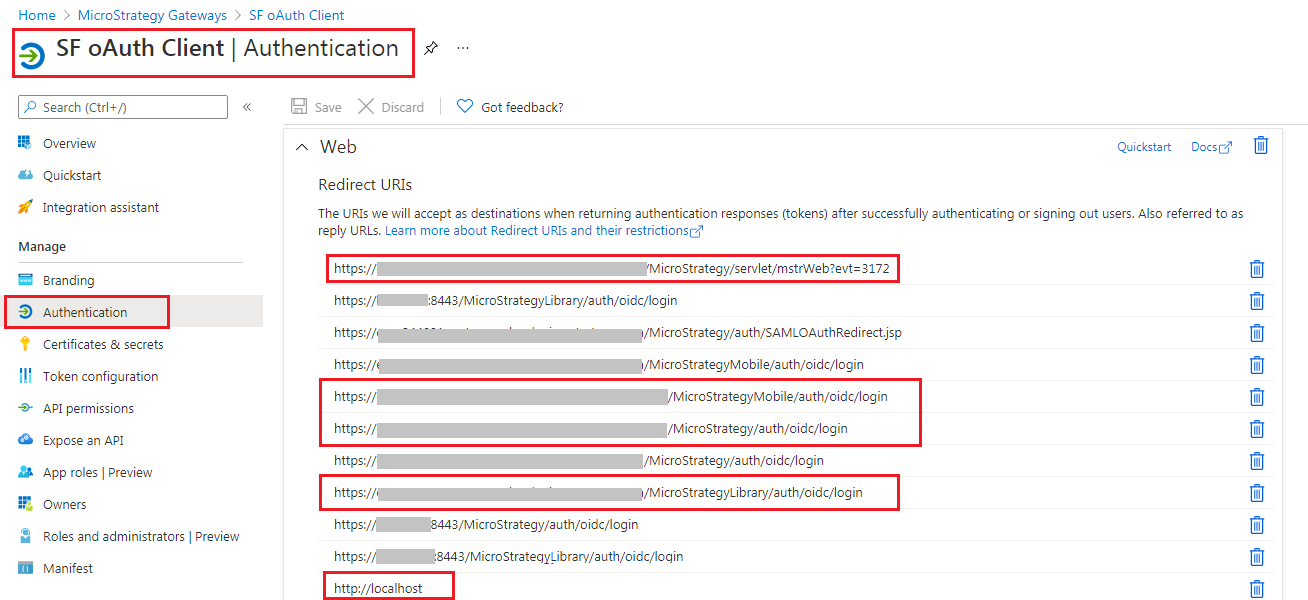
- https://<FQDN>:<port>/MicroStrategy/servlet/mstrWeb?evt=3172
- http://localhost
- Based on the Snowflake documentation, create two applications: Snowflake OAuth Resource Application and Snowflake OAuth Client Application. When configuring the Client Application, add the following redirect URLs:
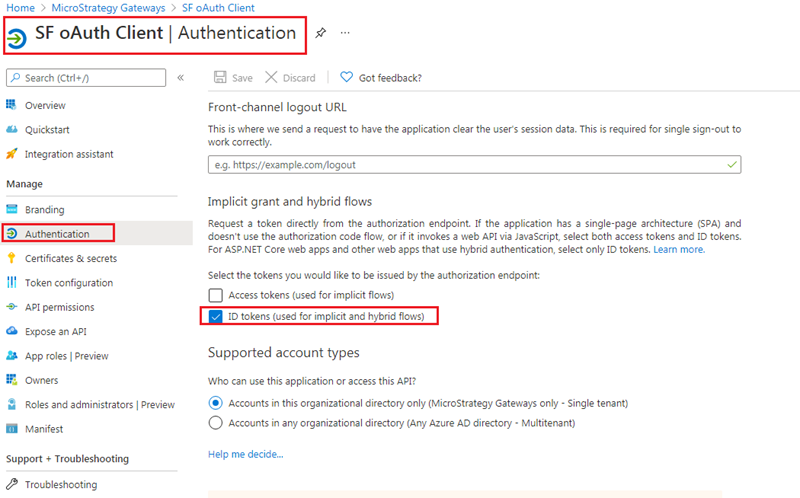
- Go to the Snowflake OAuth Client Application > Authentication.
-
Under the Implicit gran and hybrid flows section, select the ID tokens checkbox.
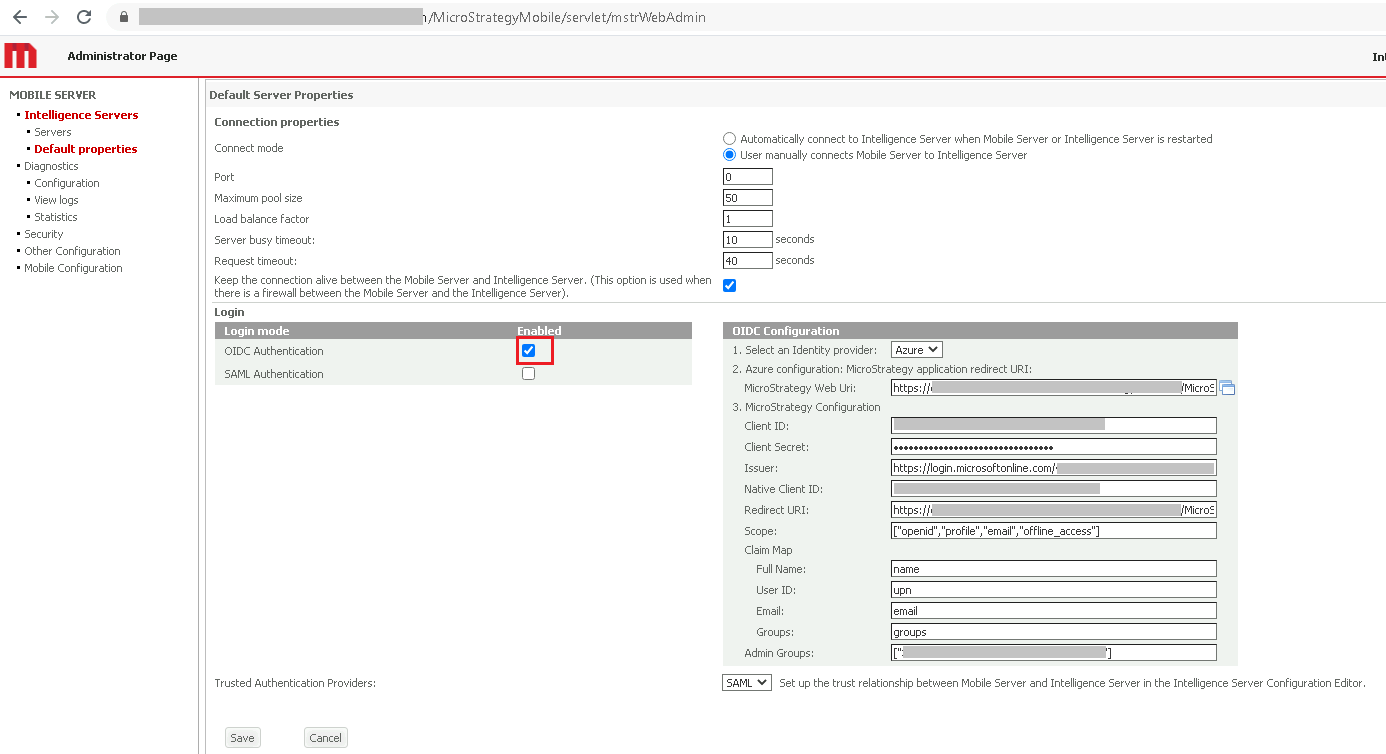
Enable MicroStrategy Web OIDC with Microsoft Entra ID
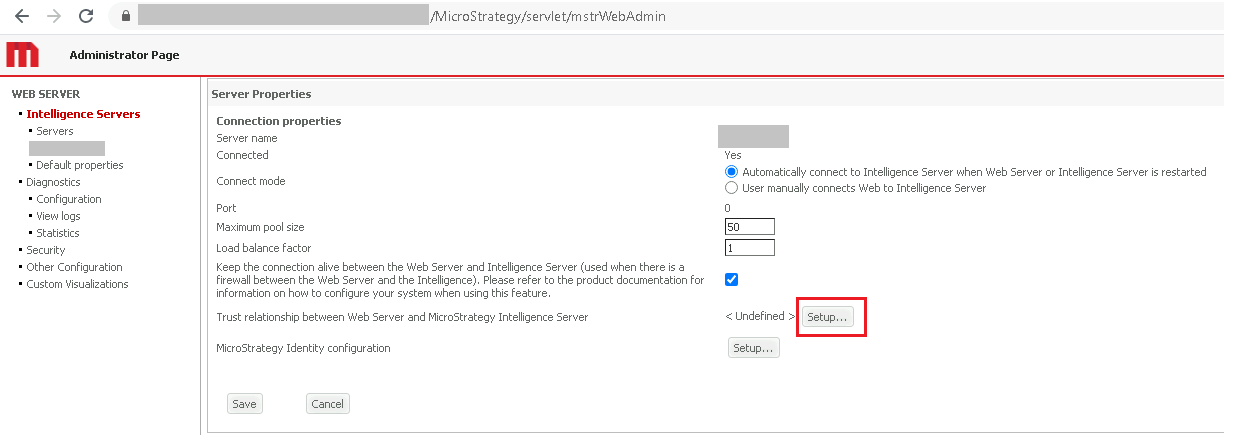
- Establish trust between the Web Server and Intelligence Server.
- Log into MicroStrategy Web.
- Connect to the Intelligence Server.
Select your Intelligence Server and next to Trust relationship between Web Server and MicroStrategy Intelligence Server, click Setup.
- Enter the administrator account and password to establish trust.
-
Set OIDC as the login mode and complete the required fields.
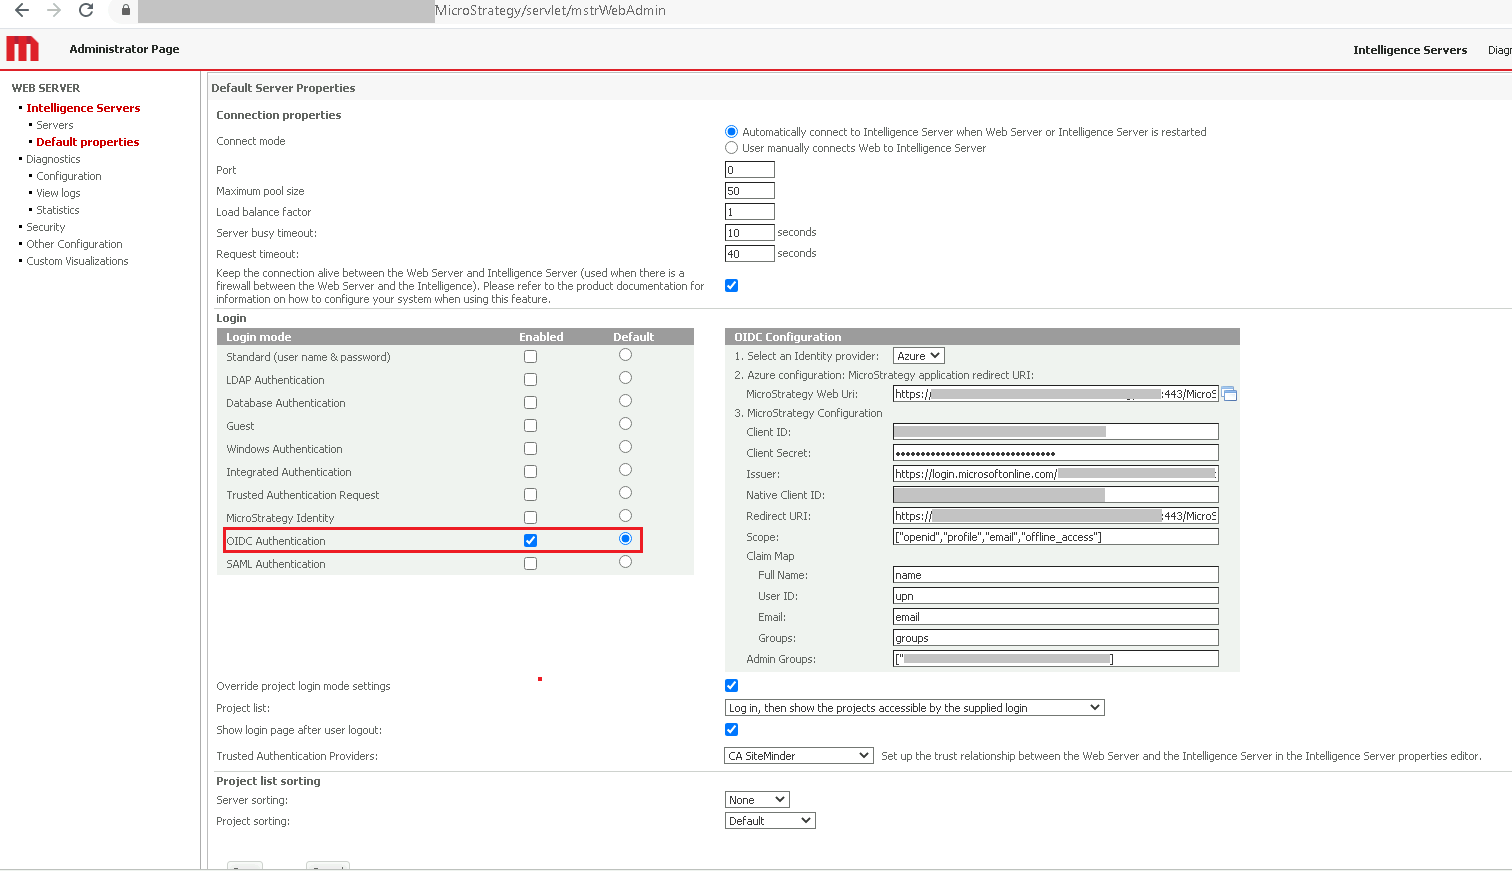
For the MicroStrategy application redirect URI, the value must be added to Microsoft Entra ID > Snowflake OAuth Client Application > Authentication > Web Redirects URIs.
-
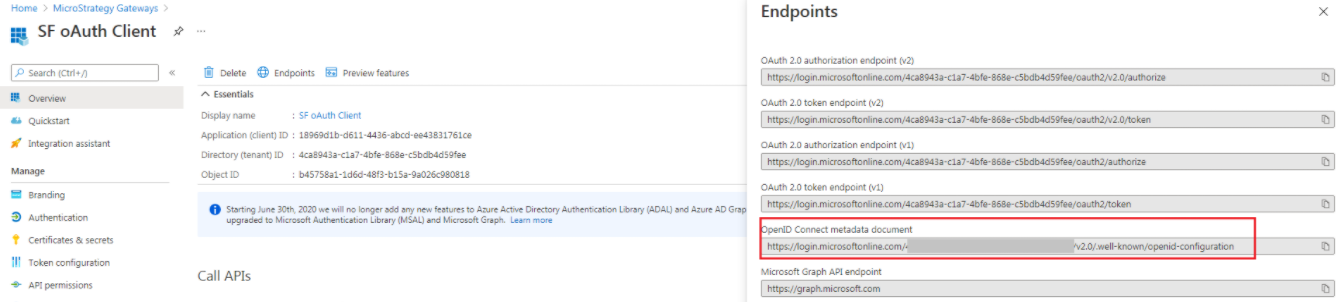
For Client ID, go to the app > Overview > Application (client) ID, and locate the ID.

-
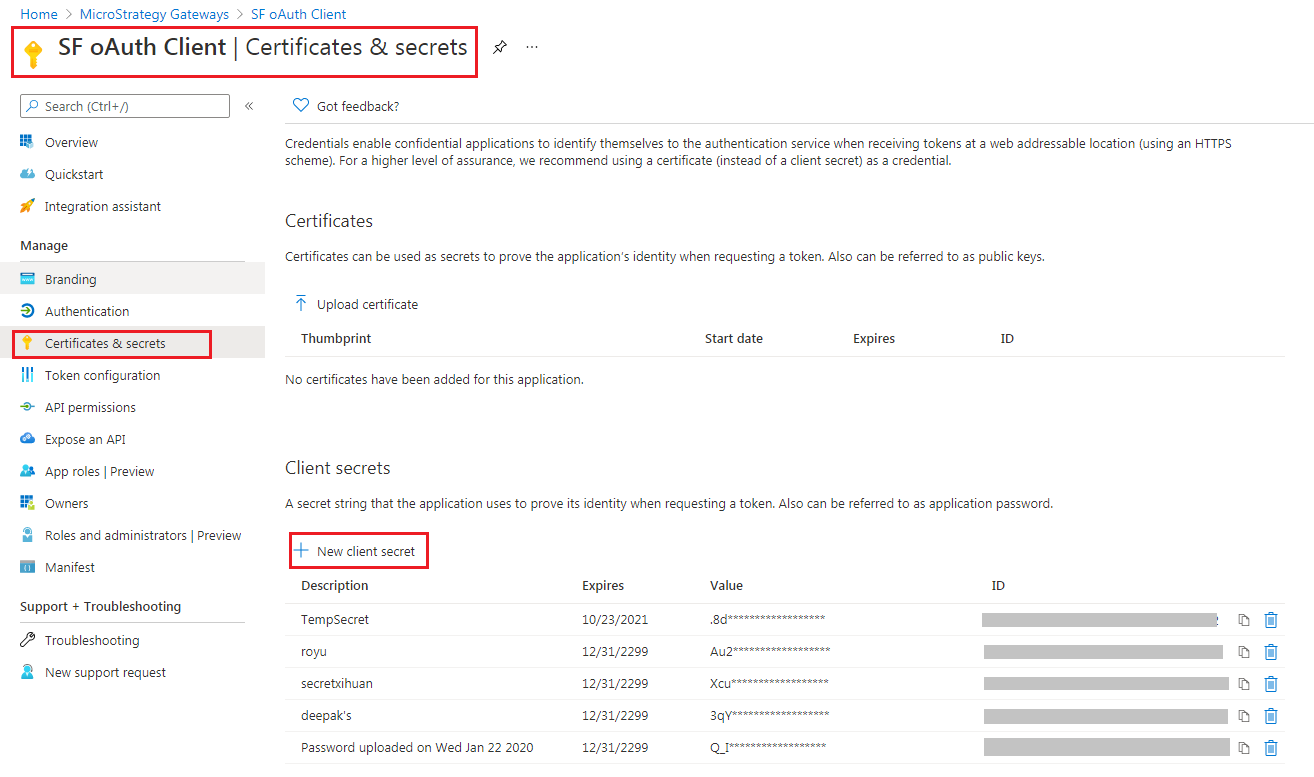
For Client Secret, go to the app > Certificates & secrets, and locate the secret. If necessary, create a new secret.
-
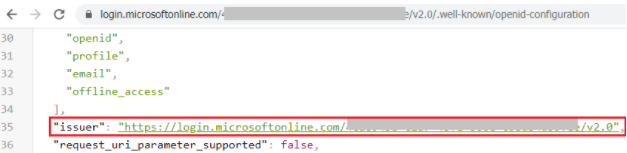
For Issuer, go to App > Overview > Endpoints, open the URL of OpenID Connect metadata document, and copy the issuer value. For example, https://login.microsoftonline.com/[Directory tenant ID]/v2.0.
- For Native ID, use the same value as Client ID.
- For Redirect URI and Scope, leave the fields unmodified.
- For the Claim Map fields:
- Full Name: name
- User ID: upn
- Email: email
- Groups: groups
- For Admin Groups, go the app > Groups > Overview, and locate Object Id. If the Object Id is a value set, only users in the group can access mstrWebAdmin pages.
-
- Restart Tomcat for the MicroStrategy Web configurations to take effect.
Enable MicroStrategy Library OIDC with Microsoft Entra ID
-
Create or modify MicroStrategyLibrary\WEB-INF\classes\auth\Oidc\OidcConfig.json.
Copy{
"iams":[{
"clientId":"XXXXXXX",
"clientSecret":"XXXXXXX",
"nativeClientId": "XXXXXXX",
"id":"test",
"issuer":"https://login.microsoftonline.com/XXXXXXX/v2.0",
"redirectUri":"https://XXXXXXX/MicroStrategyLibrary/auth/oidc/login",
"blockAutoProvisioning": true,
"claimMap": {
"email": "email",
"fullName": "name",
"userId": "upn",
"groups": "groups"
},
"default": true,
"mstrIam": true,
"scopes": [
"openid",
"profile",
"email",
"offline_access"
],
"vendor": {
"name": "MicroStrategy IAM",
"version": "Azure AD"
}
}]
}- For clientId, clientSecret, nativeClientId, and issuer, use the same values used for OIDC configuration for MicroStrategy Web.
- For redirectUri, use <FQDN>:<port> to replace XXXXXXX, and add the URL to Microsoft Entra ID > Snowflake OAuth > Snowflake OAuth Client Application > Web Redirect URLs.
-
Set OIDC authentication mode.
-
Log into the MicroStrategy Library Admin page.
- Connect to the Intelligence Server.
- Go to the Library Server tab > Authentication Modes and select the OIDC checkbox.
-
Click Create Trusted Relationship to create a trusted relationship between the Library Server and Intelligence Server.

-
Enter the administrator account and password to establish trust.
-
- Restart Tomcat for the MicroStrategy Library configurations to take effect.
Configure Seamless Login
To navigate between MicroStrategy Web and Library without having to re-authenticate, see How to Enable Seamless Login Between Web, Library, and Workstation.
Enable MicroStrategy Mobile OIDC with Microsoft Entra ID
-
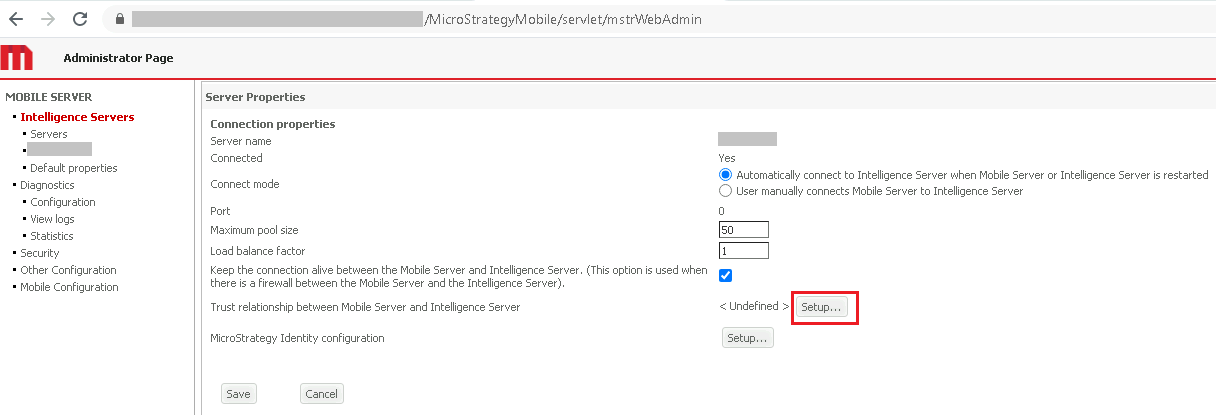
Establish trust between the Web Server and Intelligence Server.
- Log into the MicroStrategy Mobile Admin page.
- Connect to the Intelligence Server.
-
Select your Intelligence Server and next to Trust relationship between Mobile Server and MicroStrategy Intelligence Server, click Setup.
-
Set OIDC as the login mode and complete the required fields using the same values used for OIDC configuration for MicroStrategy Web.
-
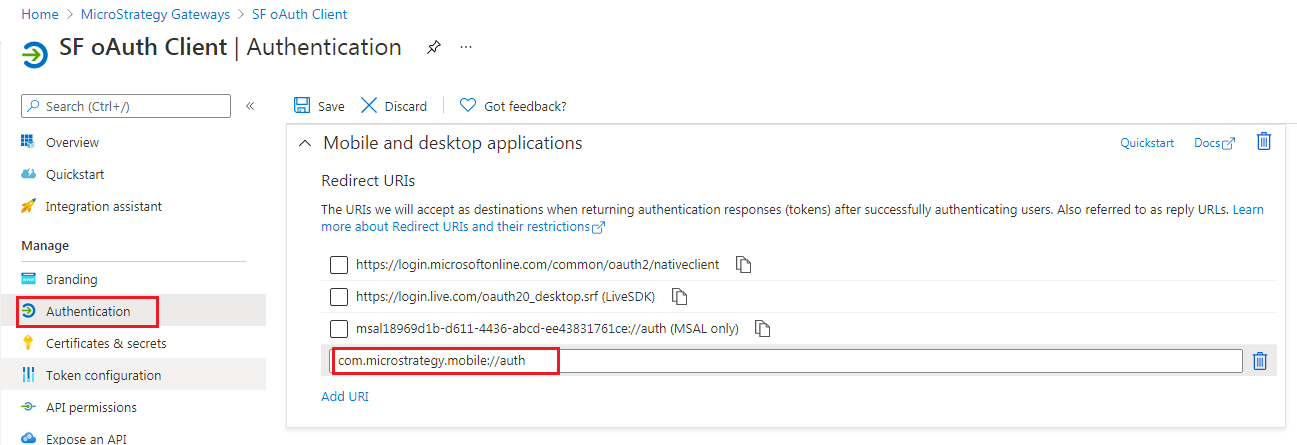
Add the Mobile Redirect URI to Microsoft Entra ID > Snowflake OAuth Client Application > Authentication > Web Refidirect URIs.
-
In Microsoft Entra ID > Snowflake OAuth Client Application > Authentication > Mobile and desktop applications, add com.microstrategy.mobile://auth as a redirect URI.
- Restart Tomcat for the MicroStrategy Mobile configurations to take effect.
Create Snowflake Database Instances
You can create Snowflake database instances with or without the project schema.
With the Project Schema
To use the project schema, you must have a basic authentication connection:
-
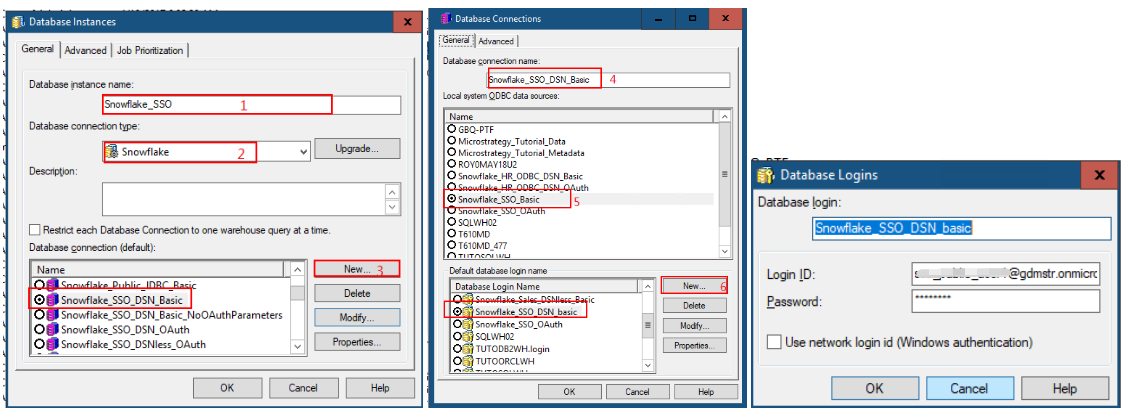
In MicroStrategy Developer:
- In the Database instance name field, type in a name.
- From the Database connection type drop-down, select Snowflake.
- Click New to create a new database connection.
- In the Database connection name field, type in a name.
- Select the DSN.
-
Create a database login and saved your settings.
-
In MicroStrategy Web:
Database instances created via MicroStrategy can be used for the project schema, but cannot be used for connection mapping.
-
In the Data Source dialog, select the Standard Connection option.

-
Without the Project Schema
To use the database instance without the project schema, you must either have basic or OAuth authentication.
-
Create an OAuth authentication database connection:
-
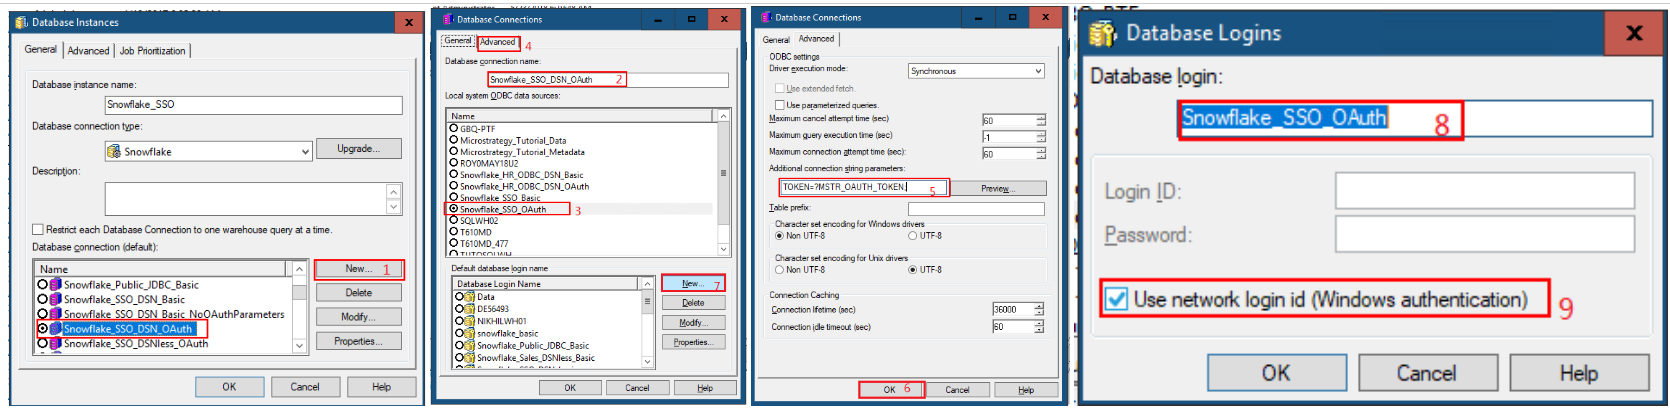
In MicroStrategy Developer:
- Click New to create a new database connection.
- In the Database connection name field, type in a name.
- Select the DSN.
- Go to the Advanced tab.
-
In the Additional connection string parameters field, enter TOKEN=?MSTR_OAUTH_TOKEN;.
This will act as a placeholder that will be replaced by a real token when the user uses the Snowflake database instance.
- Click OK.
- In the Database login, enter a name.
-
Select the Use network login id (Windows authentication) checkbox.
-
In MicroStrategy Web:
- In the Data Source dialog, select the OAuth Connection option.
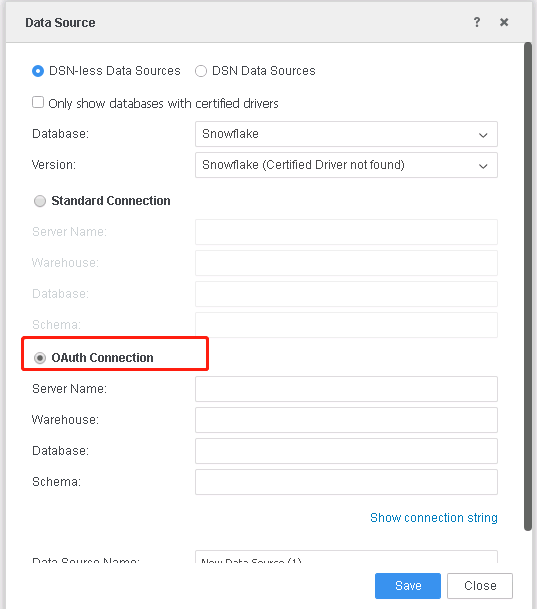
-
-
Set OAuth Parameters.
Users must have the Set OAuth parameters for Cloud App sources privilege under Client-Web.
If you want to use the DB role in MicroStrategy Workstation, OAuth parameters must be set from Workstation. Oauth parameters in Web and Workstation are different set values.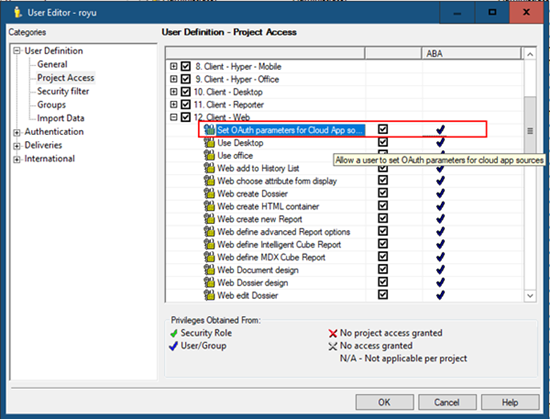
-
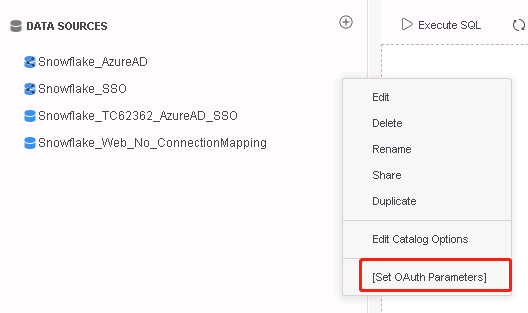
After the database instance is created, you can set the OAuth parameters in MicroStrategy Web.
-
In the Database Instance menu, select Set OAuth Parameters.
-
In the Authentication Type drop-down, select Microsoft Azure AD SSO.
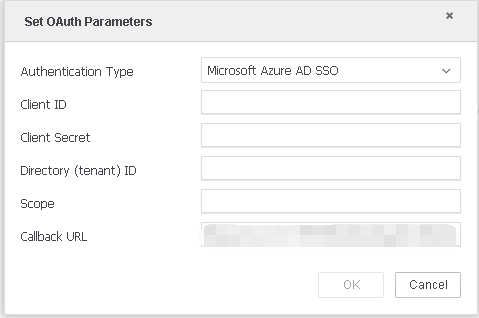
-
Fill out the required fields.
You can find the required information on Entra ID where the Snowflake OAuth Application was created in Integrate a MicroStrategy Library SAML environment with Microsoft Entra ID.
-
For Client ID, click on the app > Overview > Application (client) ID, and locate the ID.
- For Client Secret, click on the app > Certificates & secrets, and locate the secret. If necessary, create a new secret.
- For Directory (tenant) ID, click on the app > Overview, and locate the ID.
- For Scope, click on the app > API permissions, click on the API/Permission name, and locate the URL. The URL is in the format like
https://[EntraDomain]/[id]/session:scope-any. -
The Callback URL is generated by default.
For Web: https://[MicroStrategy Web Hostname]/MicroStrategy/servlet/mstrWeb?evt=3172
For Workstation: http://localhost
The callback URL should be added to the Snowflake OAtuh Client Application.
-
-
Create Connection Mappings (Optional)
If you have multiple MicroStrategy Users or User Groups and want to give access to the same database instance but with different database logins, see Controlling Access to the Database: Connection Mappings
In a primary database connection, users that are not mapped into the secondary database connection use the default database connection. In a secondary database connection, users in a specific group use the mapped database connection.
For example, the administrator uses basic authentication, while other users use OAuth authentication. All users can use the project schema. You must set the default connection to use standard authentication for the Warehouse Catalog to work in Developer:
- Create a basic authentication database connection (default).
In MicroStrategy Developer
- In the Database instance name field, type in a name.
- From the Database connection type drop-down, select Snowflake.
- Click New to create a new database connection.
- In the Database connection name field, type in a name.
- Select the DSN.
Create a database login and save your settings.
-
Create an OAuth authentication database connection.
-
In MicroStrategy Developer
- Click New to create a new database connection.
- In the Database connection name field, type in a name.
- Select the DSN.
- Go to the Advanced tab.
-
In the Additional connection string parameters field, enter TOKEN=?MSTR_OAUTH_TOKEN;.
This will act as a placeholder that will be replaced by a real token when the user uses the Snowflake database instance.
- Click OK.
- Click New.
- In the Database login, enter a name.
-
Select the Use network login id (Windows authentication) checkbox. :
-
-
Create connection mappings.
-
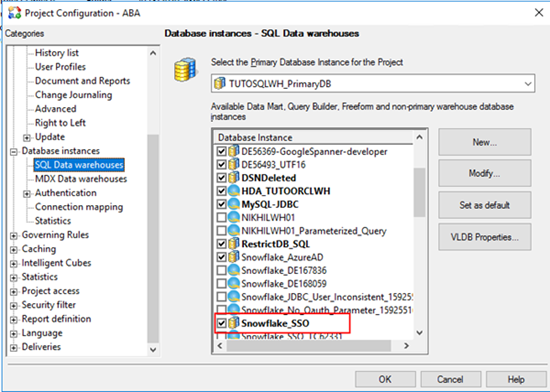
Assign the new traditional DBRole in Project Configuration > Database Instance > SQL Data warehouse.
A default database connection mapping is created for all users when you select the database instance.
-
Assign different user groups with basic and OAuth database connection in Project Configuration > Database instances > Connection mapping.
 :
:- Users in group SSO_End_User_DSNless_OAuth will use the Snowflake_SSO_DSNless_OAuth database connection.
- Users in group SSO_End_User_DSN_OAuth will use the Snowflake_SSO_DSN_OAuth database connection.
- Users in group SSO_End_User_JDBC_OAuth will use the SSO_End_User_JDBC_OAuth database connection.
- Other users will use the default database connection. In this case, the Snowflake_SSO_DSNLess_Basic database connection is used.
-
-
Set OAuth parameters via MicroStrategy Web. After the database instance is created, you can set the OAuth parameters in MicroStrategy Web.
-
In the Database Instance menu, select Set OAuth Parameters.
-
From the Authentication Type drop-down, select Microsoft Azure AD SSO.
-
Fill out the required fields.
You can find the required information on Entra ID where the Snowflake OAuth Application was created in Integrate a MicroStrategy Library SAML environment with Microsoft Entra ID.
- For Client ID, click on the app > Overview > Application (client) ID, and locate the ID.
- For Client Secret, click on the app > Certificates & secrets, and locate the secret. If necessary, create a new secret.
- For Directory (tenant) ID, click on the app > Overview, and locate the ID.
- For Scope, click on the app > API permissions, click on the API/Permission name, and locate the URL. The URL is in the format like
https://[EntraIDDomain]/[id]/session:scope-any. -
The Callback URL is generated by default.
The callback URL should be added to the Snowflake OAtuh Client Application.
-
Validate OIDC Login Mode
- Check the ID token saved in the user run time.
- Open MicroStrategy Diagnostics and Performance Logging Tool to enable Kernel XML API log.
When logging into the MicroStrategy Web, Library, or Mobile server, the id token is saved in the user run time and logs, as shown below:
Copy2021-03-05 04:03:58.020-05:00 [HOST:tec-w-XXX][SERVER:CastorServer][PID:191028][THR:194528][Kernel XML API][Trace][UID:0][SID:0][OID:0] XML Command: <st><sst><st><cmd><crs uid="XXX@gdmstr.onmicrosoft.com" twst="TokenE7061FDE496B0B87A797B6B4D00C3665" pwd="***" npwd="***" pgd="" clid="Server Machine: XXXX Client Machine: tempclient" clmn=" Client Machine Name: tempclient" amd="64" snf="33554432" rws="10" sws="1" mid="" clt="6" vr="11.3.0100.17108J"><reg_opt lcl_rsl="1"><reg_int lcl_id="1033" lcl_rsl="1"/><reg_num lcl_id="1033" lcl_rsl="1"/></reg_opt><u n="Snowflake User" eml="XXX@microstrategy.com" token="eyJ0eXAiOiJKV1QiLCJhbGciOiJSUzI1NiIsImtpZCI6Im5PbzNaRHJPRFhFSzFqS1doWHNsSFJfS1hFZyJ9.eyJhdWQiOiIxODk2OWQxYi1kNjExLTQ0MzYtYWJjZC1lZTQzODMxNzYxY2UiLCJpc3MiOiJodHRwczovL2xvZ2luLm1pY3Jvc29mdG9ubGluZS5jb20vNGNhODk0M2EtYzFhNy00YmZlLTg2OGUtYzViZGI0ZDU5ZmVlL3YyLjAiLCJpYXQiOjE2MTQ5MzQ3MzUsIm5iZiI6MTYxNDkzNDczNSwiZXhwIjoxNjE0OTM4NjM1LCJhaW8iOiJBVFFBeS84VEFBQUFxWk1ldlZ6RVJOcVovbU8rRTM1QTJueHpOK0Y0djMrNlBNWW51KzBuaHN5eW0vQUNZN3I1OUNEZ0V5d0I1VFFnIiwiZW1haWwiOiJ4aWh1YW5AbWljcm9zdHJhdGVneS5jb20iLCJuYW1lIjoiU25vd2ZsYWtlIFVzZXIiLCJub25jZSI6IlhVa3lYWDFjRlhHcm96SWRTNmxlN0VvOU5kakp1TEtzT3JZc1ZmQkpvTFkiLCJvaWQiOiJkMTIzYzE4Ny0wNWU5LTQwMWUtYTIwYy05OWQ4ODA5ZGM0MjAiLCJwcmVmZXJyZWRfdXNlcm5hbWUiOiJzbm93Zmxha2V1c2VyQGdkbXN0ci5vbm1pY3Jvc29mdC5jb20iLCJyaCI6IjAuQUFBQU9wU29US2ZCX2t1R2pzVzl0TldmN2h1ZGxoZ1IxalpFcTgzdVE0TVhZYzVGQURrLiIsInN1YiI6IlVkanhTNEg0b1owWmZoUDJ0U3RLSHl6TXNqbnUtTzZfZGhyOWcwNzQwcXMiLCJ0aWQiOiI0Y2E4OTQzYS1jMWE3LTRiZmUtODY4ZS1jNWJkYjRkNTlmZWUiLCJ1cG4iOiJzbm93Zmxha2V1c2VyQGdkbXN0ci5vbm1pY3Jvc29mdC5jb20iLCJ1dGkiOiI5ZlhLZVY3eXlVbXdCZ0l3aEVNSUFBIiwidmVyIjoiMi4wIn0.I625c3oUxaz9fzCSjHauMDwyooDck9cXa4F0FPycMqwSRxEMqcNwObXFsEwlc8SZ3CXRIAK0QRbvTIsoqFQiPfqmohUUhYd48a3apgwLunsL_7Hj0MhWdSlmqZXFK6JleMj2Xeiqj4oTMyi9TPkH1vi7cpHSSx2_8-M6tYyPVR1JSkbk_2yc13xOuvgZus9LmTP9SmuToAeII56kz_Pg0OmDUqWkL0IhBWq9MXEMn-RVP6xU-hkHIPrYIQAgKjR2Snpc8A48hM9igJuRHl3igqW3GuPZvuLv5xYmGqcM212INafxZKFwVHZF0QQGOLOkfa8GmhKDGev3CMSPmZj_FQ" /></crs></cmd></st></sst></st>
Check to see if SSO works for Snowflake.
- Open MicroStrategy Diagnostics and Performance Logging Tool to enable WSAuth > Info log.
Open WSAuth.log and if SSO is being used, the log should have the following content:
- id token isEmpty=false, usingSSO=true
- Refreshed an access token using id token
The log is shown below:
Copy2021-03-01 21:23:13.999-05:00 [HOST:tec-w-XXX][SERVER:CastorServer][PID:191028][THR:176252][WSAuth][Trace][UID:D27A5347411556F271A147B8DE2A74B9][SID:5EDD58F04C30D75546CB6BC97AE45CF3][OID:230016B943FD7EB57237F6A7AA185AC2] To refresh an access token: access token isEmpty=true, refresh token isEmpty=true, id token isEmtpy=false, usingSSO=true
2021-03-01 21:23:14.297-05:00 [HOST:tec-w-XXX][SERVER:CastorServer][PID:191028][THR:176252][WSAuth][Trace][UID:D27A5347411556F271A147B8DE2A74B9][SID:5EDD58F04C30D75546CB6BC97AE45CF3][OID:230016B943FD7EB57237F6A7AA185AC2] Refreshed an access token using id token
2021-03-01 21:23:14.298-05:00 [HOST:tec-w-XXX][SERVER:CastorServer][PID:191028][THR:176252][WSAuth][Trace][UID:D27A5347411556F271A147B8DE2A74B9][SID:5EDD58F04C30D75546CB6BC97AE45CF3][OID:230016B943FD7EB57237F6A7AA185AC2] To refresh an access token: access token isEmpty=false, refresh token isEmpty=false, id token isEmtpy=false, usingSSO=true
2021-03-01 21:23:14.300-05:00 [HOST:tec-w-XXX][SERVER:CastorServer][PID:191028][THR:176252][WSAuth][Trace][UID:D27A5347411556F271A147B8DE2A74B9][SID:5EDD58F04C30D75546CB6BC97AE45CF3][OID:230016B943FD7EB57237F6A7AA185AC2] The live access token: isExpired=false, expireTime=1614655378, currentTime=1614651794
Related Content
KB484275: Best practices for using the Snowflake Single Sign-on (SSO) feature