Strategy ONE
Client Telemetry Configuration
Client telemetry was introduced in MicroStrategy 2021 Update 8 (December 2022). Starting in MicroStrategy 2021 Update 9, this preview feature is out-of-the-box.
Follow the procedures listed below to configure client telemetry.
2. Configure Library Server to Send Telemetry to Telemetry Server
3. Enable Client Telemetry for MicroStrategy Projects
4. Disable Client Telemetry for MicroStrategy Projects
1. Prerequisites
-
Install and configure Platform Analytics first, prior to enabling client telemetry.
-
End users must be using clients outlined in scope of the feature.
2. Configure Library Server to Send Telemetry to Telemetry Server
Only users with administrator privileges can configure Telemetry server in Workstation. This means you should be an Admin user with the Configure statistics privilege.

-
In Workstation, connect to the environment of interest.
-
Right-click the environment and choose Properties.
-
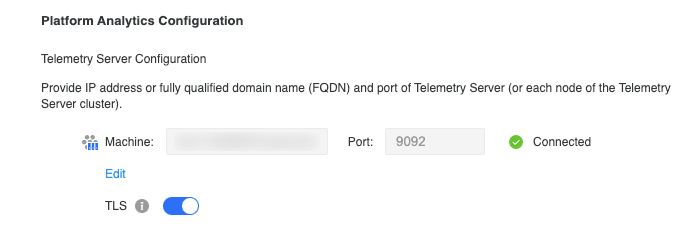
Verify the Telemetry server connection information, such as machine name, port number, is populated. If the status is Connected, skip to 3. Enable Client Telemetry for MicroStrategy Projects.
The default machine name is populated as given for
producer.kafkaproperties.bootstrap.serversin the LibraryconfigOverride.propertiesfile under:Windows
CopyC:\Program Files (x86)\Common Files\MicroStrategy\Tomcat\apache-tomcat-9.0.68\webapps\MicroStrategyLibrary\WEB-INF\classes\configLinux
Copy/opt/tomcat/webapps/MicroStrategyLibrary/WEB-INF/classes/config/configOverride.properties
-
To configure the Telemetry server, start by entering the Telemetry server information for the connected environment. This includes such information as the machine name, as well as the corresponding host/IP, port, and TLS specification. You must configure TLS for Kafka and Library prior to enabling it from Workstation. MicroStrategy does not recommend using localhost or 127.0.0.1.
-
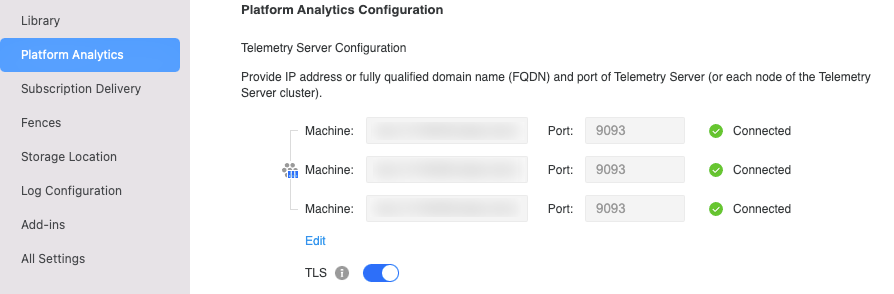
You can enter as many nodes as necessary by clicking Edit and
 . If you are using a clustered Telemetry server, ensure all node connectivity information is entered and all nodes are connectable.
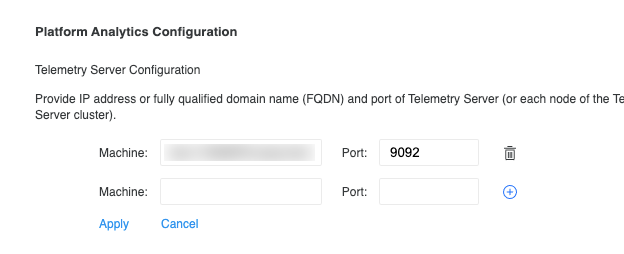
-
Verify that the status of Telemetry server connection is set to Connected after applying the settings to enable client telemetry.
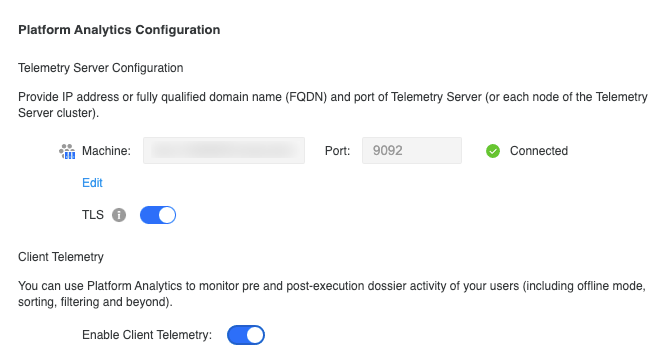
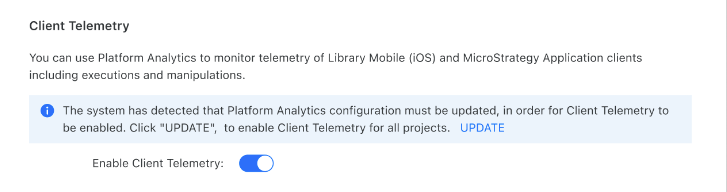
3. Enable Client Telemetry for MicroStrategy Projects
-
Enabling client telemetry requires that the Telemetry server configuration is performed first. Otherwise, the client telemetry option is Disabled.
-
Use the toggle to Enable Client Telemetry. Enabling client telemetry for an environment enables basic stats and client telemetry for all active projects.
-
If a new project is added after enabling client telemetry or basic stats are disabled for some projects using Command Manager, there is an option to Update client telemetry for all projects.
4. Disable Client Telemetry for MicroStrategy Projects
-
Disable the Enable Client Telemetry toggle.
-
At the prompt, click Apply to disable basic statistics, advanced statistics, and client telemetry for all projects.
This setting controls all of the projects in your metadata. If you want to re-enable basic statistics for select projects, see 3. Enable Client Telemetry for MicroStrategy Projects.
5. Enable/Disable TLS
Enabling TLS enables a secured connection between the Library and Telemetry servers.
To enable TLS from Workstation , you must manually configure TLS for the Telemetry and Library servers. If TLS is not configured correctly for both servers, attempting to enable TLS from Workstation will fail.
Follow the instructions below to:
If you have a clustered Telemetry server, make sure TLS is configure properly on each node.
-
Use the TLS toggle to enable a TLS connection.

-
Click the TLS toggle again to disable the TLS connection.
