Strategy ONE
Customize Authentication for Android on the Mobile Server
Both the MicroStrategy Mobile application and custom applications that embed the MicroStrategy Mobile framework must log on to MicroStrategy and be authenticated before they can access MicroStrategy data and platform functionality.
Two different types of authentication are performed by the application:
-
Server authentication
The server authentication process is handled by the container (for example, Tomcat or IIS). MicroStrategy does not take part in this process and none of the MicroStrategy SDK APIs are used. Authentication choices include Windows, Basic and Anonymous, which requires no credentials.
-
Project authentication
The project authentication process is handled by the MicroStrategy Intelligence Server. The authentication authority used to verify that the login credentials are valid depends on how user credentials are stored within a company's environment. Companies typically store user credentials in a database, a Windows domain, or a directory server. Depending on the Intelligence Server configuration, authentication choices include
 Standard,
Windows, LDAP, and Trusted.
Standard,
Windows, LDAP, and Trusted. -
Standard authentication: The credentials entered by or supplied for the user are validated against the credentials stored in the MicroStrategy metadata repository. The MicroStrategy Intelligence Server is the authentication authority.
-
Windows authentication: The Windows NT SID (security identifier) is validated against the NT logon context stored in the MicroStrategy metadata repository. The Windows domain is the authentication authority.
-
LDAP authentication: The credentials entered by or supplied for the user are validated against the credentials stored in an LDAP (Lightweight Directory Access Protocol) directory. The LDAP directory is the authentication authority.
-
Trusted authentication: The credentials entered by or supplied for the user are validated against the credentials stored in a trusted authentication provider, such as CA SiteMinder, IBM Tivoli Access Manager, or Oracle Identity Manager (referred to as Oblix). The trusted authentication provider is the authentication authority.
-
MicroStrategy Mobile performs project authentication using the mobile login task. This task is responsible for obtaining the credentials passed by the MicroStrategy Mobile application and sending them to the Intelligence Server for validation. If this process is successful, the Intelligence Server creates a session and passes the corresponding session ID back to the client. Tasks are discussed in detail under Tasks and Service-Oriented Architecture in the Web SDK section of the MSDL.
There may be instances when you need to change the authentication workflow of your mobile application. For example, you may need to map one user ID to another user ID, create users on the fly, validate credentials against another server, or validate additional input parameters. You can achieve custom workflows like these by creating a custom mobile login task that includes the code to handle the necessary authentication scenarios.
To create a custom mobile login task using MicroStrategy's Web Customization Editor, follow the steps below:
-
Launch the Web Customization Editor in Eclipse.
For information about the Web Customization Editor, open the Web SDK and navigate to Customizing MicroStrategy Web -> Part I: Fundamentals of Customization -> Web Customization Editor.
-
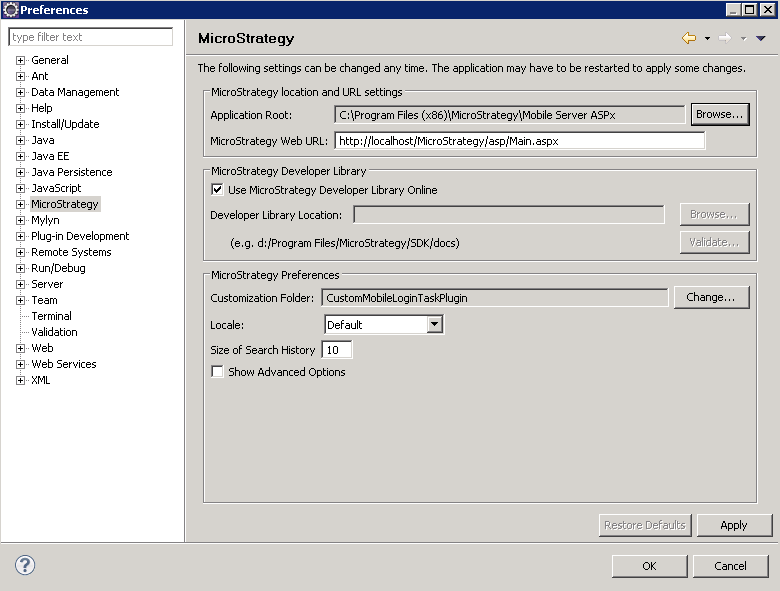
Navigate to Windows -> Preferences -> MicroStrategy and do the following:
-
Set the Application Root to the root folder where MicroStrategyMobile is installed.
-
For the Customization Folder, click Change. On the Select Plug-in dialog, click New, enter CustomMobileLoginTask as the Plug-in Name, and click OK.
-
Click OK.
-
-
Use the Task Creation Wizard to create a custom mobile login task.
-
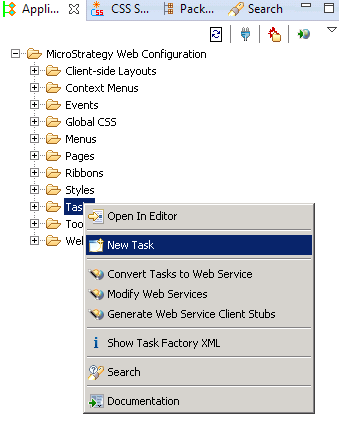
Select the Application Settings tab, expand MicroStrategy Web Configuration, right-click Tasks and choose New Task.
-
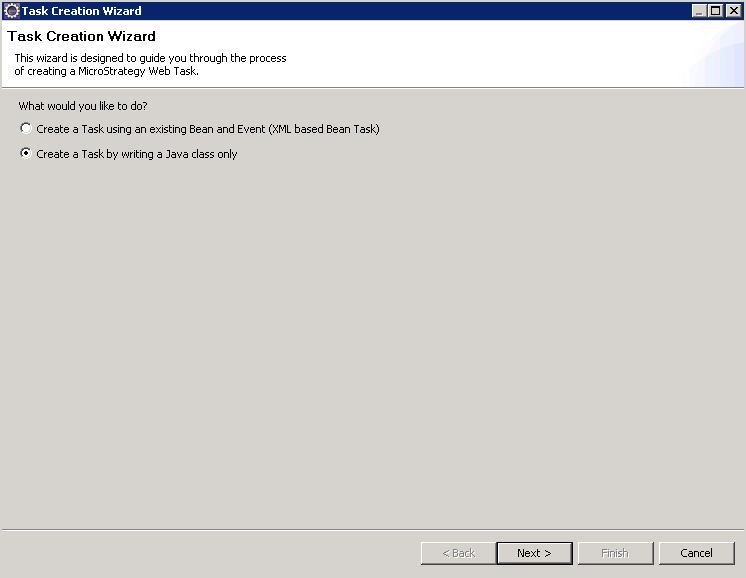
On the first Task Creation Wizard screen, select Create a Task by writing a Java class only and click Next.
-
On the next screen, do the following:
-
For Source folder, browse to the folder that holds the source code for the project. For example, MicroStragegyMobile/src and click OK.
-
For Package, enter the package name. For example, com.microstrategy.custom.
-
For Superclass, browse to com.microstrategy.web.app.tasks.MobileAppLoginTask and click OK. This is the base class that your custom login task class will extend.
-
For Name, enter a name for your task, such as CustomMobileLoginTask.
-
For Task ID, enter mobileLogin.
-
For Task Description, enter a short descriptive phrase for your task, such as Custom Mobile Login Task.
-
Leave Inherit abstract methods selected.
-
Click Next.

-
-
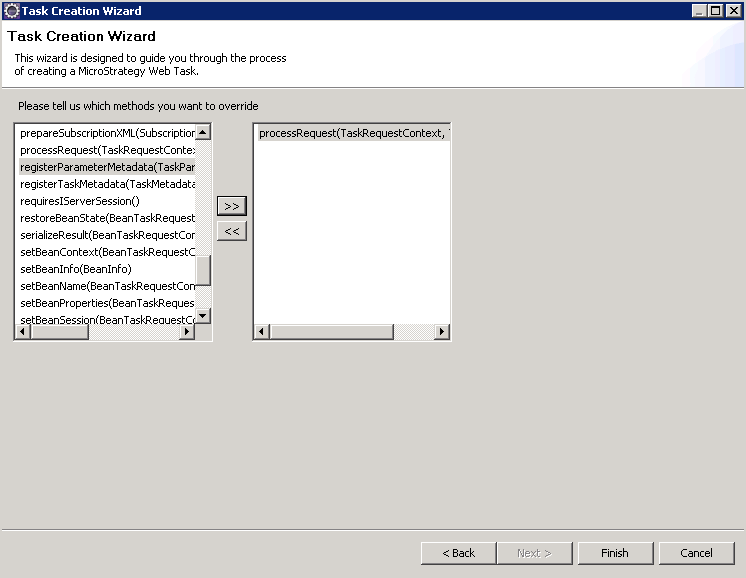
On the next screen, choose to override the processRequest(TaskRequestContext, TaskOutput) method and click Finish.
-
Eclipse generates the basic plug-in code required for the new custom mobile login task and displays it on a tab, where you can make modifications.
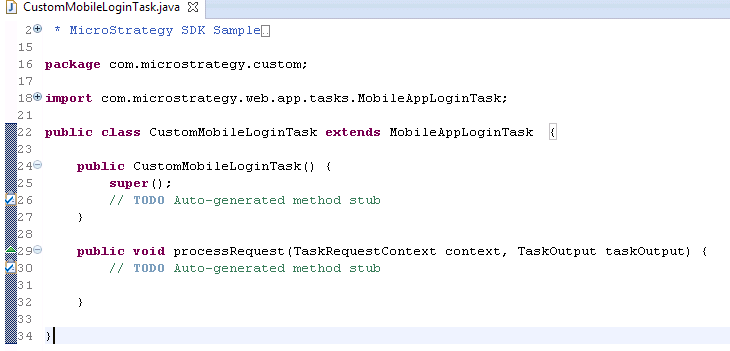
In the processRequest method, add the logic to perform your custom authentication workflow. The following code snippet shows how to obtain the different authentication parameters from the request keys.
Copypublic void processRequest(TaskRequestContext context, TaskOutput taskOutput) throws TaskException {
RequestKeys keys = context.getRequestKeys();
String username = keys.getValue("userid");
String password = keys.getValue("password");
//assumes the login screen in the application sends an additional "token" parameter
String token = keys.getValue("token");
//add logic to validate token
//add code to validate the credentials as normal if token is valid
super.processRequest(context, taskOutput);
}
-
-
The plug-in for your new custom login task is generated under CustomMobileLoginTask in the plugins folder of the MicroStrategyMobile installation directory. This plug-in includes the code to perform your custom authentication actions and registers your new custom login task as the mobile login task. The compiled Java class file for the custom mobile login task is generated and placed under CustomMobileLoginTask/WEB-INF/classes/com/microstrategy/custom in the MicroStrategyMobile plugins folder.
To help you create your own authentication workflow without using the Web Customization Editor, a sample plug-in, with the basic code for a custom mobile login task has been provided. This includes the Java source code and the XML configuration file to register the task. The Java source file is located under src/com/microstrategy/custom in the sample plug-in.
Once you have performed these steps, when you use the mobile application, your custom authentication behavior will be used.