Strategy One
SDS Limitations and Troubleshooting
The following functionality is only available for MCE container environments.
See the following sections for more information on your SDS limitations and troubleshooting tips:
Limitations and Best Practices
-
SDS supports deploying on Linux (using the installer or a Docker container) and on Windows (using a Docker container). However, Strategy strongly recommends deploying via Linux Service Installation.
-
SDS does not support mutual TLS (mTLS) encryption between the SDS agent and the warehouse database server.
-
Using SDS may introduce some performance degradation compared to connecting directly to the warehouse database (including via direct connection, dedicated private links, or VPN), due to the additional network hop introduced by the SDS agent.
-
SDS supports up to 150 concurrent database connections (same or different databases). Plan your operations and database queries to avoid exceeding this limit.
-
For warehouse database login credentials, only standard authentication and vault-based modes are supported. Kerberos and OAuth, or any method requiring third‑party interaction, are not supported.
-
SDS saves data and configurations in a lightweight, locally-embedded, and encrypted database. SDS does not support exporting or importing data or configurations.
-
SDS may be disabled after the Intelligence Server stops. You may need to re-enable SDS manually when this occurs.
-
Similar to Strategy Gateway Agent (DGS), Strategy recommends the following:
-
Install SDS on a machine that is geographically and network‑wise close to your data warehouse to reduce latency and network costs.
-
Install SDS on a dedicated machine behind your firewall so it does not compete for resources with other applications.
-
You may need to fine‑tune ODBC and JDBC parameters (for example, array size and fetch size) to optimize database fetch performance when using SDS.
-
Modify the Environment Connectivity URL
The SDS user interface does not support modifying MCE environment connectivity information (or the Strategy Library URL) after it has been configured and connected successfully. To manually update this information, see the following steps.
This operation removes all existing database login and vault connection configuration data.
If SDS is deployed using the installer:
-
Modify the connectivity URL.
-
Stop SDS.
-
Delete the
dgsagent/datafolder. -
Restart SDS.
-
Repeat the configuration steps in SDS Configuration.
If SDS is deployed on a Docker container:
-
Modify the connectivity URL.
-
Run the following command:
Copycd /home/admin/secure-data-service
./dgs-sds-container.sh stop
docker volume rm secure-data-service_dgs_data
./dgs-sds-container.sh start
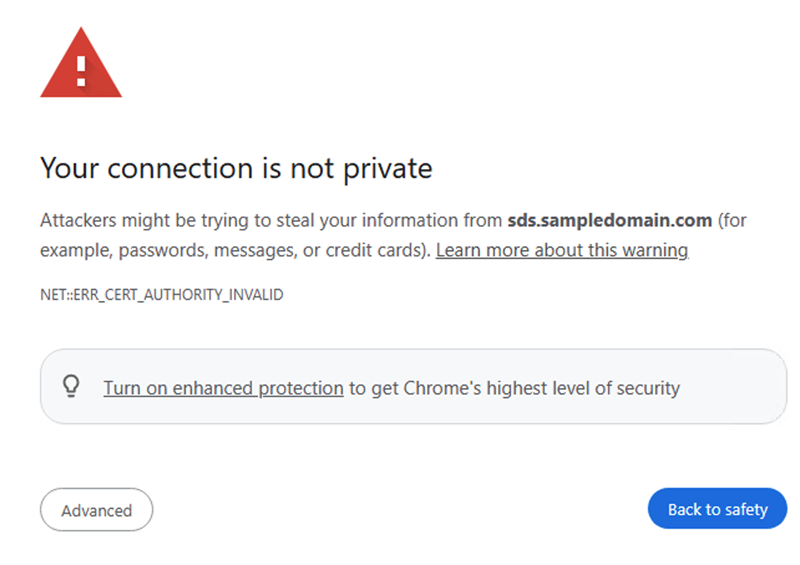
Fix the Connection Not Private Web Browser Error
When accessing the SDS HTTPS endpoint in a web browser, while SDS is using the default self-signed certificate, a security warning may appear. To bypass the warning and proceed, click Advanced and Proceed to <sds-agent-hostname> (unsafe).
To eliminate the warning and use a certificate signed by a trusted certificate authority:
-
Contact your system administrator to obtain a PKCS#12 keystore (.p12) that contains the trusted certificate and its associated private key.
-
On the SDS machine, configure the following properties in
/opt/mstr/dgsagent/config/application.properties:Copy# sample https setup
server.ssl.key-store=/opt/mstr/dgsagent/config/keystore.p12
server.ssl.key-store-password=abcd123
server.ssl.key-store-type=PKCS12
server.ssl.key-alias=sds -
Restart the SDS service to apply the changes.
-
When deploying SDS as a container, complete the following steps:
-
Copy your
.p12keystore file into the SDS container:Copydocker cp keystore.p12 dgs-sds:/opt/mstr/dgsagent/config/keystore.p12 -
Enter the SDS container and edit the configuration file:
Copydocker exec -it dgs-sds bash
nano /opt/mstr/dgsagent/config/application.properties -
In
nano, pressCtrl + X, thenY, andEnter. -
Restart the SDS container using one of the following scripts (depending on your environment):
Option 1
Copycd <sds_install_dir>
./dgs-sds-container.sh restartOption 2
Copycd <sds_install_dir>
.\dgs-sds-container.ps1 restart
-
Supported Drivers
The following gateway connectors are supported by SDS.
| Support Level | Gateway | Driver |
|---|---|---|
| Diamond
|
SQL Server | ODBC |
| JDBC | ||
| Oracle | ODBC | |
| JDBC | ||
| PostgreSQL | ODBC | |
| JDBC | ||
| Teradata
|
ODBC | |
|
JDBC |
||
| IBM DB2
|
ODBC | |
|
JDBC |
||
| Amazon Redshift
|
ODBC | |
|
JDBC |
||
| Platinum
|
Cloudera CDP Impala
|
ODBC |
|
JDBC |
||
| Exasol
|
ODBC | |
|
JDBC |
||
| Hortonworks HDP SparkSQL
|
ODBC | |
|
JDBC |
||
| MongoDB | JDBC only | |
|
MySQL |
ODBC |
|
| JDBC | ||
| SAP HANA
|
ODBC | |
|
JDBC |
||
| Gold
|
Vertica
|
JDBC |
|
ODBC |
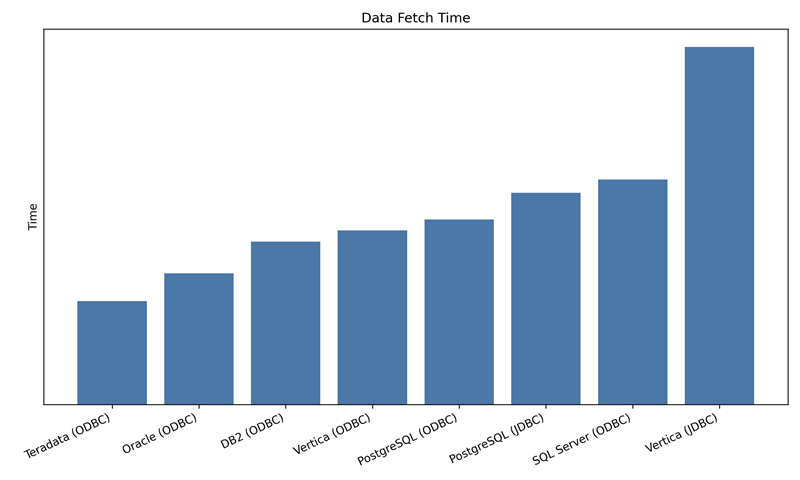
The figure below displays data fetch times for several databases when accessed by Intelligence Server via SDS. For best performance, select the database/driver with the lowest fetch time. Note that these results are based on a Linux SDS Agent (16 vCPUs, 64 GB RAM) running in Strategy’s internal network, connected to a Strategy environment on GCP (32 vCPUs, 256 GB RAM) and transferring a 37.2 GB cube. Actual performance may vary depending on your data, schema, network, and infrastructure.
Migrate from DGS
Although SDS leverages DGS to establish secure, bidirectional, on-demand communication channels, there are fundamental differences between SDS and DGS. For example, DGS requires you to define whitelist rules to specify the host name and port for each warehouse database and vault server. SDS does not expose this option. Because of these differences, DGS and SDS maintain their internal configurations in incompatible formats. Therefore, migrating connectivity settings between DGS and SDS is not supported.
To migrate from DGS to SDS:
-
Uninstall DGS using one of the following commands:
To uninstall from Linux, use the following. Replace
<install_dir>with the DGS installation directory:Copycd <install_dir>
sudo ./agent-service.sh uninstallTo uninstall from Windows:
Copycd <install_dir>
agent-service.bat uninstall -
Follow the steps in Deploy SDS.
-
While configuring your Intelligence server-to-SDS connection in Workstation, you can edit your existing DGS database connection instead of creating a new one. When editing the connection:
-
Select the non-offline Gateway Agent that corresponds to the SDS agent.
-
Do not choose the DGS agent.
-
-
Repeat the step above for every database connection that previously used DGS.
TLS Encryption
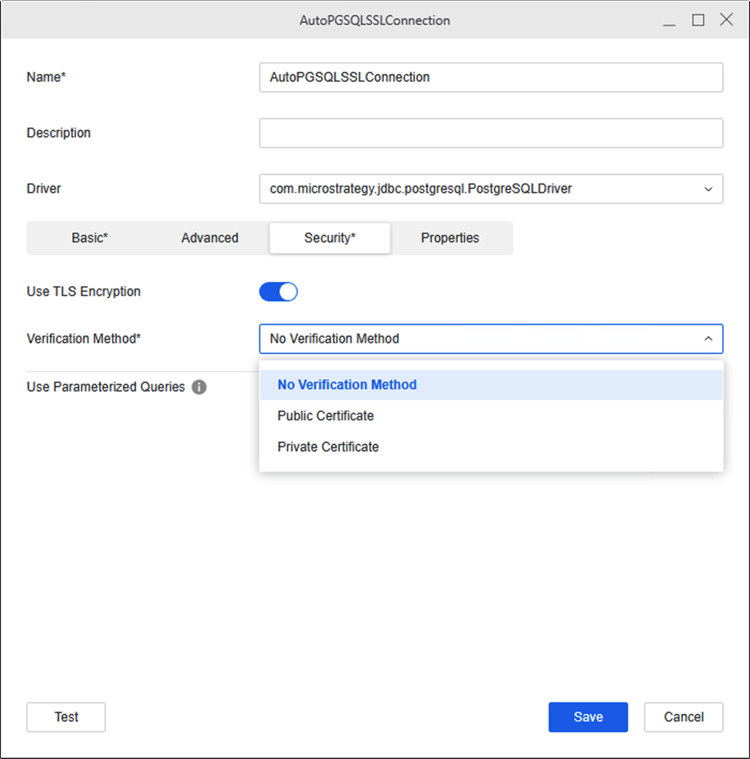
Starting in Strategy One (April 2026), SDS supports TLS encryption only when No Verification Method is selected. To enable TLS encryption:
-
In the Workstation Navigation pane, click Data Sources.
-
Click the Database Connections tab.
-
To create a database connection, click Add New Database Connection or to edit a database connection, right-click it and choose Edit.
-
Find your data source and enter the required fields.
-
In the database connection dialog, click the Security tab.
-
Toggle on Use TLS Encryption.
-
Expand the Verification Method drop-down list and choose No Verification Method.
-
Click Save.
Connection Timeout When an Older SDS Version is Connected to a Newer Intelligence Server Version
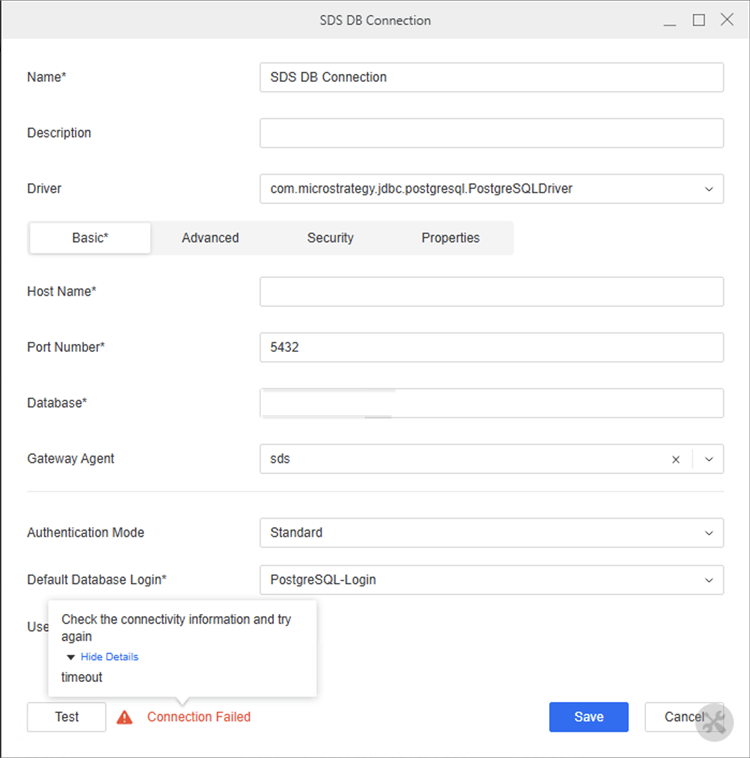
If you upgrade your MCE environment (for example, upgrading from Strategy One (March 2026) to Strategy One (April 2026)), your SDS-based database connections may not function properly. The Test Connection interface will display a timeout error.
Further Identification: When you inspect the Intelligence Server's DSSErrors.log file, the following error message appears:
... Remote handshake failed: Timed out waiting for ACK byte from serverResolution: To resolve this issue, deploy the latest SDS Agent version using Upgrade SDS.
Diagnose SDS Issues
-
Network diagnostics in SDS functions similar to DGS. For more information, see Network Diagnostics in Connect to On-Premises Database Via a Gateway Agent.
-
When troubleshooting, you can also check the SDS log files in the following locations, where
/optis the SDS installation directory.-
/opt/mstr/dgsagent/logs/gateway-agent.log -
/opt/mstr/dgsagent/logs/memory-monitor.log -
/opt/mstr/MicroStrategy/log/DSSErrors.log
-
View Additional SDS Information to Diagnose Issues
To diagnose SDS issues and view more SDS information in /opt/mstr/MicroStrategy/log/DSSErrors.log:
-
If you deploy SDS on Linux using the installer, log in to your host machine. If you deployed SDS as a container, exec into the SDS container.
-
Edit the
/opt/mstr/MicroStrategy/MSIReg.regfile and add the following line:Strategy recommends making a backup before you modify the file.
Copy[HKEY_LOCAL_MACHINE\SOFTWARE\MicroStrategy\Diagnostics\Log2\ProcessServerRemote\Trace]
"DSSErrors"="" -
Restart SDS by running the following:
Copy# In Linux
cd <sds_install_dir>
sudo ./dgs-sds-service.sh restart
# In Windows
cd <sds_install_dir>
.\dgs-sds-container.ps1 restart
Review the Intelligence Server Log to Diagnose Issues
To review the Intelligence server log to diagnose SDS issues:
-
Open Workstation.
-
In the Navigation pane, click Environments.
-
Right-click your environment name and choose Properties.
-
In the left pane, click Log Configuration.
-
Enable or add the following under DSSErrors:
-
DatabaseCommands: Info, Trace, Warning
-
MultiProcess: Client Command Trace, Command Error, Parent Command Trace, Trace, Verbose Client Command Trace, Verbose Parent Command Trace
-
Network: Connection Trace, Packet Trace, Verbose Packet Trace, Trace, Warning
-
Database Classes: Info, SQL Trace, SQL Trace Verbose, Trace
-
-
Contact your MCE administrator to download and analyze the resulting
DSSErrors.logfile.
Generate Core Dump for SDS
When SDS is deployed on Linux, failures may occur. If a failure occurs, generating and collecting a core dump can significantly improve the debugging and root-cause analysis accuracy.
To configure the Linux host system to enable core dump generation:
If SDS runs in a container, perform the following steps on the host machine and not inside the container.
-
Use the following command to create a directory to store core files:
Copymkdir /path_to_the_location/core -
Use the following command to check the current core dump configuration for the shell used by the current user:
Copyulimit -c -
If the result is 0, core dumps are disabled. Edit
/etc/security/limits/confand add the following line to the end of the file to allow core files of an unlimited size:Copy* - core unlimited -
Enable core file generation by adding the following lines to
/etc/sysctl.conf(asroot):Copykernel.core_pattern = /path_to_the_location/core.%e.%p.%h.%t
fs.suid_dumpable = 2You can use the following variables in
kernal.core_pattern:-
%e: Executable filename -
%g: GID of the process -
%p: PID of the process -
%s: Signal that caused the dump -
%t: Time of the dump -
%u: UID of the process
-
-
Use the following command to load the updated
sysctlsettings:Copysysctl -p /etc/sysctl.conf -
Reproduce the issue and collect the generated core file from the following:
/path_to_the_location/core.%e.%p.%h.%t.
Database Login Mapping
SDS requires database login objects defined in the Intelligence server metadata to be mapped to corresponding database logins configured in the on-premises SDS agent. The mapping uses the following logic:
-
Primary mapping by name: SDS first attempts to match the database login in the metadata to a database login in the SDS agent using the following information. These name values must be identical and unique to ensure correct mapping.
-
The Name field of the database login in Workstation.
-
The Name field of the database login in the SDS agent.
-
-
Fallback mapping by user name: If no matching database login is found in the SDS agent using the Name field, SDS attempts to find a match using the following fields:
-
The User Name field of the database login in Workstation.
-
The Name field of the database login in the SDS agent.
-
-
Final fallback to metadata credentials: If no matching database login is found in the SDS agent using the Name or User Name field, SDS uses the user name and password stored in the database login definition in the metadata to connect to the database.
For example, assume you have the following configuration:
Metadata (database login)
-
Name:
SalesDB-Login -
User Name:
sales_app -
Password:
xxxxxx
SDS (database logins)
-
Database Login A:
-
Name:
SalesDB-Login -
User Name:
sales_app
-
-
Database Login B:
-
Name:
ReportingDB-Login -
User Name:
report_app
-
With the above configuration, the following mapping behavior occurs:
-
SDS looks for a database login in the SDS agent with a
SalesDB-Loginname. -
It finds Database Login A. This login is used.
-
If Database Login A did not exist, SDS would next look for a database login in the SDS agent with a
sales_appname. -
If no match is found by Name or User Name, SDS connects using the user name and password stored in the metadata (
sales_appandxxxxxx).