Strategy ONE
Update SSL Certificates on an MCP Environment
This pages shows you how to change the SSL certificate on the application load balancer of the environment.
-
Update the SSL certification on the Application Load Balancer for the underlying environment
-
Configure the Intelligence server with SSL to use the new certificate and import certificate into
trusted.jksfor Strategy Web, Library, and Mobile
Update the SSL Certification on the Application Load Balancer for the Underlying Environment
-
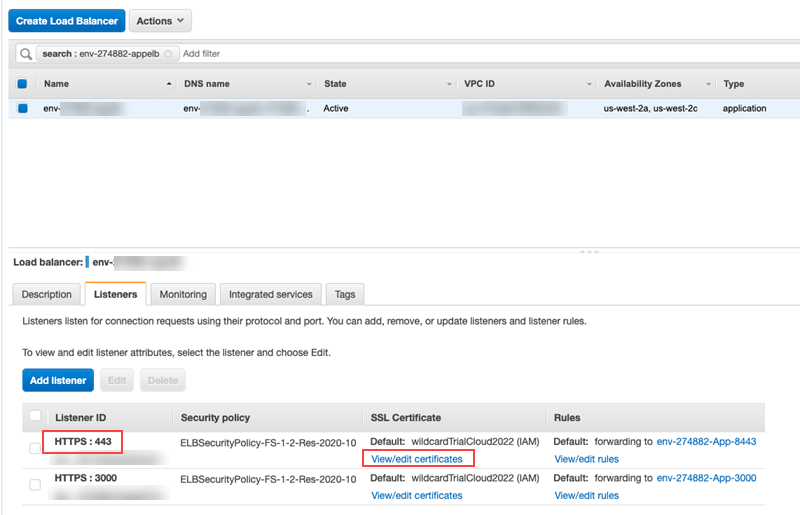
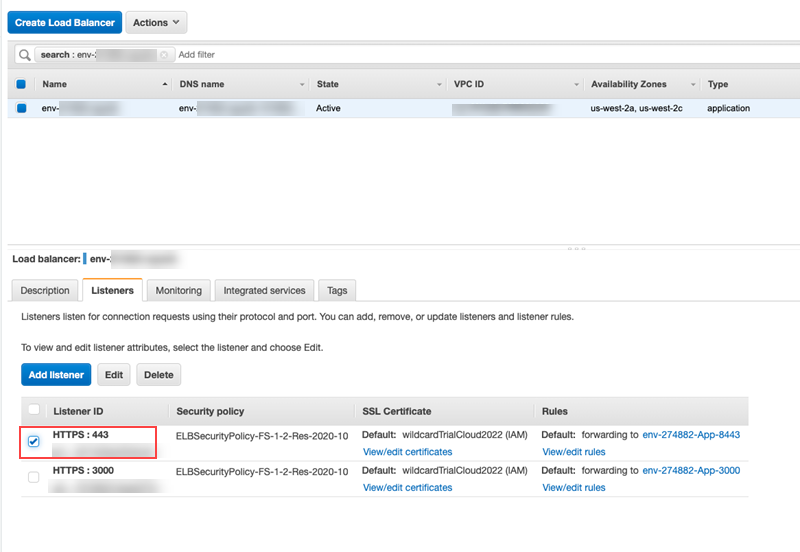
Navigate to the AWS Console > EC2 > Load Balancer.
-
Select the application load balancer for the environment by searching for the environment ID.
-
Go to the Listeners tab.
-
Select the listener with the ID of HTTPS: 443.
-
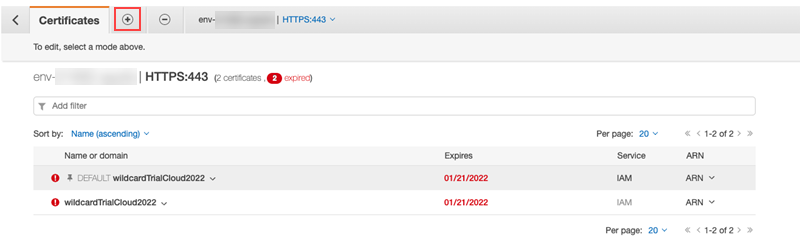
Click View/edit certificates.
-
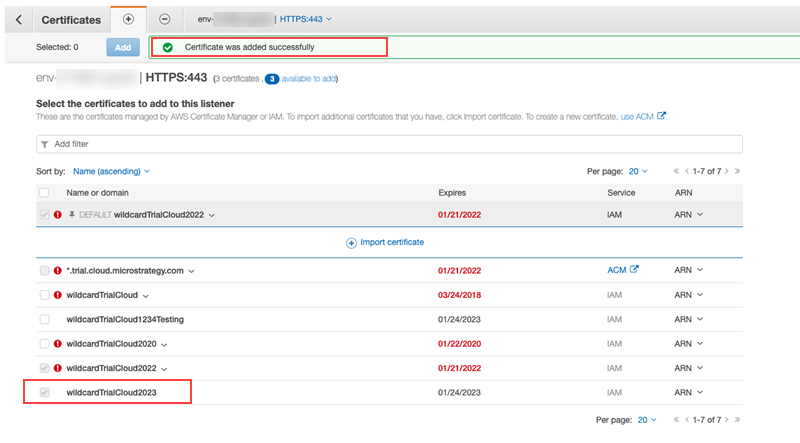
Go to the + tab in the top left corner to add an updated certificate.
-
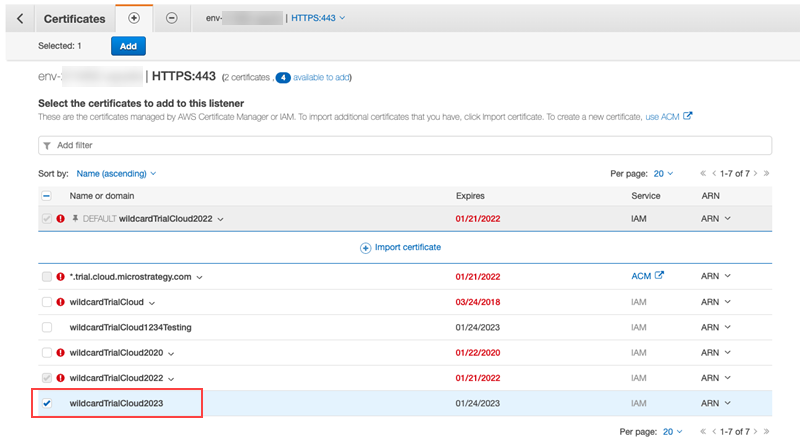
From the list of certificates, select the certificate you want to import.
-
Click Add.
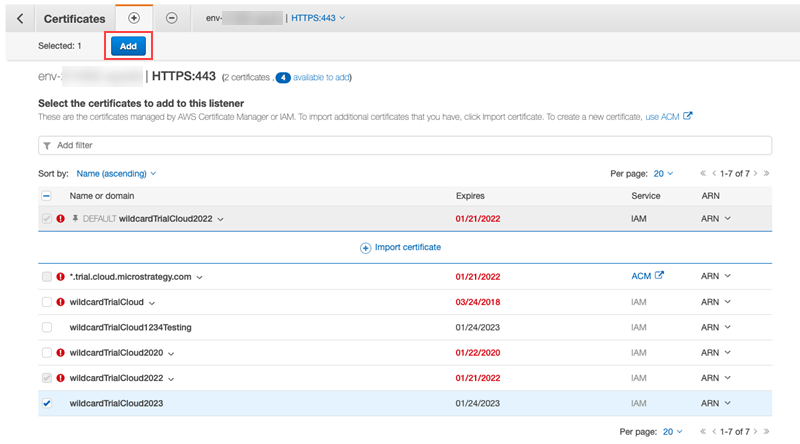
Once it successfully added, the following message appears.
-
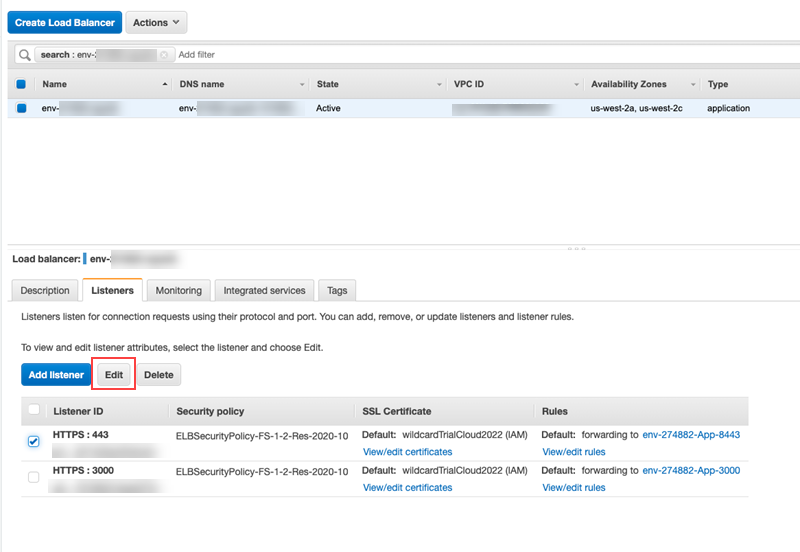
Go back to the load balancer to select the HTTPS:443 listener.
-
Click Edit.
-
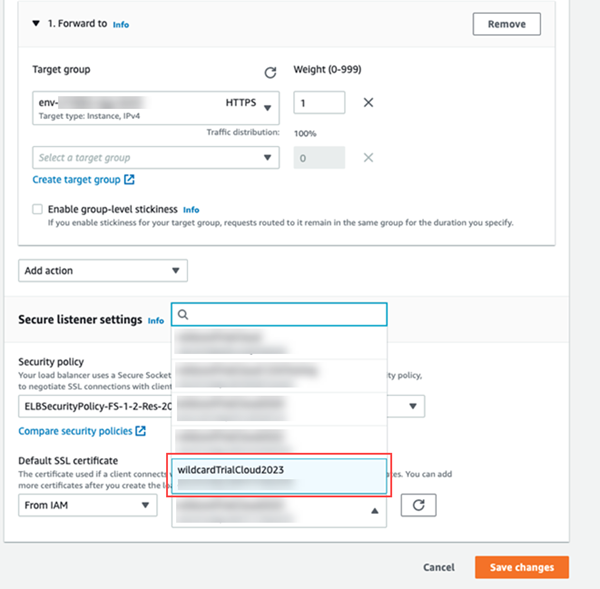
From the Default SSL certificate drop-down, choose the certificate you imported in step 7.
-
Click Save changes.
Update the SSL Certificate on the Collaboration Server on All Nodes of the Environment
-
After updating the load balancer URL in AWS or Azure, download the pem SSL certificate file to the Linux box.
For Azure, you must convert the
.pfxfile provided by the customer to pem. - Use SSH to access the Linux environment and run the following command:Copy
cd /opt/usher/ssl - Back up the existing
ThawteRootCa.crt,server.pem, andserver.crtfiles:Copycp thawteRootCa.crt thawteRootCa.crt_bak
cp server.pem server.pem_bak
cp server.crt server.crt_bak - From the downloaded file in step 1, place the certificate in
opt/usher/ssl(only the.pemfile is required) asserver.pem. -
Add the certificate to the Java keystore for both nodes:
Copykeytool -noprompt -import -trustcacerts -alias collabcert3 -file /opt/usher/ssl/server.pem -
Modify
config.jsonby removing entries for CA, crt, and intermediate and only put references to the new.pemfile on both nodes. -
Restart the Collaboration server.
-
Add the certificate to
trusted.jksfor MicroStrategey Library, Web, and Mobile on all nodes after taking the backup:Copycp /opt/apache/tomcat/latest/webapps/MicroStrategy/WEB-INF/trusted.jks /opt/apache/tomcat/latest/webapps/MicroStrategy/WEB-INF/trusted.jks.bak
cp /opt/apache/tomcat/latest/webapps/MicroStrategyLibrary/WEB-INF/trusted.jks /opt/apache/tomcat/latest/webapps/MicroStrategyLibrary/WEB-INF/trusted.jks.bak
cp /opt/apache/tomcat/latest/webapps/MicroStrategyMobile/WEB-INF/trusted.jks /opt/apache/tomcat/latest/webapps/MicroStrategyMobile/WEB-INF/trusted.jks.bak
keytool -importcert -trustcacerts -alias "mobilenewcert" -keystore /opt/apache/tomcat/latest/webapps/MicroStrategyMobile/WEB-INF/trusted.jks -storepass mstr123 -file /opt/usher/ssl/server.pem
keytool -importcert -trustcacerts -alias "webnewcert" -keystore /opt/apache/tomcat/latest/webapps/MicroStrategy/WEB-INF/trusted.jks -storepass mstr123 -file /opt/usher/ssl/server.pem
keytool -importcert -trustcacerts -alias "librarynewcert" -keystore /opt/apache/tomcat/latest/webapps/MicroStrategyLibrary/WEB-INF/trusted.jks -storepass mstr123 -file /opt/usher/ssl/server.pemr -
Restart tomcat. Confirm if Library Admin displays any error and if bookmarks are working in Library.
Configure the Intelligence Server With SSL to Use the New Certificate and Import Certificate Into trusted.jks for Strategy Web, Library, and Mobile
According to KB484336, a new set of SSL standards requires the Intelligence server SSL certificate to include a subjectAlternativeName, or SAN. This was not previously required in MicroStrategy 2019. Thus, the certificate /opt/usher/ssl/server.crt doesn’t work for SSL on MicroStrategy 2020 and later. A new certificate must be generated for the Intelligence Server SSL. You must enable SSL and manually generate a new certificate as described in the following section.
Run all following steps with the mstr user and not root.
-
Use SSH to access the cloud machine.
-
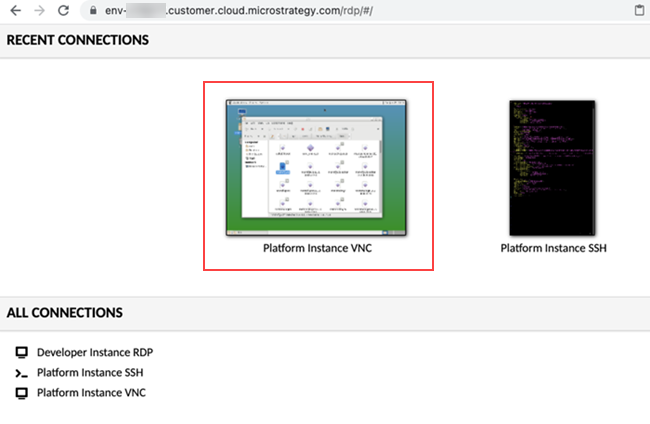
Obtain your credentials from your email and log into the VNC service.
-
In File System, go to
/opt/mstr/MicroStrategy/bin.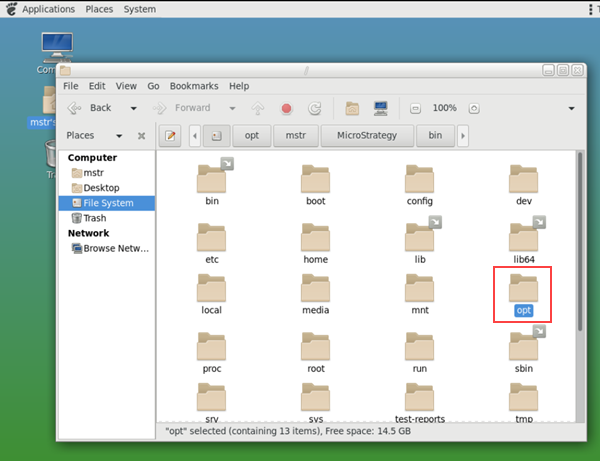
-
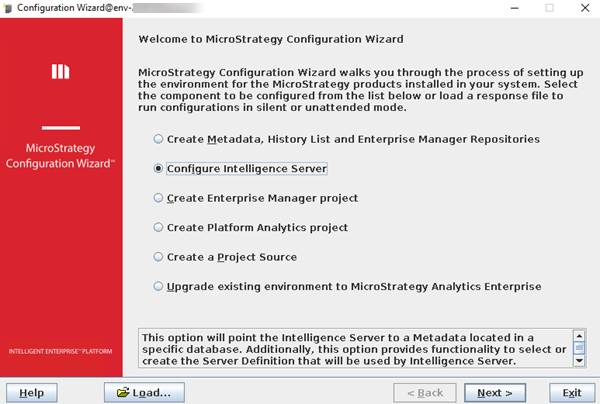
Launch Configuration Wizard, located in
/opt/mstr/MicroStrategy/bin/mstrcfgwiz, using the VNC service. -
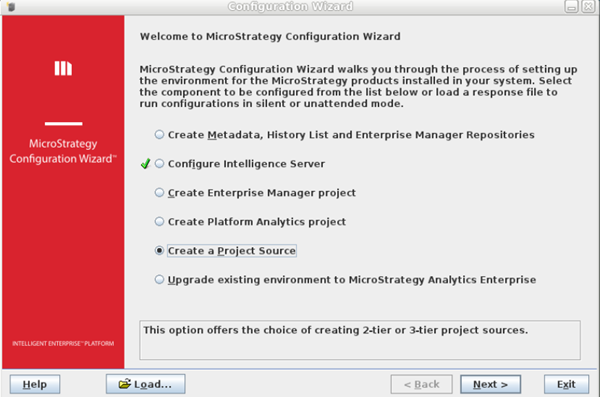
Choose Configure Intelligence Server and click Next.
-
From the DSN drop-down, select the current metadata DSN. This was previously created, or check with
cat /opt/mstr/MicroStrategy/MSIReg.reg | grep -E 'DSN=|MetadataLogin'. -
Enter the
mstrusername and password and click Next.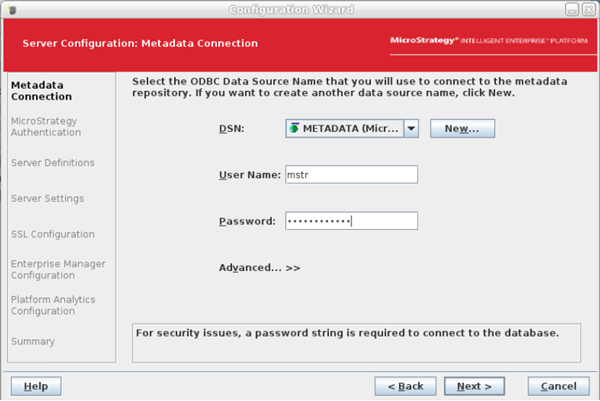
-
Enter the same password for the
Administratoruser and click Next.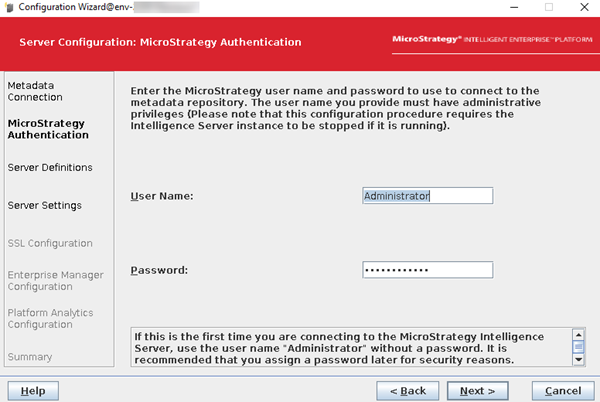
-
Choose an existing server definition.
For a parallel or existing environment, you can get the server definition by executing the following:
Copy/opt/mstr/MicroStrategy/bin/mstrctl -s IntelligenceServer gsic|sed -n '/svrd/p'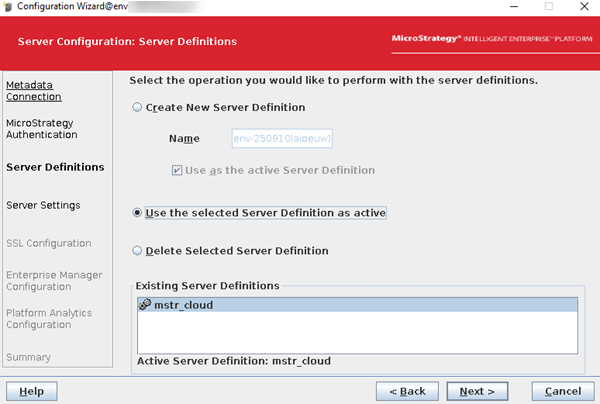
- Check the project load and port settings and click Next.
In the case you receive an error stating that a chosen port is invalid or already in use, see KB485344.

-
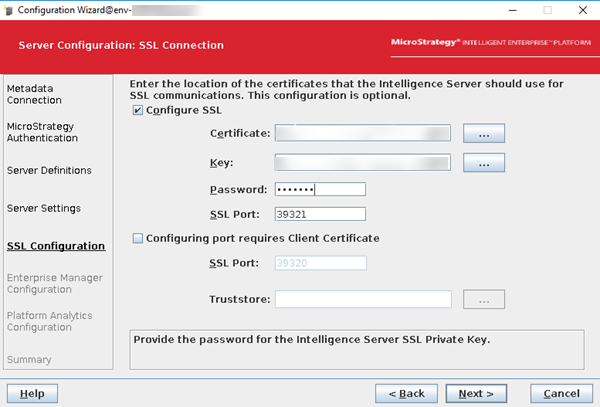
For MicroStrategy 2021 and later, SSL must be enabled for environments.
You can also check if
39321is used as the SSL port in Web Admin or the/opt/apache/tomcat/latest/webapps/MicroStrategy/WEB-INF/xml/sys_defaults.propertiesfile.Click here if39321is set in Web.Select the Configure SSL checkbox and use the certificate and key, as shown below:
-
Certificate:
/opt/mstr/MicroStrategy/install/IntelligenceServer/TLS/cert_<HOSTNAME>.customer.cloud.microstrategy.com.pem -
Key:
/opt/mstr/MicroStrategy/install/IntelligenceServer/TLS/pvtKey_<HOSTNAME>.customer.cloud.microstrategy.com.pem -
Password:
mstr123 -
SSL Port:
39321
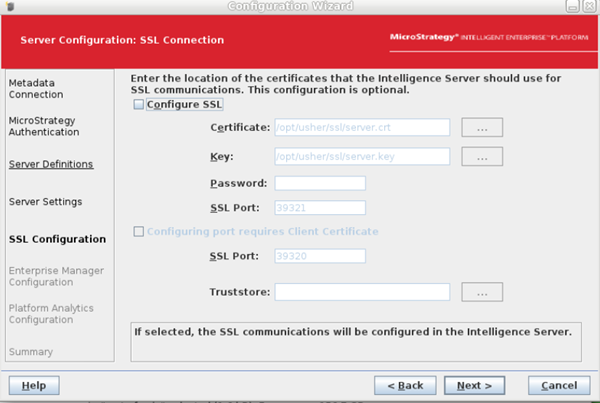
 Click here if the
/opt/usher/ssl/server.crtand/opt/usher/ssl/server.keypaths are used.-
Deselect the Configure SSL checkbox and click Next.
-
Complete the configuration.
-
Restart the configuration. The certificate path is automatically returned.
-
Correct certificate :
/opt/mstr/MicroStrategy/install/IntelligenceServer/TLS/cert_<HOSTNAME>.customer.cloud.microstrategy.com.pem -
Correct Key:
/opt/mstr/MicroStrategy/install/IntelligenceServer/TLS/pvtKey_<HOSTNAME>.customer.cloud.microstrategy.com.pem
-
-
-
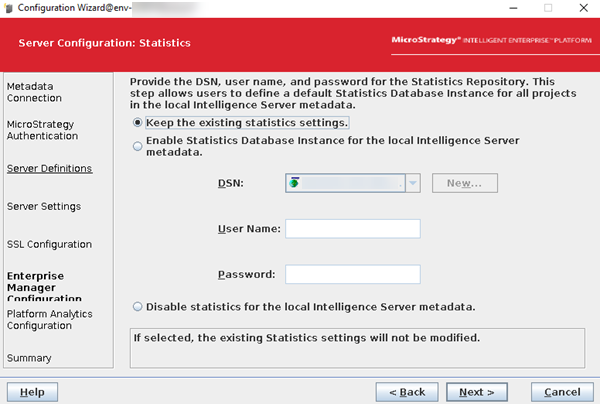
Select Keep the existing statistics settings and click Next.
-
Select the Send Intelligence Server telemetry to Platform Analytics checkbox.
-
Enter
<this server IP address>:9092. For cluster nodes, enter the IP address of node1 on both nodes (there must be an odd number of Telemetry servers, so for a 2-node environment, it is just on node1).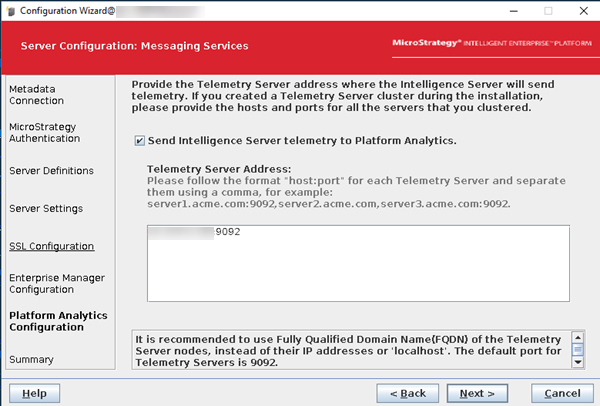
-
Click Next.
-
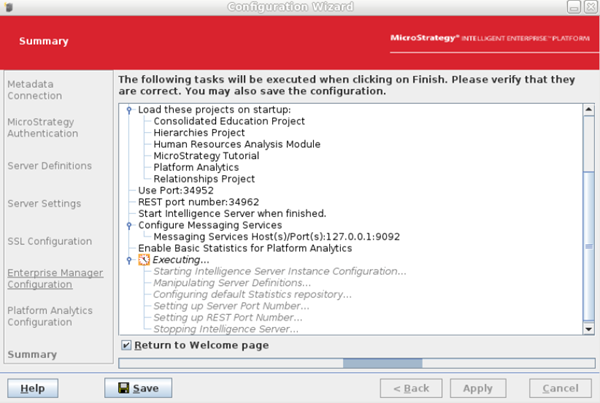
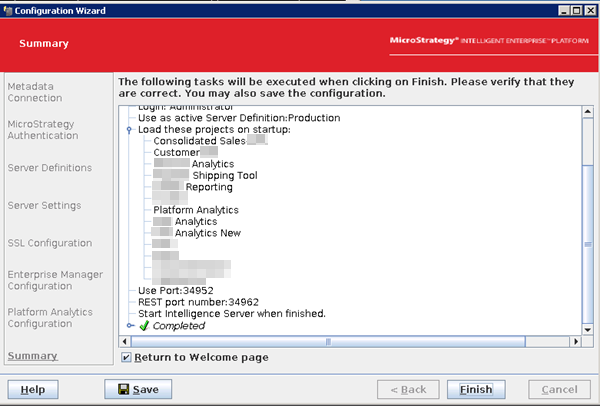
Review the summary and click Apply.
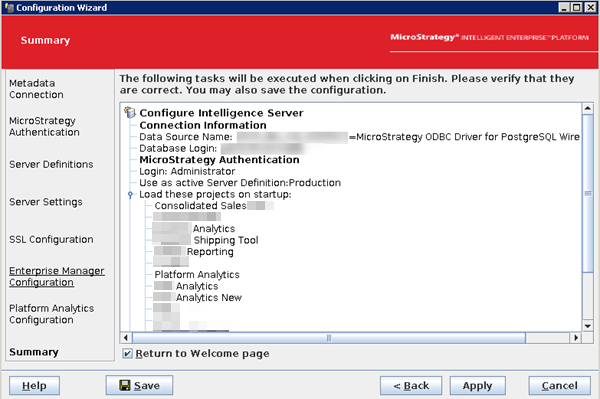
The Intelligence server reconfiguration may take a while. Upon successful reconfiguration, the following window is returned.
-
Click Finish.
-
For clustered nodes, repeat on all nodes of the environment.
Import Certificate Into trusted.jks for Strategy Web, Library, and Mobile
Since the certificate has been changed for the Intelligence server SSL, you must import the certificate to trusted.jks for Strategy Web, Library, and Mobile to establish trust between these services and the Intelligence server.
You can check the current webapps folder on the environment to see if there are any custom ones:
ls /opt/apache/tomcat/latest/webapps/-
Go to each of the following paths. For cluster nodes, perform it on each node and each Web, Library, and Mobile web app.
-
Web:
/opt/apache/tomcat/latest/webapps/MicroStrategy*/WEB-INF -
Library:
/opt/apache/tomcat/latest/webapps/MicroStrategyMobile*/WEB-INF -
Mobile:
/opt/apache/tomcat/latest/webapps/MicroStrategyLibrary*/WEB-INF
For example:
Copycd /opt/apache/tomcat/latest/webapps/MicroStrategySTD/WEB-INF -
-
Make a backup of the current certificate:
Copycp trusted.jks trusted.jks.bak -
Run the following command and type
yeswhen asked if you trust this certificate.Click here for a single node.
Copykeytool -importcert -trustcacerts -alias "rootca_new" -keystore trusted.jks -storepass mstr123 -file /opt/mstr/MicroStrategy/install/IntelligenceServer/TLS/cert_env-hostname.mstrci.com.pemFor example:
Copykeytool -importcert -trustcacerts -alias "rootca_new" -keystore /opt/apache/tomcat/latest/webapps/MicroStrategy/WEB-INF/trusted.jks -storepass mstr123 -file /opt/mstr/MicroStrategy/install/IntelligenceServer/TLS/cert_*.pem -nopromptIf
trusted.jskis missing, for example, in the Mobile web app, copy it fromMicroStrategy.Example
For a single node and only three default web apps, run the following scripts individually to back up the jks certificate and add it to the keystore:
Copycp /opt/apache/tomcat/latest/webapps/MicroStrategy/WEB-INF/trusted.jks /opt/apache/tomcat/latest/webapps/MicroStrategy/WEB-INF/trusted.jks.bak
cp /opt/apache/tomcat/latest/webapps/MicroStrategyLibrary/WEB-INF/trusted.jks /opt/apache/tomcat/latest/webapps/MicroStrategyLibrary/WEB-INF/trusted.jks.bak
cp /opt/apache/tomcat/latest/webapps/MicroStrategyMobile/WEB-INF/trusted.jks /opt/apache/tomcat/latest/webapps/MicroStrategyMobile/WEB-INF/trusted.jks.bak
keytool -importcert -trustcacerts -alias "rootca_new" -keystore /opt/apache/tomcat/latest/webapps/MicroStrategy/WEB-INF/trusted.jks -storepass mstr123 -file /opt/mstr/MicroStrategy/install/IntelligenceServer/TLS/cert_*.pem -noprompt
keytool -importcert -trustcacerts -alias "rootca_new" -keystore /opt/apache/tomcat/latest/webapps/MicroStrategyLibrary/WEB-INF/trusted.jks -storepass mstr123 -file /opt/mstr/MicroStrategy/install/IntelligenceServer/TLS/cert_*.pem -noprompt
keytool -importcert -trustcacerts -alias "rootca_new" -keystore /opt/apache/tomcat/latest/webapps/MicroStrategyMobile/WEB-INF/trusted.jks -storepass mstr123 -file /opt/mstr/MicroStrategy/install/IntelligenceServer/TLS/cert_*.pem -nopromptClick here for a clustered node.
Node 1
Copykeytool -importcert -trustcacerts -alias "rootca_1" -keystore trusted.jks -storepass mstr123 -file /opt/mstr/MicroStrategy/install/IntelligenceServer/TLS/cert_<HOSTNAME>.customer.cloud.microstrategy.com.pemNode 2
Copykeytool -importcert -trustcacerts -alias "rootca_2" -keystore trusted.jks -storepass mstr123 -file /opt/mstr/MicroStrategy/install/IntelligenceServer/TLS/cert_<HOSTNAME>.customer.cloud.microstrategy.com.pemcert_<HOSTNAME>.customer.cloud.microstrategy.com.pemis the certificate created when the Intelligence server was configured. - Restart tomcat on each node: Copy
service mstr tomcatrestart - Restart the Modeling service on each node:Copy
/opt/mstr/MicroStrategy/install/ModelingService/bin/modelservice.sh restart