Strategy ONE
Creating metrics in documents
You can add metrics to a document in any of the following ways:
-
Add metrics from the datasets of a document. See Adding metrics from a dataset to a document for steps.
-
Create new metrics directly in the document; for steps, see Creating metrics directly in the document. This approach is useful if you need to achieve any of the following:
-
Perform additional calculations on the metrics from the datasets (such as multiplying by a constant or using a function)
-
Create calculations that combine metrics from different datasets
-
Create totals using specific functions
-
For descriptions of the types of metrics that you can create within a document and steps to create each type, see Creating metrics directly in the document.
Adding metrics from a dataset to a document
To use an existing metric from a dataset, place the metric into the document in either a Grid/Graph or a text field. In summary:
-
A metric in a text field is calculated at the level of the document section in which it is placed. For example, a metric in a Region Group Header is calculated at the regional level. A metric in the Document Footer section is calculated as a grand total for the entire document.
-
A metric in a Grid/Graph is calculated at the level of the objects in the Grid/Graph. If the Grid/Graph is placed in a Group Header, the group level is also taken into account. For background information on Grid/Graphs and instructions to create them, see Displaying Reports in Documents: Grid/Graphs.
For a more detailed description of how metrics are calculated in a document, see Metric calculation in document sections.
To add a metric from a dataset to a document
-
In MicroStrategy Web, open the document in Design Mode.
-
Expand the document section where you want to place the metric by clicking the plus sign next to the section name.
The metric is calculated at the level of the section that you place it in. For example, a metric in a Region Group Header is calculated at the regional level. A metric in the Document Footer section is calculated as a grand total for the entire document. For more details, see Metric calculation in document sections.
-
Select the metric from the objects displayed in the Dataset Objects panel, then drag and drop the metric into the Layout area.
The metric is added to the document in a text field. The dataset name is added to the metric name if the metric exists in multiple datasets.
If the Dataset Objects panel is not displayed, click Datasets at the bottom of the panel on the left.
-
The metric is automatically formatted in a default style using the control defaults. You can change the formatting of the text field, as described in Formatting text fields.
-
You can also resize the text field, if needed. See Sizing controls for instructions.
Creating metrics directly in the document
Metrics that can be defined directly in the document include calculated expressions, derived metrics, and summary metrics. They are created in the document, not added from the dataset. Like other metrics, they are calculated at the level returned by the dataset, based on the attributes, consolidations, and custom groups on the dataset.
The various types of metrics that can be created directly in a document all help to achieve different goals. Use the table below to determine which type of metric you should create based on your goal.
Summary metrics provide subtotals; they are discussed in Calculating totals in documents and Using a function to create a subtotal: Creating summary metrics.
|
Goal |
Calculated expression |
Derived metric |
|
Use metrics from multiple datasets |
Yes |
Yes, in a Grid/Graph No, in a text field |
|
Use advanced functions, such as banding, cosine, and Chi square distribution |
Yes See Advanced Functions for Calculated Expressions for a list of supported functions. |
Yes |
|
Place in a grid |
No |
Yes |
|
Place in a text field |
Yes |
Yes |
|
Use in conditional formatting |
No |
Yes |
|
Reuse within the document |
No |
Yes |
|
Create on the fly in a text field, without creating a new object and adding it to the layout |
Yes |
No |
Creating calculated expressions
A calculated expression is a metric that is calculated dynamically when the document is executed, directly from metrics on a document dataset. Metrics used to define the calculated metric can come from different datasets.
Calculated expressions are created directly in text fields on the document, which makes them quicker to create than derived metrics. Unlike derived metrics, calculated expressions cannot be reused within the document because they are not added to the document as dataset objects. They appear as text fields only.
A calculated expression is created using at least one of the metrics in the document. To define a calculated expression, you combine metrics using any of the following:
-
Certain advanced functions including many financial, statistical, and mathematical functions
To use an advanced function, you must type the function syntax in the calculated expression. Syntax for supported functions is included in Advanced Functions for Calculated Expressions. For details on the individual functions, see the MicroStrategy Functions Reference.
-
The logical operator IF
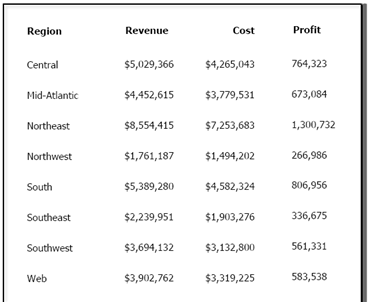
For example, your grouping and sorting dataset contains the Revenue by Region metric and a second dataset contains Cost by Region. (For details on the grouping and sorting dataset, see Working with multiple datasets.) You need to find the profit, which is calculated from the revenue less the cost, so you create a calculated expression with a definition of Revenue - Cost.
To create the calculated expression for profit in MicroStrategy Developer, drag the Revenue metric from the Dataset Objects panel to the Layout area, which automatically creates a new text field. Right-click the new text field and select Edit Text. Type - Cost inside the braces, then press ENTER. The final text field looks like {Revenue - Cost}, as shown on the right side of the image below.

The resulting document looks like the following sample:
An example of an advanced function is Banding, which maps metric values that fall within a certain range to a particular band value. The function returns a number indicating the band. The syntax of this function is Banding(ValueList, StartAt, StopAt, Size).
For example, create bands on the Revenue metric in the document above. Bands are created in $1,000,000 increments, starting at $1,000,000 and ending at $7,000,000. Band 1 is $1,000,000 to $2,000,000, which includes the Northwest region; Band 2 is $2,000,001 to $3,000,000, which includes the Southeast; Band 3 is $3,000,001 to $4,000,000, which includes the Regions Southwest and Web, and so on.
To create these bands in a calculated expression, create a text field and type the following in it:
{Banding(Revenue, 1000000, 7000000, 1000000)}Remember to use braces { } if you type the expression.
The resulting document is shown below.
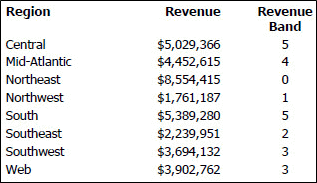
Because two regions have revenue between $3,000,001 and $4,000,000, there are two lines for Band 3. Because no Revenue value falls between $6,000,001 and $7,000,001, there is no Band 6.
To create a calculated expression
-
In MicroStrategy Web, open the document in Design Mode.
-
Expand the section where you want to place the calculated expression by clicking the plus sign next to the section name.
-
To enter the expression, do one of the following:
-
Drag and drop data fields from the Dataset Objects panel.
-
Add a text field and type the expression in it.
-
Combine the above methods.
Join data fields with an arithmetic operator (+, -, *, /) or use an advanced function. You can use constants and parentheses within the calculation. Parentheses indicate the order of arithmetic operations.
For more detailed instructions to use these methods, see Adding dynamic data to a document. For a list of supported functions and their syntax, see Advanced Functions for Calculated Expressions.
-
If you type the expression, use braces { } around the entire calculated expression. If the name contains spaces or special characters, type it in brackets [ ] within the braces. Special characters are characters other than a - z, A - Z, 0 - 9, #, _, and . (period).
If the object exists in multiple datasets, use the format {[dataset name]:[object name]}. This format also allows you to create calculated expressions across datasets.
Creating, editing, and deleting derived metrics
A derived metric calculates data and displays results dynamically, when a document is executed, by using at least one of the metrics in a document dataset. Metrics used to define the derived metric can come from different datasets, when the derived metric is used on a Grid/Graph. Derived metrics provide the dynamic application of calculations to a document without requiring new metric definitions.
For example, if your dataset contains the dollar sales for a particular region, and you want to view the same data in millions, you can create a derived metric with a definition of [Dollar Sales]/1000000.
A derived metric:
-
Must be a compound metric. A compound metric does not have to be a derived metric.
-
Can be reused within the document, including in Grid/Graphs and in conditional formatting expressions.
-
Is calculated by the MicroStrategy Analytical Engine based on metrics that are contained in the Dataset Objects pane.
-
Cannot use transformation objects.
-
If the derived metric will be used on a Grid/Graph, it can use metrics from multiple datasets.
-
If the derived metric will be used in a data field, the derived metric must use metrics from the same dataset. To create a calculation that uses metrics from multiple datasets in a data field, create a calculated expression. For steps, see Creating calculated expressions.
You can also create derived training metrics, which are used for Data Mining Services, on a Grid/Graph. A training metric analyzes data and generates a forecast, or predictive metric. For background information on training metrics and predictive metrics, including instructions to create a derived training metric on a Grid/Graph, see the Data Mining Services chapter of the Advanced Reporting Guide.
When you create a derived metric, it is added to the Dataset Objects pane but is not placed on the document. You can add it to the document just as you would any other dataset object. If you select a Grid/Graph before creating the derived metric, the metric is added to the Grid/Graph as well as placed in the Dataset Objects pane for future use.
For example, you want to show profit for each region of your business. The grouping and sorting dataset contains both Revenue and Cost by Region. You create a derived metric defined as (Revenue - Cost).
The following image shows the new derived metric, Profit, in both the Layout area on the right and the Dataset Objects pane on the left.
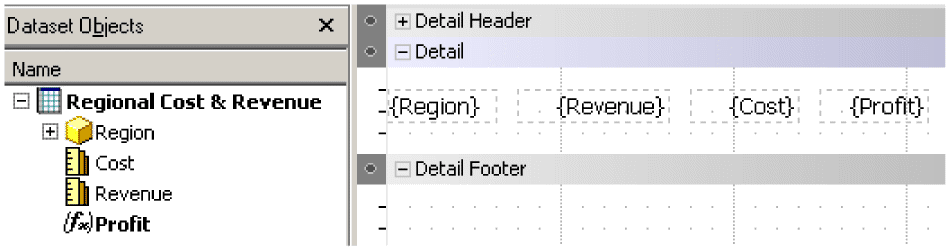
The resulting document looks like the following sample:

Another document contains two datasets:
-
Dataset 1: Category, Subcategory, and Profit
-
Dataset 2: Category, Region, and Revenue
A Grid/Graph displays Category, Subcategory, Revenue, Profit, and a derived metric called Derived Cost. The formula of the Derived Cost metric is Revenue - Profit. Notice that the metrics come from different datasets. A sample of the resulting document is displayed below:
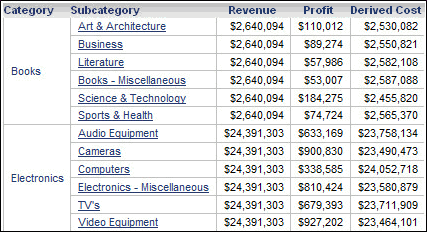
Notice that the Revenue amount is the same for each subcategory in a category, because Revenue is available at the Category level (from Dataset 2), but not at the Subcategory level. Therefore, the Derived Cost metric calculates as Category Revenue - Subcategory Profit. This can be helpful to create a percent-to-total metric.
When a metric is requested at a level lower than it exists in a dataset, the metric level on the Grid/Graph is raised to that of the dataset. This occurs whether a single dataset or multiple datasets are involved.
Steps are below to create, edit, and delete basic derived metrics. You can also create more sophisticated metrics to meet your needs, by typing the metric formula directly, using custom expressions, and adding conditional calculations using the Metric Expression Editor. For steps, see the MicroStrategy Web Help.
Prerequisite
Before you can combine metrics from multiple datasets in a single derived metric, you must have the Import Table from Multiple Data Sources privilege and enable this behavior at the project level. For steps, see Determining whether Grid/Graphs can use multiple datasets.
To create a derived metric
-
In MicroStrategy Web, open the document in Design or Editable Mode.
-
Do one of the following:
-
To create a derived metric in a Grid/Graph: Right-click a Grid/Graph in the document's Layout area and select Insert New Metric. The Metric Editor opens.
-
To create a derived metric based on an attribute in a Grid/Graph: Right-click the attribute in the Grid/Graph, point to Insert Metric, and select the function. The derived metric is created, and you can skip the remaining steps of this procedure.
-
To create a derived metric directly from a metric in the document: From the Dataset Objects pane, right-click the metric on which to base the derived metric, and select Insert New Metric. The Metric Editor opens.
You must be in Design Mode to access the Dataset Objects pane.
-
To create a derived metric directly from a metric or an attribute in the document and base the derived metric on a function: Right-click the metric or attribute in the Layout area and select Insert Function. The Insert Function dialog box opens. Continue creating this derived metric by following the steps to create a summary metric in Using a function to create a subtotal: Creating summary metrics.
-
-
Click Switch to Function Editor.
-
Type a name for the metric in the Metric Name field.
-
From the Functions list on the left, browse to and select the function to use to create the derived metric.
-
To display only functions from a specific category in the pane, select the category from the drop-down list.
-
To search for a function, type a function name in the search field.
-
To view a description of a function, hover your cursor over the function.
-
-
In the pane to the right, select the appropriate options to define the function, as described below. To view more details about the function, including descriptions of the options and examples, click Details at the bottom of the interface.
-
If you selected an aggregation function (also known as a grouping function), such as Sum, Average, First, or Maximum, the Expression field is displayed, along with settings for defining the level and condition. Perform the following steps:
-
Select the metric to group, in the second drop-down list.
-
If the function requires any parameters, they are listed. Select the appropriate options to define each parameter, then click OK to apply your changes. For an explanation of a function parameter, click the Information icon next to the parameter.
-
By default, the function is calculated at the level of the attributes on the document section or Grid/Graph on which the metric is placed. You can specify an attribute to use as the level, by selecting the attribute from the Level drop-down list.
For example, if a Grid/Graph contains Region and Category, by default the metric calculates regional and category values on that Grid/Graph. If you select Region as the level, the metric calculates the regional revenue values on that Grid/Graph; it does not include a breakdown by Category. This allows you to compare revenue across regions.
-
-
If you selected a non-aggregation function, such as data mining, date, OLAP, and ranking functions, you are presented with options to define the input values (called arguments) for the function, as well as any parameters you can use to determine the behavior of the function. For example, the NTile function has two parameters, Ascending and Tiles. Ascending controls whether the NTiles are ordered in ascending or descending order, while Tiles sets the number of splits. Perform the following steps:
-
For each argument listed, type a value to use as input values of the function.
-
For each parameter listed, type a value or select the parameter value from the drop-down list.
-
-
-
By default, the aggregation and subtotal behavior for derived metrics is automatically determined. (Dynamic aggregation is the roll-up of metric values that occurs when an attribute is removed from a Grid/Graph or a document section.) If you need a different calculation than the values provided by the default automatic behavior, you can use manual mode. Manual mode allows you to specify whether the derived metric is calculated using the whole dataset (the base) or the data in the document section or Grid/Graph that it is placed on. To use manual mode, complete the steps below:
-
Click Properties. The Metric Options dialog box opens.
-
From the Aggregation and Subtotal Behavior drop-down list, select Manual.
-
By default, the derived metric is aggregated at the level of the attributes on the document. To aggregate it at the level of its dataset, select the Aggregate From Base check box.
-
By default, the derived metric is subtotaled at the level of the attributes on the document. To subtotal it at the level of its dataset, select the Subtotals From Base check box.
-
Click OK to return to the Metric Editor.
-
-
Click Save. Your derived metric is created and added to the appropriate dataset in the Dataset Objects pane. If you selected a Grid/Graph before creating the metric, the new metric is also added to that Grid/Graph.
-
You can change the number format of the derived metric:
-
In Design Mode, right-click the derived metric in the Dataset Objects pane and select Number Format. The Format dialog box opens.
-
Select a number format option, such as Currency or Percentage. An example of the number category and additional options are displayed on the right.
-
Specify the options, such as the number of decimal places.
-
Click OK to return to the document.
-
You can now use the derived metric as you would any other dataset object. You can drag and drop it from the Dataset Objects pane to the document's Layout area to place it into the document.
If the derived metric uses metrics from multiple datasets, place the derived metric on a Grid/Graph to ensure correct calculations.
To edit a derived metric
-
In MicroStrategy Web, open the document in Design Mode.
-
Right-click the derived metric in the Dataset Objects pane and select Edit. The Metric Editor opens.
-
Apply any changes you want to make to the metric. See the steps above for creating a derived metric, for details to make changes to the metric.
To delete a derived metric
| 1 | In MicroStrategy Web, open the document in Design Mode. |
| 2 | Right-click the derived metric in the Dataset Objects pane and select Delete from Document. |
Using a function to create a subtotal: Creating summary metrics
A summary metric is essentially a shortcut to a subtotal. It allows you to select the function to use to calculate the subtotal. If you use a metric from a dataset rather than a summary metric, the default subtotal function is used to subtotal the metric. This default subtotal function is defined in the metric's definition and cannot be changed in the document.
A summary metric is calculated differently depending on its location in the document. (For details on how metrics calculate depending on their document section, see Calculating totals in documents.) You can place the same summary metric in multiple locations in the same document.
For example, you need to add a count of employees to a document containing Region and the Revenue metric. The count must be calculated at the regional and document levels. The Revenue metric uses SUM as the default subtotal, but the COUNT function is needed in this case. You can create a summary metric for Revenue that uses COUNT. With the new summary metric named Count of Revenue, placed in the Region Header and the Document Footer, the result is shown in the following sample.
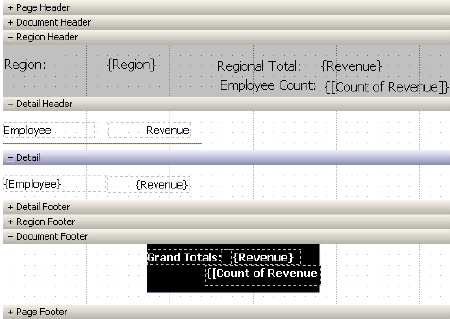
When the PDF is generated, the same summary metric returns different values in the different document section locations. The metric in the Region Header calculates a regional count, and the metric in the Document Footer calculates a count for the entire document.

To create a summary metric
-
Right-click the metric in the Dataset Objects pane, point to New Summary Metric, then select the function to use. The new summary metric is added to the appropriate dataset in the Dataset Objects pane.
-
If you need to, you can rename the summary metric:
-
Right-click the summary metric in the Dataset Objects pane and select Edit. The Input Metric Formula dialog box opens.
-
Change the metric name and click OK.
-
You can now use the summary metric as you would any other dataset object, by dragging and dropping it from the Dataset Objects pane to the Layout area to place it in the document.