Strategy ONE
Arranging controls on a document
Once you have added data and other controls to a document, you can arrange them on the document to determine their layout when viewed in Presentation Mode or as a PDF. This section explains the ways in which you can move and arrange controls.
Moving controls
You can modify the look of your document by specifying the positions of the controls. You can move controls in relationship to each other, by aligning them.
If multiple controls are selected and moved, they move as a block. The selected controls do not have to be in the same document section; you can select controls that are in different document sections.
You can evenly distribute controls automatically; for steps, see Distributing controls evenly.
If a selected control does not move, it may be locked. A locked control cannot be resized or moved on the Layout area. For steps to unlock it, see Locking and unlocking controls.
To move a control
-
In MicroStrategy Web, open the document in Design Mode or Editable Mode.
-
Click a control to select it. To select multiple controls, press and hold CTRL while selecting controls.
-
Do any of the following:
-
Drag and drop the control(s) at the new location, which can be in the same document section or a different one.
-
Use the arrow keys on your keyboard to reposition a control within the document section. To move in smaller increments, press and hold CTRL while using the arrow keys. If you have Snap to grid enabled, it is temporarily disabled.
-
To specify an exact location within the document section, right-click a control and select Properties and Formatting. On the Layout tab, specify the new position for the control in the Position area.
-
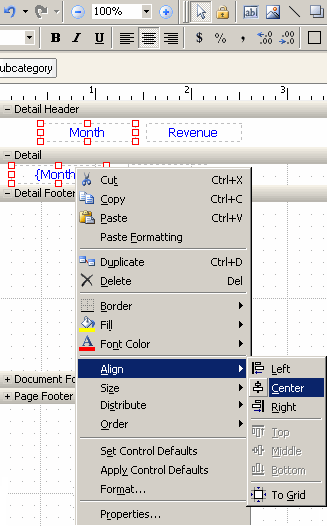
To align controls in the same document section or a different one, select multiple controls, right-click a control, point to Align, then select one of the following options:
-
Align Left: Horizontally aligns all selected controls with the left-most control.
-
Align Center: Horizontally centers all selected controls.
-
Align Right: Horizontally aligns all selected controls with the right-most control.
-
Align Top: Vertically aligns all selected controls with the topmost control.
-
Align Middle: Vertically centers all selected controls.
-
Align Bottom: Vertically aligns all selected controls with the lowest control.
-
To Grid: Aligns the upper left corner of all selected controls to the closest grid point.
-
-
Snapping controls to the alignment grid
Snap to grid means that controls are automatically aligned to grid points. If this feature is enabled, the top left corner of the control automatically moves from one grid point to another grid point when you move or resize the control. When you create a new control, the top left corner of the control is aligned to a grid point. If you drag a control while creating it, all corners of the control are aligned to the grid.
If snap to grid is disabled, you can add, move, or resize controls freely without reference to the alignment grid. The corners do not automatically move to grid points.
To temporarily disable snap to grid, press the CTRL key while moving or sizing controls.
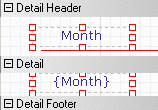
For example, you can align a heading in the Detail Header above its data column in the Detail section. This is shown in the following MicroStrategy Developer image in which two Month controls, in different document sections, are aligned.
The resulting aligned controls are shown in the following image:
To enable or disable the Snap to Grid feature
-
In MicroStrategy Web, open the document in Design Mode.
-
From the Tools menu, select Snap to Grid. If Snap to Grid was enabled, it is now disabled. Snap to Grid is enabled by default.
If the alignment grid is not visible when you enable Snap to Grid, you can display it by selecting Alignment Grid from the Tools menu.
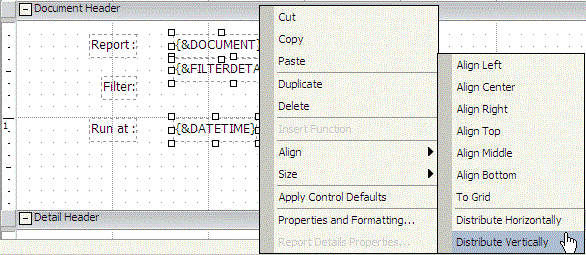
Distributing controls evenly
You can evenly distribute controls that are not well-spaced. For example, the image below shows three controls in a document. Note the difference in vertical gaps between the selected controls ({&DOCUMENT}, {&FILTERDETAILS}, {&DATETIME}).
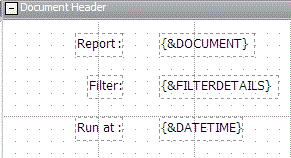
The result after the vertical distribution is shown in the following image, where the controls are distributed relative to each other:
To distribute controls relative to the layout, instead of relative to other controls, use MicroStrategy Developer. For steps, see the MicroStrategy Developer help.
To distribute controls evenly
-
In MicroStrategy Web, open the document in Design Mode or Editable Mode.
-
Right-click one selected control and choose Align.
-
Select one of the following options:
-
Distribute Horizontally: Evenly spaces the selected controls across the width of the page.
-
Distribute Vertically: Evenly spaces the selected controls across the height of the section.
-
Sizing controls
You can size text fields, images, rectangles, and other controls. You can resize by dragging the edges of a control or by specifying a control's height and width. If you resize multiple controls at one time, they can be uniformly sized. Steps to size a single control and multiple controls are below.
If a selected control does not resize, it may be locked. A locked control cannot be resized or moved until it is unlocked. For steps to unlock it, see Locking and unlocking controls.
To size a single control
-
In MicroStrategy Web, open the document in Design Mode or Editable Mode.
-
Select a control and do one of the following:
-
Drag any of its sizing handles to its new size.
-
Press and hold SHIFT while pressing the up, down, left, or right arrow keys on the keyboard.
-
Right-click the control and select Properties and Formatting. From the left, select Layout. Then define the sizing options for the control:
-
Width: Sets the width of the control. This option is not available for section headers or footers.
-
Fixed at: The width does not change from the set size. This option is not available for sections, panel stacks, or selectors.
-
100%: Sets the item's width to that of the section. This option is used for lines and rectangles only; it is not available for sections, panel stacks, or selectors.
-
Fit to contents: The width expands to the width of the item. This option is not available for sections, panel stacks, text fields, or selectors.
-
-
Height: Sets the height of the control.
-
Fixed at: The height does not change from the set size.
-
100%: Sets the item's height to that of the section. This option is used for lines and rectangles only; it is not available for sections or panel stacks.
-
Fit to contents: The height expands to the height of the item. This option is used for text fields and reports displayed as grids, and only affects display in Presentation Mode. This option is not available for sections or panel stacks.
-
-
Length: These options are available for lines; they determine whether the length of a line adjusts dynamically.
-
Fixed at: The length does not change from the set size.
-
100%: The line's length changes automatically to remain the length of the section.
-
-
-
-
Display the document in Presentation Mode to see your resizing results.
-
Save the document.
Locking and unlocking controls
A control can be locked, so that it cannot be resized or moved. This is useful when a document template contains an object that should not be moved or resized inadvertently when multiple objects are selected at the same time. It also avoids a control being accidentally moved or resized using the sizing handles.
The following options are affected when a control is locked: height, left, top, and width.
To lock a control
-
In MicroStrategy Web, open the document in Design Mode or Editable Mode.
-
Add a control to the document, if it does not already contain one.
-
Right-click the control and select Properties and Formatting. The Properties and Formatting dialog box opens.
-
In the Layout area of the dialog box, select the Locked check box and then click OK. The control is locked.
To unlock a locked control
-
In MicroStrategy Web, open the document in Design Mode or Editable Mode.
-
Add a control to the document, if it does not already contain one.
-
Right-click the control and select Properties and Formatting. The Properties and Formatting dialog box opens.
-
In the Layout area of the dialog box, clear the Locked check box and then click OK. The control can now be moved.
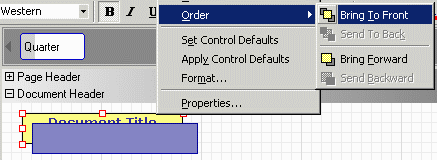
Ordering controls
You may have controls that you want to overlap, with one control on top of the another that is in the background. You can change the order of a control and display it in front of or behind another control.
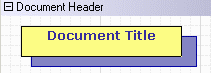
The example below, created in MicroStrategy Developer, shows a rectangle that needs to be placed behind the Document Title (to create a drop shadow).
The result, with the title in front, is shown below:
To order controls
-
In MicroStrategy Web, open the document in Design Mode or Editable Mode.
-
Right-click a control, highlight Order, and select one of the following options:
-
Send to Back: Moves the control behind the other control(s).
-
Bring to Front: Moves the control in front of the other control(s).
-
Send Backward: When three or more controls overlap and you want to incrementally send one control back, but not all the way to the back.
-
Bring Forward: When three or more controls overlap and you want to incrementally bring one control forward, but not all the way to the front.
-
In MicroStrategy Web, you can also access these ordering options from the Align and Order toolbar. To show the Align and Order toolbar, from the menu, select Align and Order.
Restoring images to their default size
If you change the size of an image but are not satisfied with the results, you can restore the image to its original, or default, size.
To restore the default size of an image
-
In MicroStrategy Web, open the document in Design Mode or Editable Mode.
-
Right-click the image and select Restore Default Size.