Strategy One
Creating a Workflow
You use System Manager to create a workflow visually, by dragging and dropping processes and linking them together. This allows you to see the step-by-step process that leads the workflow from one process to the next. This visual approach to creating a workflow can help you to notice opportunities to troubleshoot and error check processes as part of a workflow.
The steps provided below show you how to create a workflow using System Manager. Additional details on the various components that constitute a System Manager workflow are provided after these steps.
It can be beneficial to determine the purpose of your workflow and plan the general logical order of the workflow before using System Manager.
To Create a System Manager Workflow
The steps provided below are expressed as a linear process. However, as you create a workflow, the steps of creating and modifying processes, connectors, decisions, parameters, and other components of a workflow can be interchanged as the requirements for a workflow are determined.
- Open System Manager.
- Select one of the following options to create a workflow:
- New Workflow: Creates a new workflow. The steps below assume that you have selected this option to create a new workflow.
- Open Workflow: Opens an existing workflow. You can create a new workflow based on an existing workflow.
- Templates: Opens a sample, template workflow for a configuration scenario. The sample workflows provide a framework for certain tasks, letting you modify the details for each process to work with the components and tools in your environment. For information on some of the available sample workflows, see Sample Workflows: Templates.
To Create Processes in a Workflow
-
From the Connectors and processes pane, double-click a process to add it to the workflow. You can then move the process around so that it fits into the organization of the workflow.
By default, the first process created in a workflow is automatically defined as an entry process, and all other processes are automatically disabled as entry processes.
- Right-click the process and select Rename. Type a new name for the process.
- Select the process, and then select Properties in the pane on the right side. Provide all the required information for the process. For details on the properties required for each process, see Defining Processes.
You can also use parameters to supply information for a process. To use a parameter in a process or decision, you must use the following syntax:
${ParameterName}In the syntax listed above, ParameterName is the name of the parameter. During execution, this is replaced with the value for the parameter. Defining the parameters for a workflow is described in To Define the Parameters for a Process, which is a part of this procedure.
- While providing the information for a process, you can review the exit codes for a process. On the Properties pane, scroll down to the bottom and click Show Description, as shown in the image below.
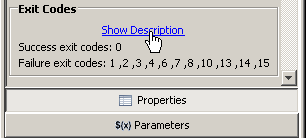
Detailed information on each exit code for a process is displayed. For additional information on how you can use exit codes to help create a workflow, see Determining Process Resolution Using Exit Codes.
Exit code -4242424 is a general exit code that is shared among all processes. This exit code indicates that either the user canceled the workflow manually, or the reason for the process error cannot be determined.
- Repeat the steps for To Create Processes in a Workflow to create all the processes required for a workflow.
To Define the Parameters for a Process
Each workflow has one set of parameters, which can be defined on the Parameters pane on the right side. The parameters can be used to provide values for a process when the workflow is executed. Using parameters can also let you provide this information in a secure fashion. For more information on how to include parameters in a workflow, including importing parameters from a file, see Using Parameters for Processes.
To Define the Logical Order of a Workflow
Once you have all the processes required for a workflow, you can begin to define the logical order of the workflow by creating connectors between all the processes. Each process in a workflow needs to connect to another process in the workflow, otherwise the workflow could end prematurely. You can also define a process as an entry processes of a workflow, create decisions to direct the logical order of a workflow, and add comments to provide further information and explanation to a workflow.
While defining the logical order of a workflow, you may find that additional processes are required. Processes can be added at any time while creating a workflow.
- From the Connectors and processes pane, select from the following types of connectors:

- Success: The green arrow, to the left, is the success connector. If the process is completed with an exit code that is defined as a successful status, the process that the success connector points to is the next process that is attempted. If you use a success connector from a process, it is recommended that you also provide a failure connector.
- Failure: The red arrow, in the middle, is the failure connector. If the current process is completed with an exit code that is defined as a failure status, the process that the failure connector points to is the next process that is attempted. If you use a failure connector from a process, it is recommended that you also provide a success connector.
- Continue: The white arrow, to the right, is the continue connector. Regardless of the status of the exit code for the current process, the process that the continue connector points to is the next process that is attempted. If you use the continue connector from a process, you cannot use any other connectors for that process.
With a connector type selected, click the process to start from and drag to the process to proceed to next in the workflow. A connector is drawn between the two processes. If you use the success and failure connectors for a process, you must do this process for each connector.
These steps must be repeated for every process. For information on how to use connectors to define the logical order of a workflow, see Using Connectors to Create the Logical Order of a Workflow.
- From the Connectors and processes pane, select the Decision icon, and then click in the workflow area. A decision process is created in the workflow, as shown in the image below.

Decisions provide the ability to determine the next process in a workflow based on specific exit codes for the previous process, rather than just the simple success or failure of a process. For examples of how decisions can be used to define the logical order of a workflow, see Using Decisions to Determine the Next Step in a Workflow.
Create as many decisions as you need for your workflow. Each decision should use a success and a failure connector to other processes in the workflow.
- To enable or disable a process as an entry process for the workflow, in the workflow area, right-click the process and select Toggle Entry Process.
An entry process is a process that can be selected as the first process to attempt when the workflow is executed. For information on how to use entry processes, see Using Entry Processes to Determine the First Step in a Workflow.
A process that is defined as an entry process is displayed with a green flag symbol, as shown in the image below.

By default, the first process created in a workflow is defined as an entry process, and all other processes are disabled as entry processes.
- To process related tasks one by one, from the Connectors and processes pane, select the Iterative Retrieval icon, and then click in the workflow area. An iterative retrieval process is created in the workflow, as shown in the image below.
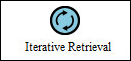
With an iterative retrieval process, you can have a workflow retrieve information from sources including a folder, the contents of a file, or a System Manager parameter. This information can then be passed to another process in the System Manager workflow for processing a task. For example, by using an iterative retrieval process, a folder that stores weekly update packages can be analyzed to determine how many update packages need to be applied for a week, and then apply these updates one by one.
For information on how you can use the iterative retrieval process to perform related tasks one by one in a workflow, see Processing Related Tasks One by One.
- To create a split execution process, from the Connectors and processes pane, select the Split Execution icon, and then click in the workflow area. A split execution process is created in the workflow, as shown in the image below.

A split execution process lets you start multiple threads in a workflow to perform parallel processing of the tasks. This can speed up a workflow for systems that can handle the parallel processing.
As tasks are executed simultaneously, you can also determine if additional tasks in the workflow should be processed if tasks that were performed in parallel are completed. From the Connectors and processes pane, select the Merge Execution icon, and then click in the workflow area. A merge execution process is created in the workflow, as shown in the image below.

For information on how you can use the split execution and merge execution to handle the parallel processing of tasks in a workflow, see Processing Multiple Tasks Simultaneously.
- To create a comment in the workflow, from the Connectors and processes pane, select the Comment icon, and then click in the workflow area.
Comments can be used to explain the design of a workflow. For example, you can use comments to explain the paths of a decision process, as shown in the image below.

You can add as many comments as needed to explain a workflow. Be aware that the comments are viewable only in System Manager and cannot be displayed to a user while the workflow is being executed. For information on how to use comments to add context to a workflow, see Using Comments to Provide Context and Information to a Workflow.
To Define the End of a Workflow
- Create an exit process, which ends the workflow and can explain how the workflow ended. From the Connectors and processes pane, select the Exit Workflow icon, and then click in the workflow area. An exit process is created in the workflow, as shown in the image below.

- With the exit process selected, from the Properties pane, you can choose to have the exit process return the exit code from the previous process or return a customized exit code. For more information on how to use exit processes to end a workflow, see Using Exit Processes to End a Workflow.
- Create connectors from any processes that should be followed by ending the workflow. All processes should lead to another process in the workflow, a decision, or an exit process.
To Validate a Workflow
- From the Workflow menu, select Validate Workflow. One of the following messages is displayed:
- If the workflow is listed as valid, click OK.
- If the workflow is not valid, click Details to review the reasons why the workflow is not valid. Click OK and make any required changes to the workflow. Once all changes are made, validate the workflow again.
For information on what is checked when validating a workflow, see Validating a Workflow.
- Click Save Workflow As.
- Click Save.
To Deploy a Workflow
The steps below show you how to deploy a workflow from within System Manager. For information on deploying a workflow from the command line or as a silent process, see Deploying a Workflow.
- From the View menu, select Options.
- In the Log file path field, type the path of a log file, or use the folder (browse) icon to browse to a log file. All results of deploying a workflow are saved to the file that you select.
- Click OK.
- From the Workflow menu, go to Execute Workflow > Run Configuration.
- From the Starting process drop-down list, select the process to act as the first process in the workflow. You can select only a process that has been enabled as an entry process for the workflow.
- In the Parameters area, type any parameters required to execute the processes in the workflow, which may include user names, passwords, and other values. To include multiple parameter and value pairs, you must enclose each parameter in double quotes (
" ") and separate each parameter and value pair with a space. For example,"UserName=User1" "Password=1234"is valid syntax to provide values for the parametersUserNameandPassword.For information on supplying parameters for a workflow, see Using Parameters for Processes.
- Click Run . As the workflow is being executed, the results of each process are displayed in the Console pane. The results are also saved to the log file that you specified earlier.
If you need to end the workflow prematurely, from the Workflow menu, select Terminate Execution. A dialog box is displayed asking you to verify your choice to terminate the execution of the workflow. Click Yes to terminate the workflow. If some processes in the workflow have already been completed, those processes are not rolled back.